
 Help
Help


Night Photography (of Jeeps and 4x4s of course)
Shooting at night presents a great number of technical challenges due to the quality and quantity of available light. This is not to say it can't be done nor can it be done well but that these constraints need to acknowledged in order for good photos to be produced. On the flip side many of the adversities if embraced can present some of the best creative opportunities (much like off roading itself, where challenging terrain makes for excellent rides)
In this thread let's discuss the techniques we use to address these conditions, criteria for use, creative advantages, and limitations.
The genesis for this post was the recent photo posting for Hit Money's Meet and Greet Apr-21-2009. Pictures were taken at the Febrary event as well.
http://jeeptalk.net/...showtopic=15438
http://jeeptalk.net/...showtopic=14592
Night photography often impacts image quality in the following ways:
- Loss of Contrast
(due to sensor limitations and noise)
(due to errant light sources)
- Loss of Sharpness
(due to longer exposure times and camera shake)
(due to subject motion relative to long exposure times)
(due to use of larger apetures, limited depth of field)
- Color rendering [cast and shifts]
(depending on design of sensor chain, colors will bias to red or green)
- Gradient errrors
(due to sensor limitations)
In addition to these constant limitations, night shooting can present the following additonal challenges.
- Inconsistent or rapidly changing lighting conditions
(lights can appear where not expected (i.e. vehicle pulls into area)
(existing lights located poorly... low in glare producing positions)
- Depending on the camera, lighting conditions can exceed the equipment operating range.
(built in meter can not accurately read very low light)
(max shutter speed exceeded)
(too much sensor noise)
To be certain this does not represent the whole of night shooting challenges so please make those additions and contribute to the thread.
Next I'll post up exposure and basic night techniques.
(later today?)
Jeep Photography & Night Shots Discuss challenges, technique and equipment
#1


- Lieutenant Colonel
-

- Group: Members
- Posts: 1,137
- Joined: 22-July 07
- Gender:Male
- Location:Miramar, FL
Posted 26 April 2009 - 01:00 PM
SFJC President
99 TJ - Wrangler Sport
35" Procomp MT, 4.56 RP, 4" Susp, 1" Body, 1" Motor Mount Lift
F: Detroit TrueTrac LS, Chromoly Shafts, Slotted & Drilled Rotors
R: Detroit Soft-Locker & 30 Spline D35c, SYE
Smitty XRC8000 Winch on A-Z Plate & Hella Lights
99 TJ - Wrangler Sport
35" Procomp MT, 4.56 RP, 4" Susp, 1" Body, 1" Motor Mount Lift
F: Detroit TrueTrac LS, Chromoly Shafts, Slotted & Drilled Rotors
R: Detroit Soft-Locker & 30 Spline D35c, SYE
Smitty XRC8000 Winch on A-Z Plate & Hella Lights
#2

- First Lieutenant
-

- Group: Members
- Posts: 359
- Joined: 03-April 08
- Gender:Male
- Location:St. George Utah
Posted 26 April 2009 - 03:23 PM
All I know is that your night shots are the chit!
You have forgotten more than I will ever know about this and you photos show it.
I guess you would have to have a SLR and not a point and shoot to take decent night shots?
My digital camera is a Canon Power Shot SD700is and I just got a fancy dancy new Canon Vixia HF S10 HD camcorder which is going to take me the rest of my natural life to learn how to use properly in good light let alone low light or no light.. lol
#3
- Lieutenant Colonel
-
- Group: Members
- Posts: 1,137
- Joined: 22-July 07
- Gender:Male
- Location:Miramar, FL
Posted 26 April 2009 - 07:33 PM
Exposure, The Basic Concept
(skip to "Night Exposure" if your familliar with manually setting shutter speed and f-stops)
For cameras exposure discribes the amount of light used to form an image and is controlled by aperature size and shutter time. The aperture is the hole in the lens for which light passes through from the outside to the sensor. A larger aperture will pass more light than a small one. The shutter sits between the apertutre and sensor. When open, light passing through the aperture can reach the sensor. When closed no light can reach the sensor. More light can reach the sensor as the shutter open time is increased.
When a picture is taken, the camera measures the current light level and adjusts the aperture size and shutter time to acheive an acceptable exposure. In some of the higher end point-n-shoots and all digital SLRs this automation can be overridden and the operator can set the aperture size measured as f-stops and shutter time also known as shutter speed.
The f-stop number is ratio of the aperture diameter to the focal lenth of lens and honestly this isn't meaningful to most photographers but only to help explain why the f-number gets bigger as the aperture gets smaller. Sometimes photographers will drop the 'f' and refer to the setting as a 'stop'. Aperature stops range from 2.0 to 16 on most high end point-n-shoots. With DSLRs it depends on the lens. A truly 'fast' lens can have a aperture stop as wide as 1.4 or even 1.2. The notion of fast comes from the idea that if you can let in a lot of light at the aperture so requiringing a shorter shutter open period.
Shutter speeds on most point-n-shoot range from 1/8th to 1/500th of a second. If the camera allows manual selection, it might only show the denominator. If the camera allows settings as long as several seconds it might indicate this by placing a double quote (") in front or back of the number.
The relation between shutter speed and f-stop is pretty tight and offers some creative control. For any given exposure, the shutter period can be halved if the f-stop value is also halved.
Example:
shutter speed 1/250 and aperture f8
yeilds the same exposure as
shutter speed 1/500 and aperture f4
As shutter period get longer motion blurs moving objects and as the aperture is openned up wider front to back focus in the image is lost. The blurring, if done right can convey speed in movement and front back focus loss can be used to isolate the subject by defocusing the background.
Night Exposure
With limited available light shutter times will get long, 2 to 3 seconds minimum and a larger apertures will be used, f2.8 to f4. If front to back focus needs to be maintained then f-stops like f5.6 to f8 are minimums and shutters double to 4 to 6 seconds as minimums. Motion blur starts to occur at shutter speeds as fast as 1/30th of a second. This motion includes the movement of the camera as held in hand (also known as camera shake). To counter this most night photos are taken off a stationary mount such as a tripod but resting the camera on the ground or hood of a car can work if the shutter time is not over just a few seconds (1 to 3 seconds). If shooting from the hood (or door, or roof) of a vehicle turn off the engine as the motor vibration will blur the image.
SFJC President
99 TJ - Wrangler Sport
35" Procomp MT, 4.56 RP, 4" Susp, 1" Body, 1" Motor Mount Lift
F: Detroit TrueTrac LS, Chromoly Shafts, Slotted & Drilled Rotors
R: Detroit Soft-Locker & 30 Spline D35c, SYE
Smitty XRC8000 Winch on A-Z Plate & Hella Lights
99 TJ - Wrangler Sport
35" Procomp MT, 4.56 RP, 4" Susp, 1" Body, 1" Motor Mount Lift
F: Detroit TrueTrac LS, Chromoly Shafts, Slotted & Drilled Rotors
R: Detroit Soft-Locker & 30 Spline D35c, SYE
Smitty XRC8000 Winch on A-Z Plate & Hella Lights
#4

- Commander
-

- Group: GlobalMod
- Posts: 8,692
- Joined: 30-April 03
- Gender:Male
- Location:Davie, FL
Posted 26 April 2009 - 07:57 PM
Excellent info Bill!  Most of the people that understand photography will easily understand most and learn form the rest.
I personally will try and contribute when I can get on in a simpler way to hopefully get the ones that want to get up to speed that don't know what a camera is. If we give them too much at one time we will lose a few.
Most will own a point and shoot and will shoot in automatic mode and let the camera do the thinking. Hence comes the once in a while shots that are blurry, hazy, dark or too light. If your camera can shoot manual you can control what you shoot.
There are also semi auto modes in manual like TV (shutter priority), AV (Fstop aperture priority). We should touch base in a simple manner on what is Aperture (which Bill explains) but in a more elementary explanation in real life examples. Same for Shutter as well as Depth of Field, what it is and how does it apply.
I'll start by saying that the Shutter Speed controls the stop action or blurriness of a shot. The higher your setting number on the Shutter the more you control the stop action, the smaller the Shutter number speed the less of a stop action. It also all depends on light and how fast the subject is moving (we can explain this latter on how it all intertwines with each). The Shutter works in conjunction with The Aperture speed (described by Bill). The questing is how.
I'll stop here to see if everyone that is following this understands Shutter. Feel free for anyone to correct me or add to anything I've said.
Most of the people that understand photography will easily understand most and learn form the rest. I personally will try and contribute when I can get on in a simpler way to hopefully get the ones that want to get up to speed that don't know what a camera is.
If we give them too much at one time we will lose a few. Most will own a point and shoot and will shoot in automatic mode and let the camera do the thinking. Hence comes the once in a while shots that are blurry, hazy, dark or too light. If your camera can shoot manual you can control what you shoot.
There are also semi auto modes in manual like TV (shutter priority), AV (Fstop aperture priority). We should touch base in a simple manner on what is Aperture (which Bill explains) but in a more elementary explanation in real life examples. Same for Shutter as well as Depth of Field, what it is and how does it apply.
I'll start by saying that the Shutter Speed controls the stop action or blurriness of a shot. The higher your setting number on the Shutter the more you control the stop action, the smaller the Shutter number speed the less of a stop action. It also all depends on light and how fast the subject is moving (we can explain this latter on how it all intertwines with each). The Shutter works in conjunction with The Aperture speed (described by Bill). The questing is how.
I'll stop here to see if everyone that is following this understands Shutter. Feel free for anyone to correct me or add to anything I've said.

El Niño
Experience is defined as something you get, after you need it.
Give the world the best you have. The best will come back to you...
There are no rules for good photographs, there are only good photographs.
"Thou shalt not bear false witness against thy neighbour." 9th Commandment.
"Speak not Evil of the absent for it is unjust." George Washington, Rule 89 of Civility and Decent Behavior.
Wheeling Gallery ----- E-Mail
Life Member: South Florida Jeep Club
#5
- Lieutenant Colonel
-
- Group: Members
- Posts: 1,137
- Joined: 22-July 07
- Gender:Male
- Location:Miramar, FL
Posted 26 April 2009 - 11:07 PM
Jim,
All excellent points and very true. Not knowing everyone and experience levels I wanted to get out a post with a set technical starting points. Something that covered the essentials to get us up to low light and night photography. I agree any discussion in a thread should be carried out at the level most comfortable to the participants and I encourage question be asked no matter the level. The advantage of putting out the conceptual under pinnings is they can be refered back to validate the questions. I'll admit, when first introduced they are abstract and not immediately comprehended... but that's what the questions are for.
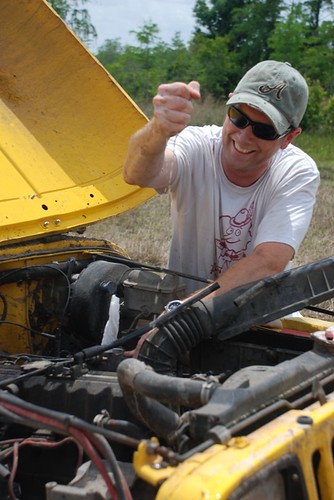
As for the aperture the most important quality to remember is a small f-stop f1.4 thru f5.6) will throw the background out of focus. It will also render things in front of the subject out of focus. If a the f-stop is extremely small (f1.4 2.0 or 2.8) things inches from the camera like wire mesh and chain link fences become invisable enough to shoot right through.
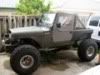
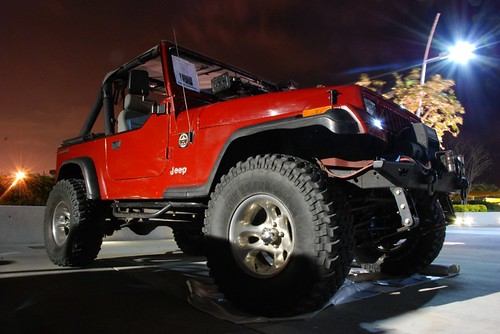
Here's a shot taken at f5.6. Note the lower right corner of the picture where the YJ's lights and grill are starting to go out of focus. Also note the background is not in focus either. Only the subject area in the engine bay and the person working the Jeep are sharply in focus. By selecting this f-stop of 5.6 I'm trying to keep the veiwers attention on the person and the working being done on the engine.
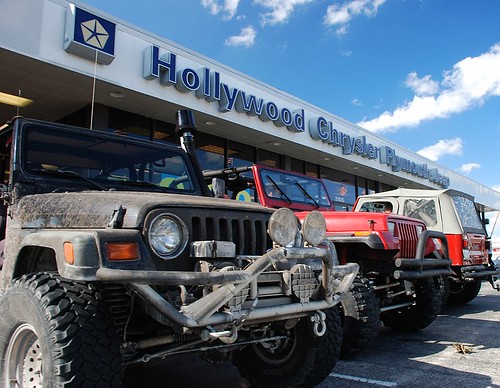
Compare that to photo below shot at f13. Focus is maintained from the first jeep right tio the last and right up into the clouds. By selecting the small aperture (big f-number means small hole for light to pass through), I was constructing an image with sharp focus from up close to all the way back. In this case so the dealership sign and Jeeps were crisp and clear. These f-numbers can be set on fully manual cameras or as an aperture priority value (as Jim mentioned as an AV setting).
All excellent points and very true. Not knowing everyone and experience levels I wanted to get out a post with a set technical starting points. Something that covered the essentials to get us up to low light and night photography. I agree any discussion in a thread should be carried out at the level most comfortable to the participants and I encourage question be asked no matter the level. The advantage of putting out the conceptual under pinnings is they can be refered back to validate the questions. I'll admit, when first introduced they are abstract and not immediately comprehended... but that's what the questions are for.
As for the aperture the most important quality to remember is a small f-stop f1.4 thru f5.6) will throw the background out of focus. It will also render things in front of the subject out of focus. If a the f-stop is extremely small (f1.4 2.0 or 2.8) things inches from the camera like wire mesh and chain link fences become invisable enough to shoot right through.
Here's a shot taken at f5.6. Note the lower right corner of the picture where the YJ's lights and grill are starting to go out of focus. Also note the background is not in focus either. Only the subject area in the engine bay and the person working the Jeep are sharply in focus. By selecting this f-stop of 5.6 I'm trying to keep the veiwers attention on the person and the working being done on the engine.
Compare that to photo below shot at f13. Focus is maintained from the first jeep right tio the last and right up into the clouds. By selecting the small aperture (big f-number means small hole for light to pass through), I was constructing an image with sharp focus from up close to all the way back. In this case so the dealership sign and Jeeps were crisp and clear. These f-numbers can be set on fully manual cameras or as an aperture priority value (as Jim mentioned as an AV setting).
SFJC President
99 TJ - Wrangler Sport
35" Procomp MT, 4.56 RP, 4" Susp, 1" Body, 1" Motor Mount Lift
F: Detroit TrueTrac LS, Chromoly Shafts, Slotted & Drilled Rotors
R: Detroit Soft-Locker & 30 Spline D35c, SYE
Smitty XRC8000 Winch on A-Z Plate & Hella Lights
99 TJ - Wrangler Sport
35" Procomp MT, 4.56 RP, 4" Susp, 1" Body, 1" Motor Mount Lift
F: Detroit TrueTrac LS, Chromoly Shafts, Slotted & Drilled Rotors
R: Detroit Soft-Locker & 30 Spline D35c, SYE
Smitty XRC8000 Winch on A-Z Plate & Hella Lights
#6
- Master Sergeant
-

- Group: Members
- Posts: 52
- Joined: 26-March 08
- Gender:Male
- Location:On the Edge of the Everglades FL
Posted 27 April 2009 - 08:57 AM
This is good stuff thanks!
#7
- Commander
-
- Group: GlobalMod
- Posts: 8,692
- Joined: 30-April 03
- Gender:Male
- Location:Davie, FL
Posted 28 April 2009 - 04:02 PM
Ok, so does everyone following understand Shutter, Aperture (f stop) and how it applies to Depth of Field and why it's used at times 
El Niño
Experience is defined as something you get, after you need it.
Give the world the best you have. The best will come back to you...
There are no rules for good photographs, there are only good photographs.
"Thou shalt not bear false witness against thy neighbour." 9th Commandment.
"Speak not Evil of the absent for it is unjust." George Washington, Rule 89 of Civility and Decent Behavior.
Wheeling Gallery ----- E-Mail
Life Member: South Florida Jeep Club
#8
- Second Lieutenant
-

- Group: Members
- Posts: 240
- Joined: 11-December 07
- Gender:Male
- Location:Miami, FL 33183
Posted 28 April 2009 - 08:51 PM
Very good info so far! I have a Canon Rebel XTi with the standard EFS 18-55mm lens (no money yet for a new lens cuz of the Jeep build). My main problem has always been cuz my hands shake. Nothing too bad, but noticable during delayed low-light shots and hi zoom shots (with my old Rebel 2000 and the 200mm lens).
I took 3yrs in High School, but like everything else, you need to practice to keep it fresh in your mind. Now reading through this i see a few things that i need to work on.
BTW, great pics! I was actually showing them to my wife a while back cuz of how good they came out.
I took 3yrs in High School, but like everything else, you need to practice to keep it fresh in your mind. Now reading through this i see a few things that i need to work on.
BTW, great pics! I was actually showing them to my wife a while back cuz of how good they came out.
BUILD IN PROCESS:
YJ, Chevy 350/th350/np208, front & rear stretch, MileMarker 12k winch, D44 w/ OX Locker & 4.88's,
12-bolt w/ Detroit Locker & 4.88's, 38.50x14.50r15 TSL/SX, 15x14 Centerline Wheels
YJ, Chevy 350/th350/np208, front & rear stretch, MileMarker 12k winch, D44 w/ OX Locker & 4.88's,
12-bolt w/ Detroit Locker & 4.88's, 38.50x14.50r15 TSL/SX, 15x14 Centerline Wheels
#9
- Lieutenant Colonel
-
- Group: Members
- Posts: 1,137
- Joined: 22-July 07
- Gender:Male
- Location:Miramar, FL
Posted 28 April 2009 - 11:43 PM
The hand shaking that TrailBlazer mentions is a large factor in image quality, especially for longer shutter periods. If the camera is moved even just a little while the shutter is open (during the actual picture taking), sharpness is compromised. If the movement is small the effect is subtle and perhaps the minor blurriness is not noticed. If the movement is big enough it can ruin the shot (or perhaps be used to produce something abstract or interesting).
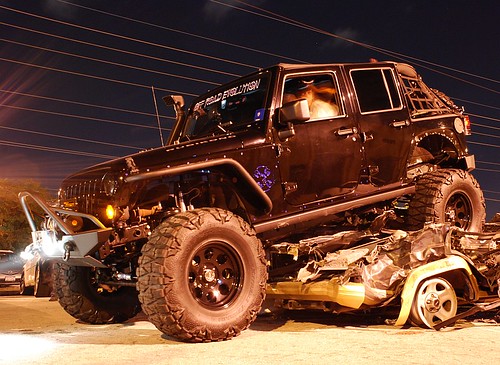
The image below was taken from a tripod mounted camera with a shutter period of 5 seconds. Notice lines are well defined, decal lettering crisp and a high level of detail maintained even in the crumples of the crushed vehicles.
The photo below was taken with the camera resting on my knee as I knelt for added stability but the 1/10th of a second shutter speed wasn't fast enough to prevent some fuzziness (click picture to see larger image where blur is easier to see). The Jeep name on the hood is not completely crisp and the logo name on the steering stablizer is hard to make out.
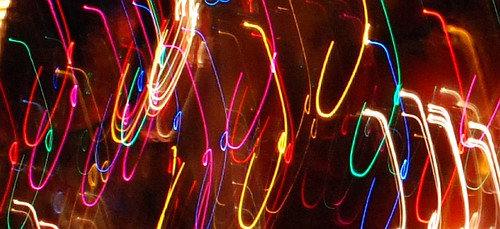
The image below is the result of a failure to stalize the camera. The resulting image shows nothing of the original subject but might be considered interesting by some viewers.
TrailBlazer also mentioned that camera shake is more likely a problem at high zoom. As magification is increased so is the effect of any camera movement. This can be seen even before taking the shot when looking through the view finder of any SLR (single lens reflex camera). To quantify the amount of zoom it can be stated in optical magnification as done by point-n-shoot cameras or as focal length a practice followed by SLR manufactures.
Point-n-shoot camera zooms range from a mild 3x all the way up to a staggering 12x while mild SLR zooms top out near 150mm and the more agressive ones close to 300mm. Using a rough conversion where 50mm is 1x magnification, a 150mm lens provides about 3x magification and the 300mm about 6x. For the 200mm zoom mentioned by TrailBlazer maginification would be about 4x and for effect of camera shake, would be the same, 4x.
The math here is really unimportant. The point being stressed is as magification goes up so does camera shake. With more magnification (or zoom) the need to shoot from a stable platform become more critical. Lean up against something solid or place the camera on a stable surface. If the shutter period is short enough the blur may not be notiaceable. As a rule of thumb the safest shutter speed by which the camera may be hand held at is 1/focal lenth. For the 200mm zoom this would be 1/200th of a second. Conversely, if shooting a wide angle shot (typically 30mm) the lowest safe shutter speed would be 1/30th of a second.
Most night shots taken without the use of strong flash require shutter speeds in the range of about 2 to 10 seconds, nowhere close to the shutter speed recommended by the safe hand held rule. Thus the absolute need for a stable shooting platform.
The image below was taken from a tripod mounted camera with a shutter period of 5 seconds. Notice lines are well defined, decal lettering crisp and a high level of detail maintained even in the crumples of the crushed vehicles.
The photo below was taken with the camera resting on my knee as I knelt for added stability but the 1/10th of a second shutter speed wasn't fast enough to prevent some fuzziness (click picture to see larger image where blur is easier to see). The Jeep name on the hood is not completely crisp and the logo name on the steering stablizer is hard to make out.
The image below is the result of a failure to stalize the camera. The resulting image shows nothing of the original subject but might be considered interesting by some viewers.
TrailBlazer also mentioned that camera shake is more likely a problem at high zoom. As magification is increased so is the effect of any camera movement. This can be seen even before taking the shot when looking through the view finder of any SLR (single lens reflex camera). To quantify the amount of zoom it can be stated in optical magnification as done by point-n-shoot cameras or as focal length a practice followed by SLR manufactures.
Point-n-shoot camera zooms range from a mild 3x all the way up to a staggering 12x while mild SLR zooms top out near 150mm and the more agressive ones close to 300mm. Using a rough conversion where 50mm is 1x magnification, a 150mm lens provides about 3x magification and the 300mm about 6x. For the 200mm zoom mentioned by TrailBlazer maginification would be about 4x and for effect of camera shake, would be the same, 4x.
The math here is really unimportant. The point being stressed is as magification goes up so does camera shake. With more magnification (or zoom) the need to shoot from a stable platform become more critical. Lean up against something solid or place the camera on a stable surface. If the shutter period is short enough the blur may not be notiaceable. As a rule of thumb the safest shutter speed by which the camera may be hand held at is 1/focal lenth. For the 200mm zoom this would be 1/200th of a second. Conversely, if shooting a wide angle shot (typically 30mm) the lowest safe shutter speed would be 1/30th of a second.
Most night shots taken without the use of strong flash require shutter speeds in the range of about 2 to 10 seconds, nowhere close to the shutter speed recommended by the safe hand held rule. Thus the absolute need for a stable shooting platform.
SFJC President
99 TJ - Wrangler Sport
35" Procomp MT, 4.56 RP, 4" Susp, 1" Body, 1" Motor Mount Lift
F: Detroit TrueTrac LS, Chromoly Shafts, Slotted & Drilled Rotors
R: Detroit Soft-Locker & 30 Spline D35c, SYE
Smitty XRC8000 Winch on A-Z Plate & Hella Lights
99 TJ - Wrangler Sport
35" Procomp MT, 4.56 RP, 4" Susp, 1" Body, 1" Motor Mount Lift
F: Detroit TrueTrac LS, Chromoly Shafts, Slotted & Drilled Rotors
R: Detroit Soft-Locker & 30 Spline D35c, SYE
Smitty XRC8000 Winch on A-Z Plate & Hella Lights
#10
- Commander
-
- Group: GlobalMod
- Posts: 8,692
- Joined: 30-April 03
- Gender:Male
- Location:Davie, FL
Posted 29 April 2009 - 06:56 AM
 trailblazer, on Apr 28 2009, 09:51 PM, said:
Very good info so far! I have a Canon Rebel XTi with the standard EFS 18-55mm lens (no money yet for a new lens cuz of the Jeep build). My main problem has always been cuz my hands shake. Nothing too bad, but noticable during delayed low-light shots and hi zoom shots (with my old Rebel 2000 and the 200mm lens).
I took 3yrs in High School, but like everything else, you need to practice to keep it fresh in your mind. Now reading through this i see a few things that i need to work on.
BTW, great pics! I was actually showing them to my wife a while back cuz of how good they came out.
I took 3yrs in High School, but like everything else, you need to practice to keep it fresh in your mind. Now reading through this i see a few things that i need to work on.
BTW, great pics! I was actually showing them to my wife a while back cuz of how good they came out.
Really nice read with examples Bill
 Never took a class but I would sure go to yours.
TrailBlazer, everyone of us have shaky hands, some more than others. Next time you shoot with the big lens make sure you have enough ambient light. This will allow you to use a higher shutter speed (with desired f stop for depth of field) therefore compensating for the shake (stay 250 to 500 shutter if you can, shoot TV or AV). Stabilize the camera as best as you can if you are going to hand hold. Hold with left hand, tuck the elbow vertically to your waste, steady with the right shutter release hand. Spread your legs a bit and become a human tripod. Some lenses have image stabilizer but they also cost big money.
On the trail I mostly use a small zoom, 16 to 70mm, 2.8 stop across the zoom. Most of the shots that you see in my Gallery are from this lens. People think they need a large zoom to accomplish getting the shot. I say get closer to where the action is. For those who have a point and shoot.... if you zoom a lot, your shot will come out blurry 90% of the time unless you are really steady or on a mini tripod or monopod.
El Niño
Experience is defined as something you get, after you need it.
Give the world the best you have. The best will come back to you...
There are no rules for good photographs, there are only good photographs.
"Thou shalt not bear false witness against thy neighbour." 9th Commandment.
"Speak not Evil of the absent for it is unjust." George Washington, Rule 89 of Civility and Decent Behavior.
Wheeling Gallery ----- E-Mail
Life Member: South Florida Jeep Club
#11
- Second Lieutenant
-
- Group: Members
- Posts: 240
- Joined: 11-December 07
- Gender:Male
- Location:Miami, FL 33183
Posted 30 April 2009 - 07:55 AM
What are your opinions on mono-pods? I have a tripod already, but i was thinking of buying a mono-pod cuz the are much more compact.
Also, do you guys really ever use you 200mm or greater zoom lenses? Or do you find that the zoom lenses just get stored away most of the year?
Also, do you guys really ever use you 200mm or greater zoom lenses? Or do you find that the zoom lenses just get stored away most of the year?
BUILD IN PROCESS:
YJ, Chevy 350/th350/np208, front & rear stretch, MileMarker 12k winch, D44 w/ OX Locker & 4.88's,
12-bolt w/ Detroit Locker & 4.88's, 38.50x14.50r15 TSL/SX, 15x14 Centerline Wheels
YJ, Chevy 350/th350/np208, front & rear stretch, MileMarker 12k winch, D44 w/ OX Locker & 4.88's,
12-bolt w/ Detroit Locker & 4.88's, 38.50x14.50r15 TSL/SX, 15x14 Centerline Wheels
#12
- Master Sergeant
-
- Group: Members
- Posts: 52
- Joined: 26-March 08
- Gender:Male
- Location:On the Edge of the Everglades FL
Posted 30 April 2009 - 08:05 AM
Keeping the camera steady for night shots has always been a challenge for me. I bought a cheap mobile tripod ($35) and my shots have improved.
#13
- Colonel
-

- Group: Members
- Posts: 2,066
- Joined: 14-May 03
- Gender:Male
- Location:Staley N.C.
Posted 30 April 2009 - 12:14 PM
Jim B, on Apr 29 2009, 07:56 AM, said:
Really nice read with examples Bill Never took a class but I would sure go to yours.
TrailBlazer, everyone of us have shaky hands, some more than others. Next time you shoot with the big lens make sure you have enough ambient light. This will allow you to use a higher shutter speed (with desired f stop for depth of field) therefore compensating for the shake (stay 250 to 500 shutter if you can, shoot TV or AV). Stabilize the camera as best as you can if you are going to hand hold. Hold with left hand, tuck the elbow vertically to your waste, steady with the right shutter release hand. Spread your legs a bit and become a human tripod. Some lenses have image stabilizer but they also cost big money.
On the trail I mostly use a small zoom, 16 to 70mm, 2.8 stop across the zoom. Most of the shots that you see in my Gallery are from this lens. People think they need a large zoom to accomplish getting the shot. I say get closer to where the action is. For those who have a point and shoot.... if you zoom a lot, your shot will come out blurry 90% of the time unless you are really steady or on a mini tripod or monopod.
Never took a class but I would sure go to yours. TrailBlazer, everyone of us have shaky hands, some more than others. Next time you shoot with the big lens make sure you have enough ambient light. This will allow you to use a higher shutter speed (with desired f stop for depth of field) therefore compensating for the shake (stay 250 to 500 shutter if you can, shoot TV or AV). Stabilize the camera as best as you can if you are going to hand hold. Hold with left hand, tuck the elbow vertically to your waste, steady with the right shutter release hand. Spread your legs a bit and become a human tripod. Some lenses have image stabilizer but they also cost big money.
On the trail I mostly use a small zoom, 16 to 70mm, 2.8 stop across the zoom. Most of the shots that you see in my Gallery are from this lens. People think they need a large zoom to accomplish getting the shot. I say get closer to where the action is. For those who have a point and shoot.... if you zoom a lot, your shot will come out blurry 90% of the time unless you are really steady or on a mini tripod or monopod.
I would like to weigh in here if I may. I went to the MIA zoo last week (day shots) with a monopod. I was glad I took it as I used it for most of my 200+ shots. I wouldn't have used anything but my sturdy tripod for night shots however. The mono helps with camera shake but not lateral movement. Just like any piece of equipment, the monopod has it's place.
The mono pod I used was bought at Wal-Mart for $10. It is also a shooting stick with the gun mount removed.
I am enjoying this thread, thanks for starting it.
Here is an example of night photography albeit not a Jeep...
I used a tripod and guessed where the bursts would be. I got lucky. I actually published this in a childrens book.

I held the shutter open with a cable release so I didn't have to touch the camera.
Joe
This post has been edited by sky6: 30 April 2009 - 12:39 PM
Reason for edit: added info
Be yourself, everyone else is taken
DAYTONA BEER POLICE MEMBER #6
'03 TJ-- 4" SkyJacker, OX lockers, D-Super35, 4.56 gears, Warn 9.5ti winch, Grant 4x4 rock rear bumper and tire carrier, 33x12.5x15 M/T, 15x10 steel rims, QuickAir2, A to Z Fabrication Rock Guards, KC lites, TrailDoors, Bushwacker 6" flares. Rock Hard Roll cage.
'04Liberty--3.7L, auto, 4x4
Joe
#14
- Lieutenant Colonel
-
- Group: Members
- Posts: 1,137
- Joined: 22-July 07
- Gender:Male
- Location:Miramar, FL
Posted 30 April 2009 - 10:34 PM
Fantastic night shot of the fireworks. The color and brilliance is superb.
I agree a tripod can be a bit much to lug around. The monopod can be a good alternative. This is expecially true if you're doing a lot of walking and it's for the most part sufficiently lit (day, sunset or well lighted street). Aside from the weight, tripods can be a pain to setup and depending on what you're shooting can get away from you before your tripod is setup.
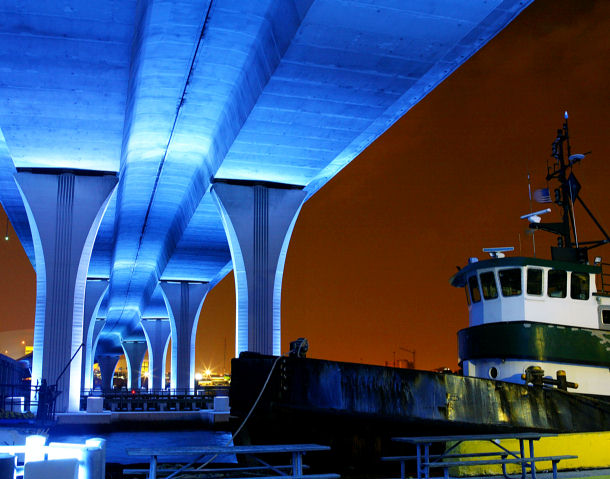
I'm glad you made the important comment that monopods fail to stablize cameras laterally. To counter this the monopod can be held tightly to another stable object like a hand railing (if not being banged on), wall, or posts (such as a parking meter). This can be done by holding the monopod and stable item together in one hand and operating the camera with the other. With pactice the technique improves. On entering the subject area if you think your shutter speeds will be in the 1/8th to 1 second range take stock of stable objects. Evaluate them for access to the subject and desired lighting.
Most often I find myself without either tri or monopod. I know its kind of strange but what I do have in the TJ is an old jacket (never know if a stuck is going to overnight me). I make a nest (a shallow ring) out of the jacket and use it to form a stable surface to conform to the camera's bottom. The method even provides some support in holding the camera at an angle (with limits of course). With this you can use rough surfaces like a solid tree branch or boulder. Below is a shot made off the hood of my TJ with the camera set in the jacket. The exposure of 8 seconds is a little longer than what this method supports but in a pinch it worth a shot. A more appropriate shutter speed would be 2 to 4 seconds.
BTW: I'm planning on heading back to this spot to do a night shot with a sharp, clean Jeep. Any takers as subjects? As additional photographers?
I agree a tripod can be a bit much to lug around. The monopod can be a good alternative. This is expecially true if you're doing a lot of walking and it's for the most part sufficiently lit (day, sunset or well lighted street). Aside from the weight, tripods can be a pain to setup and depending on what you're shooting can get away from you before your tripod is setup.
I'm glad you made the important comment that monopods fail to stablize cameras laterally. To counter this the monopod can be held tightly to another stable object like a hand railing (if not being banged on), wall, or posts (such as a parking meter). This can be done by holding the monopod and stable item together in one hand and operating the camera with the other. With pactice the technique improves. On entering the subject area if you think your shutter speeds will be in the 1/8th to 1 second range take stock of stable objects. Evaluate them for access to the subject and desired lighting.
Most often I find myself without either tri or monopod. I know its kind of strange but what I do have in the TJ is an old jacket (never know if a stuck is going to overnight me). I make a nest (a shallow ring) out of the jacket and use it to form a stable surface to conform to the camera's bottom. The method even provides some support in holding the camera at an angle (with limits of course). With this you can use rough surfaces like a solid tree branch or boulder. Below is a shot made off the hood of my TJ with the camera set in the jacket. The exposure of 8 seconds is a little longer than what this method supports but in a pinch it worth a shot. A more appropriate shutter speed would be 2 to 4 seconds.
BTW: I'm planning on heading back to this spot to do a night shot with a sharp, clean Jeep. Any takers as subjects? As additional photographers?
SFJC President
99 TJ - Wrangler Sport
35" Procomp MT, 4.56 RP, 4" Susp, 1" Body, 1" Motor Mount Lift
F: Detroit TrueTrac LS, Chromoly Shafts, Slotted & Drilled Rotors
R: Detroit Soft-Locker & 30 Spline D35c, SYE
Smitty XRC8000 Winch on A-Z Plate & Hella Lights
99 TJ - Wrangler Sport
35" Procomp MT, 4.56 RP, 4" Susp, 1" Body, 1" Motor Mount Lift
F: Detroit TrueTrac LS, Chromoly Shafts, Slotted & Drilled Rotors
R: Detroit Soft-Locker & 30 Spline D35c, SYE
Smitty XRC8000 Winch on A-Z Plate & Hella Lights
#15
- Commander
-
- Group: GlobalMod
- Posts: 8,692
- Joined: 30-April 03
- Gender:Male
- Location:Davie, FL
Posted 01 May 2009 - 07:48 AM
trailblazer, on Apr 30 2009, 08:55 AM, said:
What are your opinions on mono-pods? I have a tripod already, but i was thinking of buying a mono-pod cuz the are much more compact.
Also, do you guys really ever use you 200mm or greater zoom lenses? Or do you find that the zoom lenses just get stored away most of the year?
Also, do you guys really ever use you 200mm or greater zoom lenses? Or do you find that the zoom lenses just get stored away most of the year?
Monopods have their use and so do Tripods. Depends how and when and if you will use it. I like Stuckzilla's jacket trick, have used many different things myself to stabilize. Being on the trail a monopod can offer a bit of stability but be careful in missing the shot.
Now with regards to the 200mm question. Yes, I have a 200mm image stabilizer as well as a 400mm DO (small 400), 1.5 and 2.0 multiplier. Do I ever use them... very rarely. But when I do, it is for different type of photography. Air Show, Wildlife, things I'm not able to get close to. It's uses are for a rainy day when I need a secret weapon. Same as my wide angle 16-35 depending on how much family I'm trying to squeeze in a room.
 My 24-70mm gets used 90% of the time.
Those night shots that you guys posted are
Fireworks superb, wish you would have posted a larger shot. I wonder where that bridge came from Bill.

The above 2 shots are hanging on my living room. 11x14 and 12x18.
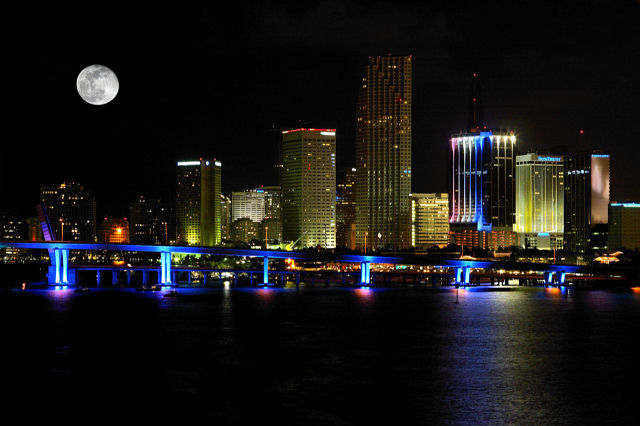
These shots where on a tripod with cable release. Funny thing about the Miami Skyline shot... This was taken on the north bridge across the bay very late at night. I had to time it just right because the bridge would move when cars would pass and it would blur the time exposure.

Now here is a question on that shot. Do you expose for the bright Moon or do you expose for the darker skyline, how can you make the two work especially on a timed shot.
El Niño
Experience is defined as something you get, after you need it.
Give the world the best you have. The best will come back to you...
There are no rules for good photographs, there are only good photographs.
"Thou shalt not bear false witness against thy neighbour." 9th Commandment.
"Speak not Evil of the absent for it is unjust." George Washington, Rule 89 of Civility and Decent Behavior.
Wheeling Gallery ----- E-Mail
Life Member: South Florida Jeep Club
#16
- Lieutenant Colonel
-
- Group: Members
- Posts: 1,137
- Joined: 22-July 07
- Gender:Male
- Location:Miramar, FL
Posted 01 May 2009 - 05:13 PM
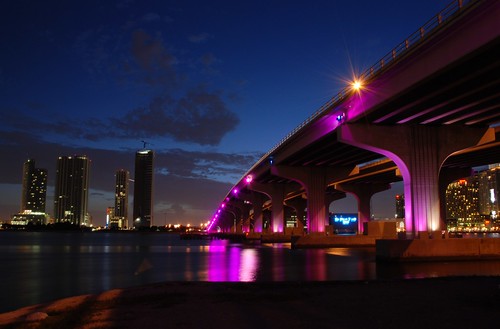
The shot of the purple lit bridge is the MacArthur Causeway from the west end of Watson Island, looking west back into downtown Miami.
It's a favorite spot for many a photographer.
Jim both the shots you posted are killer!
Here's my take for exposure strategy on the skyline shot.
Approach One
- Look for what you want to render as mid tone and spot meter that (in this case the midsized building in the center of the shot) and hope the moon is not rendered too bright and washed out.
Aproach Two
- If rendering the moon with shadow detail is essential then meter for the moon & expose 1 or 2 stops lighter.
- I'd also take the shot in Approach One as insurance. Worst case the moon in the step immediately above could be pasted in to this shot.
If the plan from the get go is to paste the moon in from another exposure I might even take it from a more stable location (off bridge).
Since shots are free under digital rules , I'd say go with option two and bracket both shots up & down one stop. To bracket a shot is to take the same picture again exposing one shot up and one shot down from the original. Some folks go as far as to bracket two shots up and two down (5 shots total, exposed -2, -1, 0, +1, +2, biased from orginal exposure. The purpose of this cover the exosure range incase the metering was not completely correct.
Jim's advice is gold with regards to missing the shot. Don't let the equipment slow you down. If you can get to all your shots with a tripod because everything is static then great, go with it. If theres some wandering mobility to the subject and the monopod is not tripping your shots up then go with it but If you're getting frustrated and miss shots, ditch it and go with a large aperture and increased sensitivity ISO 800 etc. Use existing stable surfaces where possible. Image quality might take a hit but you will at least get the shot. Once you what you came for you can bust out the tri or monopod.
As Jim mentioned there are a lot of things you can shoot off of for stability. I use the jacket just because it's there but more prepared photographers often bring a shooting bean or sand bag. The bags I use are like two small pillows stitched together with a void space between them. This allows them to be used as tripod leg anchors as well. The bags are filled loosely to allow squish space to provide for conformation to irregular surfaces. As there are three legs to the tripod, I'll bring a bag each (3 total) and only use them if I have complete moment control of the subject. With tripod and sandbags, setup and teardown times are in no way not immediate.
Something as static as a Jeep parked in a lot affords itself to a tripod setup.
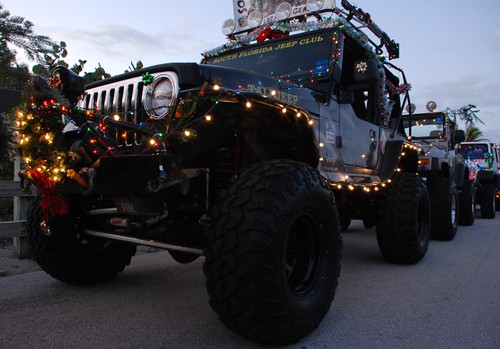
Catching Jeep and driver during a pause in a parade on the otherhand is better addressed with any stable surface immediately available. In this cae the camera was steadied off the fence post.
BTW: Jim's question about what to expose for gets into another set of very important aspects for getting a good exposure.
- What details are to be included in the shot
- The exposure range limits from dark to light
- How to meter for them, spot vs average... weighted... matrix.
Okay... how are we doing so far and any questions?
It's a favorite spot for many a photographer.
Jim both the shots you posted are killer!
Here's my take for exposure strategy on the skyline shot.
Approach One
- Look for what you want to render as mid tone and spot meter that (in this case the midsized building in the center of the shot) and hope the moon is not rendered too bright and washed out.
Aproach Two
- If rendering the moon with shadow detail is essential then meter for the moon & expose 1 or 2 stops lighter.
- I'd also take the shot in Approach One as insurance. Worst case the moon in the step immediately above could be pasted in to this shot.
If the plan from the get go is to paste the moon in from another exposure I might even take it from a more stable location (off bridge).
Since shots are free under digital rules
, I'd say go with option two and bracket both shots up & down one stop. To bracket a shot is to take the same picture again exposing one shot up and one shot down from the original. Some folks go as far as to bracket two shots up and two down (5 shots total, exposed -2, -1, 0, +1, +2, biased from orginal exposure. The purpose of this cover the exosure range incase the metering was not completely correct.Jim's advice is gold with regards to missing the shot. Don't let the equipment slow you down. If you can get to all your shots with a tripod because everything is static then great, go with it. If theres some wandering mobility to the subject and the monopod is not tripping your shots up then go with it but If you're getting frustrated and miss shots, ditch it and go with a large aperture and increased sensitivity ISO 800 etc. Use existing stable surfaces where possible. Image quality might take a hit but you will at least get the shot. Once you what you came for you can bust out the tri or monopod.
As Jim mentioned there are a lot of things you can shoot off of for stability. I use the jacket just because it's there but more prepared photographers often bring a shooting bean or sand bag. The bags I use are like two small pillows stitched together with a void space between them. This allows them to be used as tripod leg anchors as well. The bags are filled loosely to allow squish space to provide for conformation to irregular surfaces. As there are three legs to the tripod, I'll bring a bag each (3 total) and only use them if I have complete moment control of the subject. With tripod and sandbags, setup and teardown times are in no way not immediate.
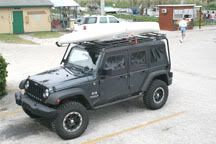
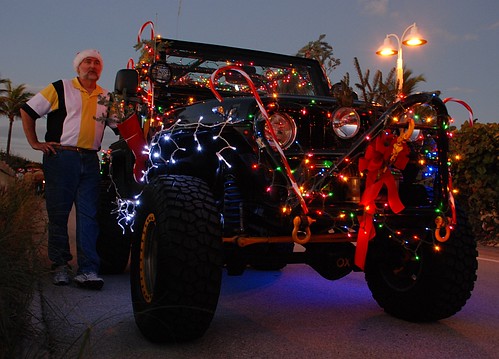
Something as static as a Jeep parked in a lot affords itself to a tripod setup.
Catching Jeep and driver during a pause in a parade on the otherhand is better addressed with any stable surface immediately available. In this cae the camera was steadied off the fence post.
BTW: Jim's question about what to expose for gets into another set of very important aspects for getting a good exposure.
- What details are to be included in the shot
- The exposure range limits from dark to light
- How to meter for them, spot vs average... weighted... matrix.
Okay... how are we doing so far and any questions?
SFJC President
99 TJ - Wrangler Sport
35" Procomp MT, 4.56 RP, 4" Susp, 1" Body, 1" Motor Mount Lift
F: Detroit TrueTrac LS, Chromoly Shafts, Slotted & Drilled Rotors
R: Detroit Soft-Locker & 30 Spline D35c, SYE
Smitty XRC8000 Winch on A-Z Plate & Hella Lights
99 TJ - Wrangler Sport
35" Procomp MT, 4.56 RP, 4" Susp, 1" Body, 1" Motor Mount Lift
F: Detroit TrueTrac LS, Chromoly Shafts, Slotted & Drilled Rotors
R: Detroit Soft-Locker & 30 Spline D35c, SYE
Smitty XRC8000 Winch on A-Z Plate & Hella Lights
#17
- Second Lieutenant
-
- Group: Members
- Posts: 240
- Joined: 11-December 07
- Gender:Male
- Location:Miami, FL 33183
Posted 01 May 2009 - 07:24 PM
When you say "meter" are you relying on the camera's meterring? Or do you carry a seperate light meter?
Also, you explained earlier what the basic principals are behind adjusting the aperture and shutter speeds, but what about ISO? What range do you you use for night shots?
Also, you explained earlier what the basic principals are behind adjusting the aperture and shutter speeds, but what about ISO? What range do you you use for night shots?
BUILD IN PROCESS:
YJ, Chevy 350/th350/np208, front & rear stretch, MileMarker 12k winch, D44 w/ OX Locker & 4.88's,
12-bolt w/ Detroit Locker & 4.88's, 38.50x14.50r15 TSL/SX, 15x14 Centerline Wheels
YJ, Chevy 350/th350/np208, front & rear stretch, MileMarker 12k winch, D44 w/ OX Locker & 4.88's,
12-bolt w/ Detroit Locker & 4.88's, 38.50x14.50r15 TSL/SX, 15x14 Centerline Wheels
#18
- Commander
-
- Group: GlobalMod
- Posts: 8,692
- Joined: 30-April 03
- Gender:Male
- Location:Davie, FL
Posted 05 May 2009 - 07:33 AM
trailblazer, on May 1 2009, 08:24 PM, said:
When you say "meter" are you relying on the camera's metering? Or do you carry a separate light meter?
Also, you explained earlier what the basic principals are behind adjusting the aperture and shutter speeds, but what about ISO? What range do you you use for night shots?
Also, you explained earlier what the basic principals are behind adjusting the aperture and shutter speeds, but what about ISO? What range do you you use for night shots?
I personally meter with the camera (very rare do I use a meter) on the trail especially. Not sure about Stuckzilla or Sky6.
Regarding ISO ranges at night. As we know higher ISO lets you work with more light but depending on camera model you shots can come out noisy. If you are going to time your shots even a low ISO can become noisy. Most DSLRs have noise filters that help a bit. If I'm doing time exposures I try to stay around 200 and shoot a few around 400. If I'm doing flash or no flash trying to capture action I would use a hight ISO, take a look at the noise in my computer darkroom and run a noise utility on it depending how bad the noise was introduced.
Here is high ISO no flash, night, very little field light.
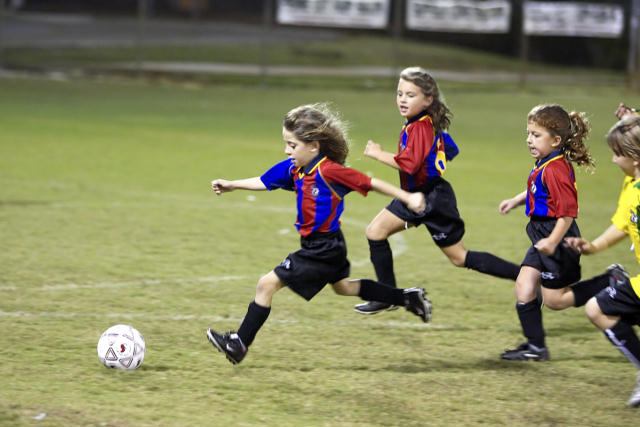
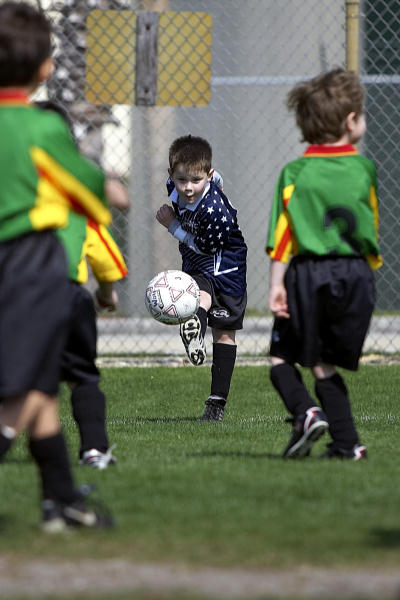
Here is a sample of action with 200 ISO, good light, aperture f stop around 4.5, shutter around 1000, creating a shallow depth of field keeping the background out of focus concentrating on the runner action.

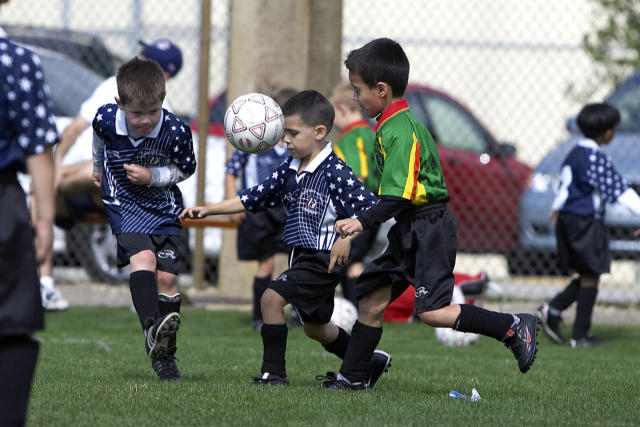
Notice the tunnel effect with front blurriness (depth of field) causing the viewing eye to zoom in on the subject.
El Niño
Experience is defined as something you get, after you need it.
Give the world the best you have. The best will come back to you...
There are no rules for good photographs, there are only good photographs.
"Thou shalt not bear false witness against thy neighbour." 9th Commandment.
"Speak not Evil of the absent for it is unjust." George Washington, Rule 89 of Civility and Decent Behavior.
Wheeling Gallery ----- E-Mail
Life Member: South Florida Jeep Club
#19

- Brigadier General
-


- Group: GlobalMod
- Posts: 2,570
- Joined: 23-April 07
- Gender:Male
- Location:West Palm Beach, FL
Posted 05 May 2009 - 10:02 AM
Great post guys . I am not a pro at it but it is one of my hobbies and trying to learn as much as I can and hopefully one day get as good as you guys.
I took this shot after 11 PM at Newfound Gap over the Smoky Mountains. I say I was lucky because on that trip I had only owned my 20D for 6 months or less.
Fully manual mode, ISO 400 , f/3.5, and held shutter open for 30 seconds and yes used a tripod.
This light you see that made the blue sky was the moon hiding behind the clouds

f/5.6, 300 mm, ISO 100, 0.016 second exposure

f/8, 300 mm, ISO 100, 0.002 second exposure

above pics are in this set http://www.flickr.co...57607117595161/
The water fall below was handheld (no tripod)
f/4, 17 MM, ISO 100, 0.6 second exposure

Water falls set http://www.flickr.co...57608693788345/
. I am not a pro at it but it is one of my hobbies and trying to learn as much as I can and hopefully one day get as good as you guys.I took this shot after 11 PM at Newfound Gap over the Smoky Mountains. I say I was lucky because on that trip I had only owned my 20D for 6 months or less.
Fully manual mode, ISO 400 , f/3.5, and held shutter open for 30 seconds and yes used a tripod.
This light you see that made the blue sky was the moon hiding behind the clouds
f/5.6, 300 mm, ISO 100, 0.016 second exposure
f/8, 300 mm, ISO 100, 0.002 second exposure
above pics are in this set http://www.flickr.co...57607117595161/
The water fall below was handheld (no tripod)
f/4, 17 MM, ISO 100, 0.6 second exposure
Water falls set http://www.flickr.co...57608693788345/

#20
- Commander
-
- Group: GlobalMod
- Posts: 8,692
- Joined: 30-April 03
- Gender:Male
- Location:Davie, FL
Posted 06 May 2009 - 07:18 AM
Willy,
Nice shot on the first one, 30 seconds might have been too long, hence the movement on the clouds. With digital you can always bring back the dark, so the picture would have come out. Did you try a higher aperture like f11
Moon looks superb, depending on your resolution you can blow that up and sharpen. Keep that one handy because you can move that moon on to another future shot.
Like the last two a lot, the waterfall shots are very nice and hats off on the no tripod. I always like the long exposures on these to make the water run. The higher shutter shots do have their place also depending on the action of the water that one is trying to stop.
People, in photography all you have to have is a good eye for good pics.
Even with a throw away camera, be at the right place, the right time and have a good eye... been there.
Nice shot on the first one, 30 seconds might have been too long, hence the movement on the clouds. With digital you can always bring back the dark, so the picture would have come out. Did you try a higher aperture like f11
Moon looks superb, depending on your resolution you can blow that up and sharpen. Keep that one handy because you can move that moon on to another future shot.
Like the last two a lot
, the waterfall shots are very nice and hats off on the no tripod. I always like the long exposures on these to make the water run. The higher shutter shots do have their place also depending on the action of the water that one is trying to stop.People, in photography all you have to have is a good eye for good pics.
Even with a throw away camera, be at the right place, the right time and have a good eye... been there.
El Niño
Experience is defined as something you get, after you need it.
Give the world the best you have. The best will come back to you...
There are no rules for good photographs, there are only good photographs.
"Thou shalt not bear false witness against thy neighbour." 9th Commandment.
"Speak not Evil of the absent for it is unjust." George Washington, Rule 89 of Civility and Decent Behavior.
Wheeling Gallery ----- E-Mail
Life Member: South Florida Jeep Club
#21
- Brigadier General
-
- Group: GlobalMod
- Posts: 2,570
- Joined: 23-April 07
- Gender:Male
- Location:West Palm Beach, FL
Posted 06 May 2009 - 01:13 PM
Jim B, on May 6 2009, 08:18 AM, said:
Willy,
Nice shot on the first one, 30 seconds might have been too long, hence the movement on the clouds. With digital you can always bring back the dark, so the picture would have come out. Did you try a higher aperture like f11
Moon looks superb, depending on your resolution you can blow that up and sharpen. Keep that one handy because you can move that moon on to another future shot.
Like the last two a lot, the waterfall shots are very nice and hats off on the no tripod. I always like the long exposures on these to make the water run. The higher shutter shots do have their place also depending on the action of the water that one is trying to stop.
People, in photography all you have to have is a good eye for good pics.
Even with a throw away camera, be at the right place, the right time and have a good eye... been there.
Nice shot on the first one, 30 seconds might have been too long, hence the movement on the clouds. With digital you can always bring back the dark, so the picture would have come out. Did you try a higher aperture like f11
Moon looks superb, depending on your resolution you can blow that up and sharpen. Keep that one handy because you can move that moon on to another future shot.
Like the last two a lot
, the waterfall shots are very nice and hats off on the no tripod. I always like the long exposures on these to make the water run. The higher shutter shots do have their place also depending on the action of the water that one is trying to stop.People, in photography all you have to have is a good eye for good pics.
Even with a throw away camera, be at the right place, the right time and have a good eye... been there.
If I remember correctly, I tried different settings mind you the camera was very new to me and I had never owned any SLR camera before. I had the best result with that setting and 30 seconds. I actually like the cloud movement
I have a cropped version of the moon.
It is linked to the full res crop

The sun was early morning March 4 2007 (our wedding anniversary) at North Carolina Outerbanks just south of Corolla.
The waterfall was December 30th 2008 at North Conway, New Hampshire "Diana's Bath Trail and Waterfall"
I have several others at the link on my first post of the same waterfall different angles.

I enjoy shooting waterfalls they are one of my favorites aside from macro/closeup.
Cades Cove Smoky Mountains same trip where I took the night sky one


#22
- Commander
-
- Group: GlobalMod
- Posts: 8,692
- Joined: 30-April 03
- Gender:Male
- Location:Davie, FL
Posted 06 July 2009 - 07:34 AM
10 Questions to Ask Yourself When Composing a Photo.
1) What story am I telling?
Basically you are asking yourself "Why am I taking this shot? What is its purpose and what am I trying to convey?"
2) What is the visual focal point of this shot?
Once you've identified the focal point you can think about where to place it in the frame.
3) What competing focal points are there?
You know where you want your viewer's eyes to be drawn to and have placed it where you want it in the frame. Now, look over the rest of the shot and see if there are any competing focal points and whether they add or take away from the image.
4) What is in the background and foreground?
Check the background for clutter, and consider if you want the background to be in focus or blurred.
5) Am I close enough?
A lot of photos fail because the subject it too small. Often shots where the subject fills the frame are more dynamic.
6) What is the main source of light?
Without good lighting you'll lose detail and clarity in your image.
7) Is my framing straight?
Unless you are going for a totally skewed angle, slightly sloping horizons and leaning people can kill an otherwise good shot.
8) What other perspectives could I capture this subject from?
Make your image stand out by finding a creative angle to shoot from.
9) How would holding the camera the other way change this shot?
Many photographers get into the habit of always holding the camera the same way (horizontally or vertically). Experiment with holding your camera in a different way and see how it changes the shot.
10) How will the eye travel through this image?
Your viewer's eyes don't remain still when looking at a still image. Think about lines or colors that might lead the eye through the image.
El Niño
Experience is defined as something you get, after you need it.
Give the world the best you have. The best will come back to you...
There are no rules for good photographs, there are only good photographs.
"Thou shalt not bear false witness against thy neighbour." 9th Commandment.
"Speak not Evil of the absent for it is unjust." George Washington, Rule 89 of Civility and Decent Behavior.
Wheeling Gallery ----- E-Mail
Life Member: South Florida Jeep Club
#23
- Brigadier General
-
- Group: GlobalMod
- Posts: 2,570
- Joined: 23-April 07
- Gender:Male
- Location:West Palm Beach, FL
Posted 11 August 2009 - 03:14 PM
Night Shots of Lake Chatuge in North Georgia.
Pics were taken after 11 PM


Pics were taken after 11 PM
#24
- Lieutenant Colonel
-
- Group: Members
- Posts: 1,137
- Joined: 22-July 07
- Gender:Male
- Location:Miramar, FL
Posted 11 August 2009 - 04:44 PM
Nice shots. I like the boat ramp composition. Night shots can be a blast as they give you a whole new opportunity to re-interpret the day world around you.
Really goods shots!
Really goods shots!
SFJC President
99 TJ - Wrangler Sport
35" Procomp MT, 4.56 RP, 4" Susp, 1" Body, 1" Motor Mount Lift
F: Detroit TrueTrac LS, Chromoly Shafts, Slotted & Drilled Rotors
R: Detroit Soft-Locker & 30 Spline D35c, SYE
Smitty XRC8000 Winch on A-Z Plate & Hella Lights
99 TJ - Wrangler Sport
35" Procomp MT, 4.56 RP, 4" Susp, 1" Body, 1" Motor Mount Lift
F: Detroit TrueTrac LS, Chromoly Shafts, Slotted & Drilled Rotors
R: Detroit Soft-Locker & 30 Spline D35c, SYE
Smitty XRC8000 Winch on A-Z Plate & Hella Lights
#25
- Brigadier General
-
- Group: GlobalMod
- Posts: 2,570
- Joined: 23-April 07
- Gender:Male
- Location:West Palm Beach, FL
Posted 11 August 2009 - 05:07 PM
I wanted to get out there just as the moon was rising but did not get back to camp in time.
If you look at the full res in flickr of the picture below you will see my Jeep in the picture.
It is just below the green glow in the center of the picture. That is where I had my camp site.
If you look at the full res in flickr of the picture below you will see my Jeep in the picture.
It is just below the green glow in the center of the picture. That is where I had my camp site.
#26
- Commander
-
- Group: GlobalMod
- Posts: 8,692
- Joined: 30-April 03
- Gender:Male
- Location:Davie, FL
Posted 17 August 2009 - 07:58 AM
JeepNWilly, on Aug 11 2009, 04:14 PM, said:
Night Shots of Lake Chatuge in North Georgia.
Pics were taken after 11 PM
Pics were taken after 11 PM
Superb
El Niño
Experience is defined as something you get, after you need it.
Give the world the best you have. The best will come back to you...
There are no rules for good photographs, there are only good photographs.
"Thou shalt not bear false witness against thy neighbour." 9th Commandment.
"Speak not Evil of the absent for it is unjust." George Washington, Rule 89 of Civility and Decent Behavior.
Wheeling Gallery ----- E-Mail
Life Member: South Florida Jeep Club
#27
- Lieutenant Colonel
-
- Group: Members
- Posts: 1,137
- Joined: 22-July 07
- Gender:Male
- Location:Miramar, FL
Posted 17 August 2009 - 09:35 PM
Shooting moving Jeeps and 4x4s at night:
General guidelines, nothing hard and fast but I've found it works fairly well.
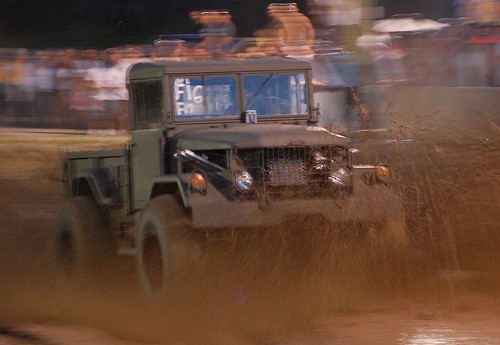
1. Time the shot for the 4x4 to move into the light.
2. Shoot short focal lengths, for less camera shake and with zooms lenses you'll get the biggest aperture supported by the lens. Just understand with a wide aperture the vehicle will not be in focus from head lights to tail pipe (no biggie as there will be some blur regardless). The important thing is to choose you focal point carefully (the grill or a few feet back from it) or take multiple pictures.
3. If the 4x4 is bouncing too much, shoot it head on or from the back.
4. If the 4x4 is cruising fairly level and at a constant speed, pan the shot. This means moving the camera with the vehicle so it is reasonably still in the frame as it passes by. Because offroad conditions are never perfectly level, the area close to the cab and just behind it hold the best chances to remain sharp (minor rotational motion vs violent heaving up and down closer to the ends; front or back.
Because the 4x4s, track and light won't do exactly what you expect, make multiple attempts. With panning, make alot more multiple attempts.
For digital cameras
- set the ISO as high as possible
- turn off anti-shake features.
General guidelines, nothing hard and fast but I've found it works fairly well.
1. Time the shot for the 4x4 to move into the light.
2. Shoot short focal lengths, for less camera shake and with zooms lenses you'll get the biggest aperture supported by the lens. Just understand with a wide aperture the vehicle will not be in focus from head lights to tail pipe (no biggie as there will be some blur regardless). The important thing is to choose you focal point carefully (the grill or a few feet back from it) or take multiple pictures.
3. If the 4x4 is bouncing too much, shoot it head on or from the back.
4. If the 4x4 is cruising fairly level and at a constant speed, pan the shot. This means moving the camera with the vehicle so it is reasonably still in the frame as it passes by. Because offroad conditions are never perfectly level, the area close to the cab and just behind it hold the best chances to remain sharp (minor rotational motion vs violent heaving up and down closer to the ends; front or back.
Because the 4x4s, track and light won't do exactly what you expect, make multiple attempts. With panning, make alot more multiple attempts.
For digital cameras
- set the ISO as high as possible
- turn off anti-shake features.
SFJC President
99 TJ - Wrangler Sport
35" Procomp MT, 4.56 RP, 4" Susp, 1" Body, 1" Motor Mount Lift
F: Detroit TrueTrac LS, Chromoly Shafts, Slotted & Drilled Rotors
R: Detroit Soft-Locker & 30 Spline D35c, SYE
Smitty XRC8000 Winch on A-Z Plate & Hella Lights
99 TJ - Wrangler Sport
35" Procomp MT, 4.56 RP, 4" Susp, 1" Body, 1" Motor Mount Lift
F: Detroit TrueTrac LS, Chromoly Shafts, Slotted & Drilled Rotors
R: Detroit Soft-Locker & 30 Spline D35c, SYE
Smitty XRC8000 Winch on A-Z Plate & Hella Lights
#28
- Commander
-
- Group: GlobalMod
- Posts: 8,692
- Joined: 30-April 03
- Gender:Male
- Location:Davie, FL
Posted 18 August 2009 - 07:05 AM
Bill, really nice shots, been looking at some of the others also.
Where you panning on a tripod or handholding all the time
What was your average aperture and shutter
You mention highest iso possible, what were you using
Where you panning on a tripod or handholding all the time
What was your average aperture and shutter
You mention highest iso possible, what were you using
El Niño
Experience is defined as something you get, after you need it.
Give the world the best you have. The best will come back to you...
There are no rules for good photographs, there are only good photographs.
"Thou shalt not bear false witness against thy neighbour." 9th Commandment.
"Speak not Evil of the absent for it is unjust." George Washington, Rule 89 of Civility and Decent Behavior.
Wheeling Gallery ----- E-Mail
Life Member: South Florida Jeep Club
#29
- Lieutenant Colonel
-
- Group: Members
- Posts: 1,137
- Joined: 22-July 07
- Gender:Male
- Location:Miramar, FL
Posted 07 December 2010 - 01:18 PM
Jim B, on Aug 18 2009, 07:05 AM, said:
Bill, really nice shots, been looking at some of the others also.
Where you panning on a tripod or handholding all the time
What was your average aperture and shutter
You mention highest iso possible, what were you using
Where you panning on a tripod or handholding all the time
What was your average aperture and shutter
You mention highest iso possible, what were you using
1) The panning was all hand held. It takes a little practice but workable panning skills can be developed in as little as 3 or 4 shoot sessions.
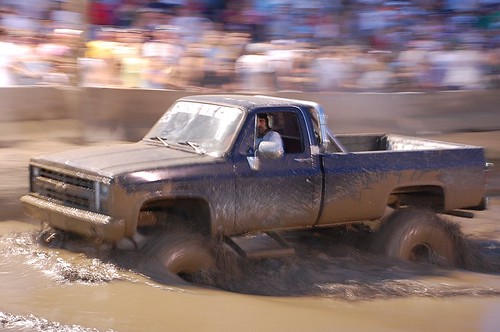
2) Aperture is not a concern but depth of field should be enough to render the subject clear front ot back. Extra DOF is not a problem. Shutter speed control will express the photographer's vision and should be thought of as the shutter open arc rather than time. The reason I say this is because the arc will detirmine the degree of desired background motion blur. The arc is dependent on the speed of subject, closeness of subject and shutter speed. In both photos below, the trucks where moving at about the same speed, but due the greater arc in the second shot, the truck appears to be moving faster.
ISO=1600, 1/50 sec at 75mm
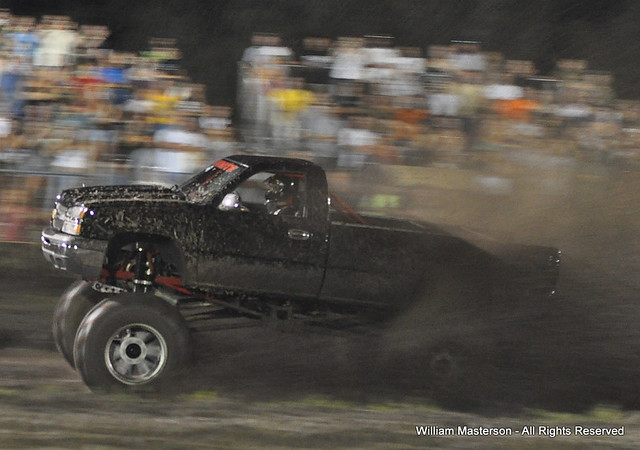
ISO=1600, 1/13 sec at 75mm
Photos taken from the June 19, 2010 Mud Bog Race
http://www.flickr.com/photos/lurkzilla/set...57624318762256/
3) Sensitivity ISO=1600 (noisy yuck!)
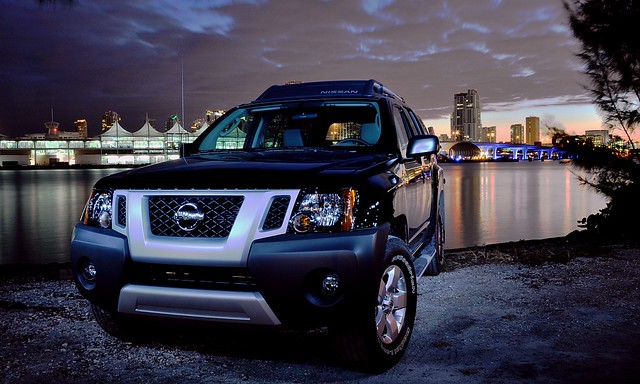
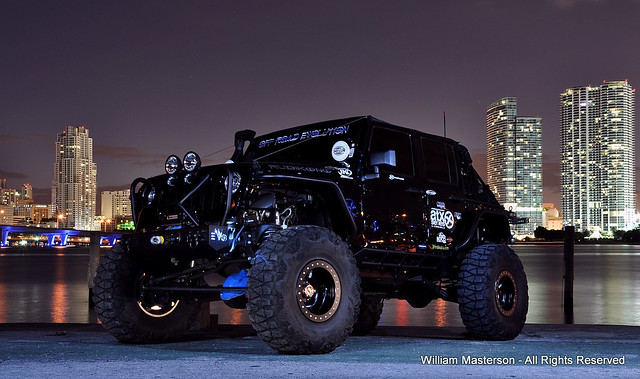
As promised, I returned to Watson Island to do a "clean" Jeep shoot. I got to thank Dennis for the offering up his way tricked out JK, Rubikong. It was blast. We got on site an hour before sun down and shot till about an hour past light. Learned a lot from the experience. Some of this may seem basic and should go without saying but it really is important and often not considered. Vehicle placement in relation to background and direction of light is critical. Understaning the use of strobes and the impact they have to fill light, high light and how they throw shadows is essential.
Test shot of my Xterra about 2 days before the shoot to scope the location.
http://www.flickr.com/photos/lurkzilla/set...57625203599929/
Sample shot from the Rubikong shoot
http://www.flickr.com/photos/lurkzilla/set...57625398192884/
SFJC President
99 TJ - Wrangler Sport
35" Procomp MT, 4.56 RP, 4" Susp, 1" Body, 1" Motor Mount Lift
F: Detroit TrueTrac LS, Chromoly Shafts, Slotted & Drilled Rotors
R: Detroit Soft-Locker & 30 Spline D35c, SYE
Smitty XRC8000 Winch on A-Z Plate & Hella Lights
99 TJ - Wrangler Sport
35" Procomp MT, 4.56 RP, 4" Susp, 1" Body, 1" Motor Mount Lift
F: Detroit TrueTrac LS, Chromoly Shafts, Slotted & Drilled Rotors
R: Detroit Soft-Locker & 30 Spline D35c, SYE
Smitty XRC8000 Winch on A-Z Plate & Hella Lights
#30
- Commander
-
- Group: GlobalMod
- Posts: 8,692
- Joined: 30-April 03
- Gender:Male
- Location:Davie, FL
Posted 08 December 2010 - 07:26 AM
Bill, superb skyline shots.
Care to share some of the settings, I gather you were on tripod The reflection of the water and percentage of the sky still light toward the right is superb.
First shot looks like when the sun was almost down, what about on the one of the Rubikong?
Btw, we can now post 800x600 instead of 640x480.
Care to share some of the settings, I gather you were on tripod
The reflection of the water and percentage of the sky still light toward the right is superb. First shot looks like when the sun was almost down, what about on the one of the Rubikong?
Btw, we can now post 800x600 instead of 640x480.
El Niño
Experience is defined as something you get, after you need it.
Give the world the best you have. The best will come back to you...
There are no rules for good photographs, there are only good photographs.
"Thou shalt not bear false witness against thy neighbour." 9th Commandment.
"Speak not Evil of the absent for it is unjust." George Washington, Rule 89 of Civility and Decent Behavior.
Wheeling Gallery ----- E-Mail
Life Member: South Florida Jeep Club


