
 Help
Help

I just bought some blackout lights & they are 24 volt with one power lead off them. The bolts anchor to the body for a ground. Can I (being a Electrician) just get a 12 to 24 volt step up transformer to run the lights? A Jeep/truck/low voltage wiring etc is a little different.
I might have to order the wiring harness & convert it to operate on a regular light 12V system since the lights have such a old hook up on the tails, or just split the regular harness & put a switch for which ever lights I want to use & install new tails on the lights.
I know I can just change the bulbs but I haven't even opened the lights yet to see what kind are in there.
Maybe I need to just think a min w/some of your feed back.
Thanks,
RollBar
Page 1 of 1
12 to 24 volt conversion or ?
#1


- Commander
-

- Group: GlobalMod
- Posts: 7,058
- Joined: 16-May 03
- Gender:Male
- Location:Palm Harbor, Florida
Posted 08 February 2006 - 10:26 PM
*MY CJ IS YOUR yJ's DADDY*
'48 Willys; '74CJ5; '80CJ7; '84 CJ8; '86 CJ7
*Who Needs A Stinking Manual When You Have A Fat Wallet For Tech Support!*
*What man is a man who does not make the world better*
Support the Central Florida Bible Camp for kids
'48 Willys; '74CJ5; '80CJ7; '84 CJ8; '86 CJ7
*Who Needs A Stinking Manual When You Have A Fat Wallet For Tech Support!*
*What man is a man who does not make the world better*
Support the Central Florida Bible Camp for kids
#2
- Sergeant Major
-

- Group: Members
- Posts: 100
- Joined: 11-May 05
- Gender:Male
- Location:Brandon, Mb, Canada
Posted 09 February 2006 - 12:17 AM
Is there any reason that you can't just run them on 12V ??
They should work, just be a little dimmer than if you had the full 24.
They should work, just be a little dimmer than if you had the full 24.
Real Jeeps are BUILT ! All others are for haulin groceries and babies...
#3

- Major
-

- Group: Members
- Posts: 989
- Joined: 28-May 03
- Location:Plantation, Fl.
Posted 09 February 2006 - 12:00 PM
A 24V bulb at 12V will be too dim. Best to see if there is a 12V bulb that replaces the 24V one. Should be easy to find out.
2005 Wrangler Unlimited Rubicon
Patriot blue
4" Pro Comp Coil spring lift w/Pro Comp shocks, sway bar disconnects. Steering box & custom "Animal Garage" engine & control arm skid plates. Front Jeeperman bumper, rear LoD bumper w/tire carrier, XJ front tie rod. 33" Dick Cepec mud country tires on black steel rims. Overhead console w/CB radio, GPS. Tuffy rear security drawer, Mile Marker 12,000 lb winch.

Paved roads are a fine example of needless government spending
Patriot blue
4" Pro Comp Coil spring lift w/Pro Comp shocks, sway bar disconnects. Steering box & custom "Animal Garage" engine & control arm skid plates. Front Jeeperman bumper, rear LoD bumper w/tire carrier, XJ front tie rod. 33" Dick Cepec mud country tires on black steel rims. Overhead console w/CB radio, GPS. Tuffy rear security drawer, Mile Marker 12,000 lb winch.
Paved roads are a fine example of needless government spending
#4
- Colonel
-

- Group: Members
- Posts: 2,066
- Joined: 14-May 03
- Gender:Male
- Location:Staley N.C.
Posted 09 February 2006 - 03:55 PM
Jack H, on Feb 9 2006, 12:00 PM, said:
A 24V bulb at 12V will be too dim. Best to see if there is a 12V bulb that replaces the 24V one. Should be easy to find out.
That's a good, and cheap, idea. It isn't like you have a practical use for black-out lights... unless you plan to sneak up on young people parking in a secluded spot late at night... not that I've ever done that, 'a course.
Be yourself, everyone else is taken
DAYTONA BEER POLICE MEMBER #6
'03 TJ-- 4" SkyJacker, OX lockers, D-Super35, 4.56 gears, Warn 9.5ti winch, Grant 4x4 rock rear bumper and tire carrier, 33x12.5x15 M/T, 15x10 steel rims, QuickAir2, A to Z Fabrication Rock Guards, KC lites, TrailDoors, Bushwacker 6" flares. Rock Hard Roll cage.
'04Liberty--3.7L, auto, 4x4
Joe
#5
- Commander
-
- Group: GlobalMod
- Posts: 7,058
- Joined: 16-May 03
- Gender:Male
- Location:Palm Harbor, Florida
Posted 09 February 2006 - 04:27 PM
sky6, on Feb 9 2006, 03:55 PM, said:
Jack H, on Feb 9 2006, 12:00 PM, said:
A 24V bulb at 12V will be too dim. Best to see if there is a 12V bulb that replaces the 24V one. Should be easy to find out.
That's a good, and cheap, idea. It isn't like you have a practical use for black-out lights... unless you plan to sneak up on young people parking in a secluded spot late at night... not that I've ever done that, 'a course.
:sneak:


I'm gonna open the lights up to see what's in them & go from there, hopefully I can do just the bulbs etc. Thanks for the info. I just hate to cut the original ends off the lights etc. ??????
RollBar
*MY CJ IS YOUR yJ's DADDY*
'48 Willys; '74CJ5; '80CJ7; '84 CJ8; '86 CJ7
*Who Needs A Stinking Manual When You Have A Fat Wallet For Tech Support!*
*What man is a man who does not make the world better*
Support the Central Florida Bible Camp for kids
'48 Willys; '74CJ5; '80CJ7; '84 CJ8; '86 CJ7
*Who Needs A Stinking Manual When You Have A Fat Wallet For Tech Support!*
*What man is a man who does not make the world better*
Support the Central Florida Bible Camp for kids
#6
- Second Lieutenant
-

- Group: Members
- Posts: 203
- Joined: 08-August 05
- Location:Texas City, Republic of Texas
Posted 10 February 2006 - 12:41 AM
Jus replace the 24 with 12 bulb and there u have it,
Send me a blackout light!
Send me a blackout light!
#7

- Commander
-
- Group: GlobalMod
- Posts: 8,692
- Joined: 30-April 03
- Gender:Male
- Location:Davie, FL
![]() Posted 10 February 2006 - 08:43 AM
Posted 10 February 2006 - 08:43 AM
TheMajor, on Feb 10 2006, 12:41 AM, said:
Jus replace the 24 with 12 bulb and there u have it,
I don't see why this would not work even thought the wiring might be different.

Take one of these lights before you install them on the tub, take out the 24v bulb, put in a 12v bulb (rig it), hook the tail light assembly to the 12volt battery. Let us know what happened.


El Niño
Experience is defined as something you get, after you need it.
Give the world the best you have. The best will come back to you...
There are no rules for good photographs, there are only good photographs.
"Thou shalt not bear false witness against thy neighbour." 9th Commandment.
"Speak not Evil of the absent for it is unjust." George Washington, Rule 89 of Civility and Decent Behavior.
Wheeling Gallery ----- E-Mail
Life Member: South Florida Jeep Club
#8
- Commander
-
- Group: GlobalMod
- Posts: 7,058
- Joined: 16-May 03
- Gender:Male
- Location:Palm Harbor, Florida
Posted 12 February 2006 - 04:50 PM
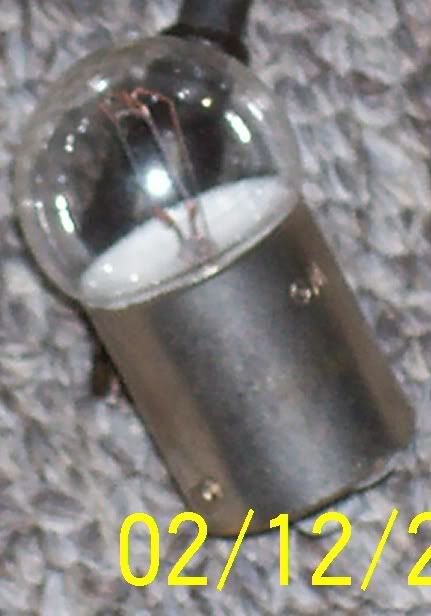
Here is the 24 volt bulb, notice the longer double filament. It still has the standard push & twist, but the small tabs/studs to lock it in are on the same level/height off the rim of the base of the bulb. The standard/modern bulbs have one stud off set/lower than the other so U can only put the bulb in one way.
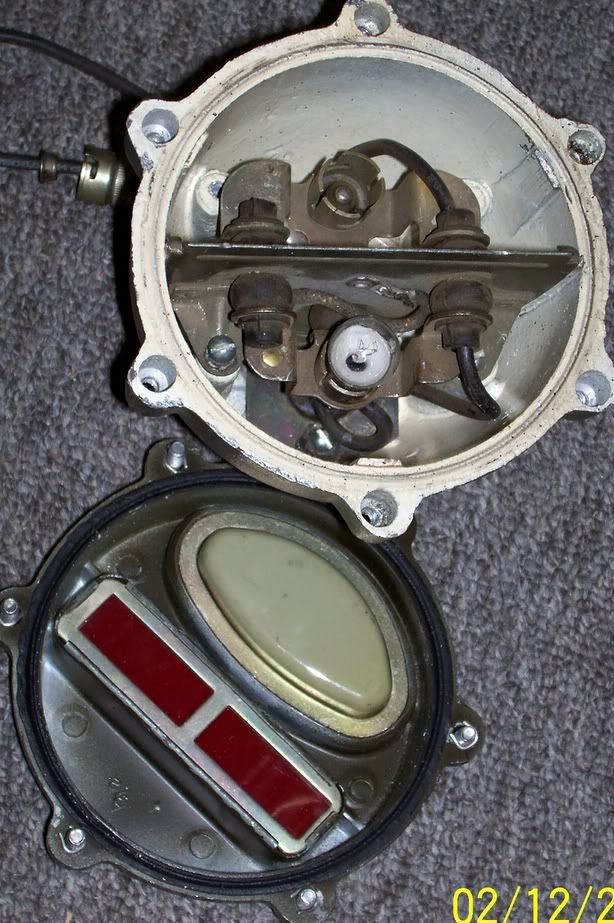
Here are the guts of the light it's self, notice how they used rubber grommets to support the light/bulb assembly for that rough ride. Oh to have engineers like that again.
Here are the guts of the light it's self, notice how they used rubber grommets to support the light/bulb assembly for that rough ride. Oh to have engineers like that again.
*MY CJ IS YOUR yJ's DADDY*
'48 Willys; '74CJ5; '80CJ7; '84 CJ8; '86 CJ7
*Who Needs A Stinking Manual When You Have A Fat Wallet For Tech Support!*
*What man is a man who does not make the world better*
Support the Central Florida Bible Camp for kids
'48 Willys; '74CJ5; '80CJ7; '84 CJ8; '86 CJ7
*Who Needs A Stinking Manual When You Have A Fat Wallet For Tech Support!*
*What man is a man who does not make the world better*
Support the Central Florida Bible Camp for kids
#9
- Major
-
- Group: Members
- Posts: 989
- Joined: 28-May 03
- Location:Plantation, Fl.
Posted 12 February 2006 - 06:30 PM
Rollbar, the offset tabs are only on bulbs that require they be inserted only one way. There are a lot of 12V bulbs with the tabs at the same level. Check at your auto parts store.
2005 Wrangler Unlimited Rubicon
Patriot blue
4" Pro Comp Coil spring lift w/Pro Comp shocks, sway bar disconnects. Steering box & custom "Animal Garage" engine & control arm skid plates. Front Jeeperman bumper, rear LoD bumper w/tire carrier, XJ front tie rod. 33" Dick Cepec mud country tires on black steel rims. Overhead console w/CB radio, GPS. Tuffy rear security drawer, Mile Marker 12,000 lb winch.
Paved roads are a fine example of needless government spending
#10
- Commander
-
- Group: GlobalMod
- Posts: 7,058
- Joined: 16-May 03
- Gender:Male
- Location:Palm Harbor, Florida
Posted 12 February 2006 - 08:02 PM
Jack H, on Feb 12 2006, 06:30 PM, said:
Rollbar, the offset tabs are only on bulbs that require they be inserted only one way. There are a lot of 12V bulbs with the tabs at the same level. Check at your auto parts store.
Thanks Jack, I never knew that
 , I just get the bulbs for waht vehicle I need & they were always offset. Ya learn something new every day.
RollBar
P.S. I'll let U know what I find.
*MY CJ IS YOUR yJ's DADDY*
'48 Willys; '74CJ5; '80CJ7; '84 CJ8; '86 CJ7
*Who Needs A Stinking Manual When You Have A Fat Wallet For Tech Support!*
*What man is a man who does not make the world better*
Support the Central Florida Bible Camp for kids
'48 Willys; '74CJ5; '80CJ7; '84 CJ8; '86 CJ7
*Who Needs A Stinking Manual When You Have A Fat Wallet For Tech Support!*
*What man is a man who does not make the world better*
Support the Central Florida Bible Camp for kids
#11
- Commander
-
- Group: GlobalMod
- Posts: 7,058
- Joined: 16-May 03
- Gender:Male
- Location:Palm Harbor, Florida
Posted 12 February 2006 - 08:07 PM
TheMajor, on Feb 10 2006, 12:41 AM, said:
Send me a blackout light!
Send me $55.00 for each one + shipping & I can order U one or two or U could just contact John from Midwest Military & get one from him, tell'em James from Ft.Pierce, Florida sent you, he may & I say may, give U a discount but I doubt it. :sneak:
RollBar

P.S. They won't work w/
 headlighted Jeeps.
  :sneak:
*MY CJ IS YOUR yJ's DADDY*
'48 Willys; '74CJ5; '80CJ7; '84 CJ8; '86 CJ7
*Who Needs A Stinking Manual When You Have A Fat Wallet For Tech Support!*
*What man is a man who does not make the world better*
Support the Central Florida Bible Camp for kids
'48 Willys; '74CJ5; '80CJ7; '84 CJ8; '86 CJ7
*Who Needs A Stinking Manual When You Have A Fat Wallet For Tech Support!*
*What man is a man who does not make the world better*
Support the Central Florida Bible Camp for kids
#12
- Second Lieutenant
-
- Group: Members
- Posts: 203
- Joined: 08-August 05
- Location:Texas City, Republic of Texas
Posted 18 February 2006 - 02:26 AM
12 volt Conversion 24 to 12
I converted my truck to 12 volts when I installed a Cummins 4BT out of a Chevy P30 van (bread truck). I figured that it was less expensive and a better match with other folks on the road to go 12 volts with the truck instead of converting the engine to 24 volts
Converting a M37 from one operating voltage to another isn't as hard as it might seem since the electrical system is pretty basic compared to a lot of other vehicles on the road. Basically, you have to change the regulator, generator, starter, lights, and any other electrical items such as gauges or wiper and fan motors. In some cases, you may find that an item can be left at 12 volts even though it was designed for 24 volts. This is the case with the heater fan, at 12 volts, it just puts out half as much air as it did before...
Conversion broke down into five major groups: lights, wipers, gauges, alternator, and fuses.
Lights
For the lights I replaced the light bulbs with equivalent 12 volt versions. Jeff Smith at www.mvpc.com has a nice chart showing 6, 12, 24 volt bulb cross references with identification drawings. A little dialectric grease was smeared on the base of the bulbs helps to prevent them from corroding and sticking to the bases in order to ease future bulb replacement.
Bulbs used in the conversion are:
--------------12V-----------------------------------------------------------24V
Application 12v Bulb Number====================24v Bulb Number (what I had before converting)
Small bulb in front marker lights and tailights, dash lights 67 or a 97 (both work)== 1251
Large bulb in tailights 1156 =======================1683
Headlight 55-60 watt H4 =========================70-75 watt H4
Turn signal indicator (in switch housing) 1445========== 313
I then converted the flasher unit from the military 24 volt solid state unit that I had been using to a generic 12 volt two pin flasher unit (got it at Pep Boys). You ignore the ground pin on the flasher harness in the truck and just take the other two pins on the cannon plug and connect each one to a pin in the civilian flasher relay. Eventually, I plan to install the flasher in a waterproof box with a cannon plug but it currently is just taped to the top of the steering column out of sight
Wipers
This was pretty easy as United Technologies makes the wiper motors that I was interested in using to replace the original vacuum units with in both 12 and 24 volt versions. I ordered the 12 volt versions and installed them as described on the Electric Wiper page.
Guages
This was another easy one. I replaced the entire set of guages with new Datcon units using the 12 volt versions. The truck had a mixture of electrically operated guages such as the fuel level and voltmeter (both worked) and mechanical ones such as the speedometer and the water temperature guage (both worked, but I kept breaking the speedometer drive cable at a hard bend near the transfer case). The guages are described on the Datcon Guages page.
Alternator
The Cummins came with a Delco 10SI already attached to it, so all I had to do was figure out how and where to connect the three wires coming off the alternator, and what parts of the original setup to remove. I disconnected the wiring harness plug from the original voltage regulator and removed the regulator from the truck leaving the bracket in place. I then cut wire #10 a few inches back from the plug leaving enough wire that I could splice a line onto the plug for possible future use. I then took a 8 guage wire and ran it from the battery box to wire #10 in order to provide power to the existing electrical systems in the truck. I then connected the large lead from the alternator to the starter post where the positive lead from the battery and slave connector are connected to the starter using a 8 guage wire. I ran a 12 guage wire from pin 2 (marked "F") of the alternator to the original ignition switch in the truck in order to provide the voltage signal to the alternator's internal voltage regulator. I then ran a 12 guage lead from pin 1 (marked "R") of the alternator to the tachometer as described on the Datcon Guages page.
More information on wiring up the Delco 10SI alternator can be found on the oldengine website.
Fuses
I decided that to seperate the new electrical items from the stock system in order to have an easier installation and to avoid overloading any of the circuit breakers. I purchased a FH-6HL ATO fuse holder that had a common power bus and dust cover from Terminal Town. The fuse holder is rated for six circuits at 30 amps per circuit. I mounted the unit on the bracket where the original voltage regulator had been bolted. I ran a 8 guage wire from the fuse holder to the battery box. Circuits on this fuse block are the starter, windshield wipers, and the engine cooling fan.
Headlight relay (installed after I purchased the M101 trailer)
When I purchased my M101 3/4 ton trailer, I changed the light bulbs in the trailer tailights from 24 volts to 12 volts for the ride home. A couple days later, after having reworked the wiring on the back of the M37 at the trailer plug in order to enable the turn signals on the trailer (trailer has newer style pin assignments on its plug than the outlet on the truck had, a description of the rewire is located on the M101 trailer page) I went went for a nighttime drive. As soon as I hit the highway, all of my lights went out. I went 1/4 mile down the road and the lights came back on as the circuit breaker cycled. Before I could make the loop around the block to my house, the circuit breaker had cycled on and off several times. In reviewing the situation, it became apparent that the addition of the tailights on the trailer had raised the current level through the circuit breaker above it maximum. Since I had replaced all of the bulbs in the truck and trailer with units of the same wattage as the original bulbs, but had converted to 12 volts, the current had doubled, and was now overloading the system.
After thinking about the problem for a while, and talking the situation over with a friend, I decided to isolate the headlight's current flow from the rest of the lighting circuit. Calculating the current draw from all of the lights showed that about a third of the current was being used by the headlights. Removing the headlight draw therefore would leave the circuit breaker handling rear and trailer lights, turn signals, parking, and dash lights (seven internally lit guages plus high beam indicator).
I had a Hella relay sitting in a tool box that I had never installed in another vehicle, so I dug it out and installed it on the bracket where the voltage regulator used to be mounted. It has a hole in a tab for a mounting screw that I opened up using a "G" drill bit to match the hole I drilled in the front face of the bracket. I then ran wires from the relay to the headlight dimmer switch and to a convenient power supply.
The relay is wired as follows:
Vehicle circuit 16 from three lever light switch to pin 86 of the relay (disconnected existing wire 16 from the headlight dimmer switch, plugged a new wire onto it and ran the new wire to former voltage regulator bracket where the relay is mounted).
Pin 85 of the relay to ground (used ring terminal on the wire to connect to the relay mounting screw).
Pin 30 of the relay to 12 volt positive (ran a line to the fuse block mounted on former voltage regulator bracket even though relay has built in fuse holder as it was a really short wire run...).
Pin 87 of the relay to the plug on headlight dimmer switch where circuit 16 had been plugged in.
I used Hella relay 4RA 003 510-361 (according to the inked stamp on box) or 87105 (according to sticker on box).
Selected wire lengths
Battery cables:
The battery to cut off switch is 60" and is routed from the negative post on the primary battery over to the switch under the driver's seat on the outside of the seat box. The wire from the battery cutoff switch to the frame is 33" long and it uses the brake return spring bolt that also has the slave cable ground attached to it on the frame beneath the driver's side of the cab as a grounding point. The battery positive to starter wire is 74" running down from the battery box to the frame and up to the right front of the engine. I am using a pair of new surplus inter battery cables to hook up pair of 12 volt batteries in parallel since I like the extra security of all those extra amps.
Smaller lines:
The fuse block 10guage wire from the battery positive to the block that is mounted on the old voltage regulator bracket is 117" long. The feed from the fuse block to the windshield wiper switch in the dash is a 14 gauge wire 45" long. The feed from the fuse block to the starter push button switch mounted in the dash is a 14 gauge wire 45" long.
Home
#13
- Commander
-
- Group: GlobalMod
- Posts: 7,058
- Joined: 16-May 03
- Gender:Male
- Location:Palm Harbor, Florida
Posted 18 February 2006 - 11:56 AM
Wow, Bill, thank you very much for taking the time to write up the info on the 24V system conversion.
JimII
JimII
*MY CJ IS YOUR yJ's DADDY*
'48 Willys; '74CJ5; '80CJ7; '84 CJ8; '86 CJ7
*Who Needs A Stinking Manual When You Have A Fat Wallet For Tech Support!*
*What man is a man who does not make the world better*
Support the Central Florida Bible Camp for kids
'48 Willys; '74CJ5; '80CJ7; '84 CJ8; '86 CJ7
*Who Needs A Stinking Manual When You Have A Fat Wallet For Tech Support!*
*What man is a man who does not make the world better*
Support the Central Florida Bible Camp for kids
#14
- Second Lieutenant
-
- Group: Members
- Posts: 203
- Joined: 08-August 05
- Location:Texas City, Republic of Texas
Posted 18 February 2006 - 06:21 PM
Ah.....It's copy and paste!!! Theres a Linky at the top.
#15

- Second Lieutenant
-
- Group: Members
- Posts: 242
- Joined: 21-December 05
- Location:Apopka, Florida
Posted 14 March 2006 - 06:41 PM
'Just wonderin'--have you retro-fitted the system to run on 12V or just looking to make replacing bulbs easier? Keep the faith man; stay with 24V!!! Besides, it would be nice to have more people to trade bulbs with! One of the Mighty Mite's headlamps is about to give up, but I obviously don't drive it alot at night (only one rear tail light and one brake light and NO turn signals, you know!) so I don't really mind other than that cloudy look they get right before they give up. Do you have any pics of the M170 that we could check out? I haven't the time to search the whole forum so maybe I've missed it.
Jeeptobetfest is October 23 & 24. Y'all come!
#16
- Commander
-
- Group: GlobalMod
- Posts: 7,058
- Joined: 16-May 03
- Gender:Male
- Location:Palm Harbor, Florida
Posted 14 March 2006 - 07:11 PM
I am doing a conversion since they are hard to come by & lot's of $$. I'm just going to switch to 12V bulbs in the lights I bought etc.
RollBar
Here is a link in the Vintage Corner, CJ8 to M170 Conversion. I talked about converting the Jeep to 24V but it would just be easier to keep it 12V. The CJ8 is pretty close except for the passenger side etc. I'm NOT gonna chop the passenger side since they didn't make to many CJ8's. I am going to get it as close to the M-170 as I can, even down to the canvas top ($1,200.00 + @ a later date). I Have to rebuild my 258 I-6 & I might swap it in but for now the 360 V8 stays. It's a fun project & costing $$ but it's what I want to do & have the best of both worlds, a modern system w/a vintage look. I did the Willy's thing etc. & wished I never lost it, maybe one day I will get another one cause that's where my hearts @.
Review the whole post to see what I'm trying to do.
*MY CJ IS YOUR yJ's DADDY*
'48 Willys; '74CJ5; '80CJ7; '84 CJ8; '86 CJ7
*Who Needs A Stinking Manual When You Have A Fat Wallet For Tech Support!*
*What man is a man who does not make the world better*
Support the Central Florida Bible Camp for kids
'48 Willys; '74CJ5; '80CJ7; '84 CJ8; '86 CJ7
*Who Needs A Stinking Manual When You Have A Fat Wallet For Tech Support!*
*What man is a man who does not make the world better*
Support the Central Florida Bible Camp for kids
Share this topic:


Page 1 of 1