JEEPTALK.net: 4 Point Harness w/OEM Seat - JEEPTALK.net

Jump to content

Page 1 of 1
  • You cannot start a new topic
  • You cannot reply to this topic

4 Point Harness w/OEM Seat

#1 User is offline   Jim B 

  • Commander
  • Group: GlobalMod
  • Posts: 8,692
  • Joined: 30-April 03
  • Gender:Male
  • Location:Davie, FL

  Posted 23 May 2005 - 03:27 PM

I really like my stock seat belt, it has served me & protected me well through out these years. The only thing I'm really getting sick off all these years is that when it locks on an incline and I get out to look, when I get back in the seat I'm not able to buckle them back up due to being off camber. This has always been a concern as it usually happens when you really need that belt.

I originally only wanted a good lap belt since the shoulder harness were not really going to get much use for the cost involved in proper attachment points. After thinking about it a bit and how I was going to do it without going to crazy with cost I decided to go forward and do the proper 4 point.

Discussion on a prior thread Lap Belts & Harness helped me make a lot of my decisions. :read:

Below were my personal goals:
1. Keep OEM stock Belt for normal use.
2. 4 point harness 2", both lap & shoulders. 3" too uncomfortable, 2" just as good.
3. Keep Stock OEM Seat.
4. If buying a seat keep away from the high sides for easy entry/exit. IMO due to the speed of our sport on the trail this side support are not really needed.
5. Keep a proper Shoulder Harness attachment point.

Since I was hoping to see if I can modify the stock OEM seat (saving money) I decided to splurge and get a good quality harness. As discussed on the above link that I listed above... there are cheaper alternatives. I called Schroth and talked them into breaking up a combination that was not part of their catalog. They also offered me an account for this type of setup in the event of future sales. We started with one of their basic setups to fit my needs (especially with the 2") & we modified from there.

Profi II-6H
Posted Image

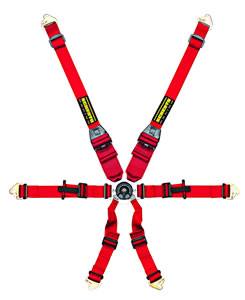
By looking at the above picture you will notice how the shoulder harness starts a 2" & ends at 3". I did not order the 5 point which is at the crotch area. The 5th point prevents submarining at high speed impacts. Since I am not racing a mustang at the track I found no need for this.

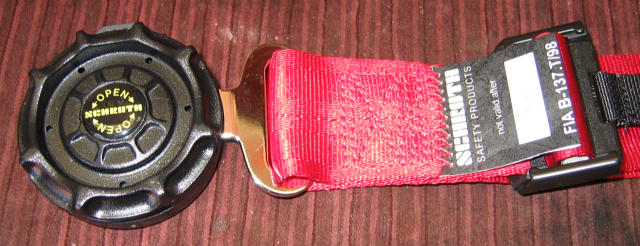
The next item was the cam buckle, I wanted the SL11 Aviation Buckle. The difference is that is has a release tab on top of the buckle that allows the release of the shoulder harness while still keeping the lap section connected. I found this to be very useful for my application. :question:

Below is a close up pic of the buckle which are made out of high impact resistant composite material.
Posted Image

Posted Image

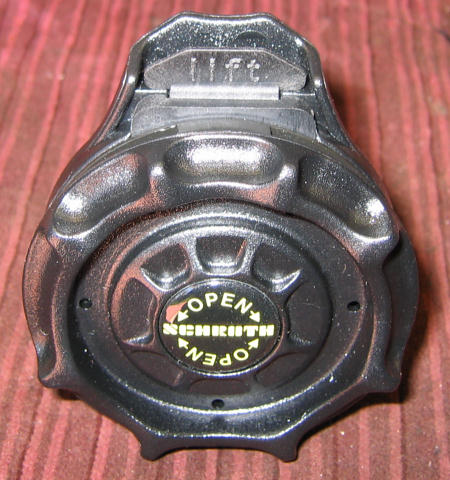
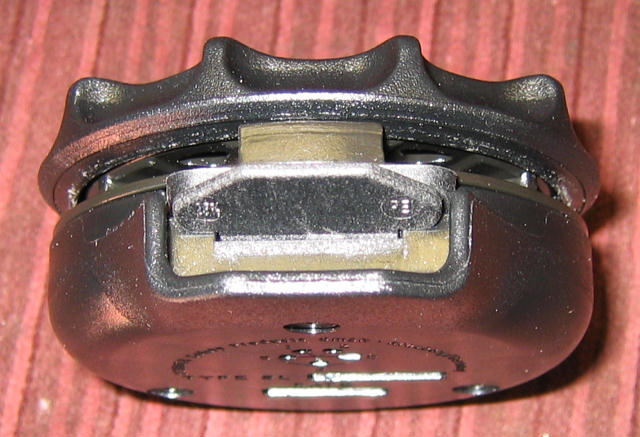
Take note of the tab on top of the buckle that releases the top shoulder section only. :ya: If you rotate or twist the buckle at any time they will all release at once.

When I got the package and saw the quality & workings of this belt I was very satisfied with the quality of this product. :good: I'm glad that I took this route as I was comparing it to other belts that I have seen in the past.

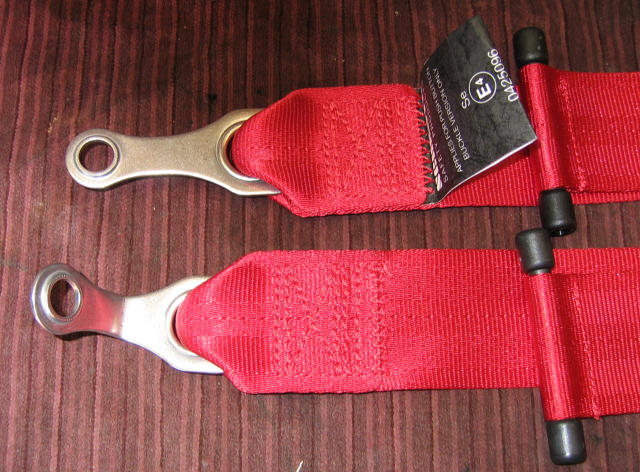
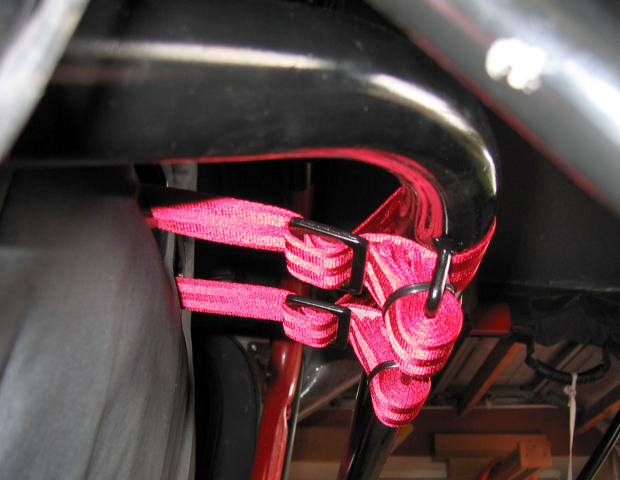
Below you will find a few close up pics of the lap belt.
Posted Image

Posted Image

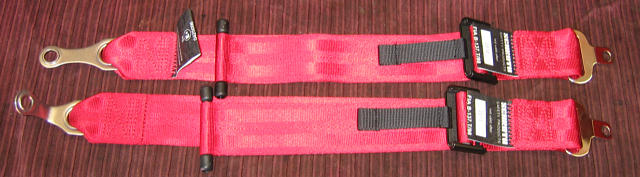
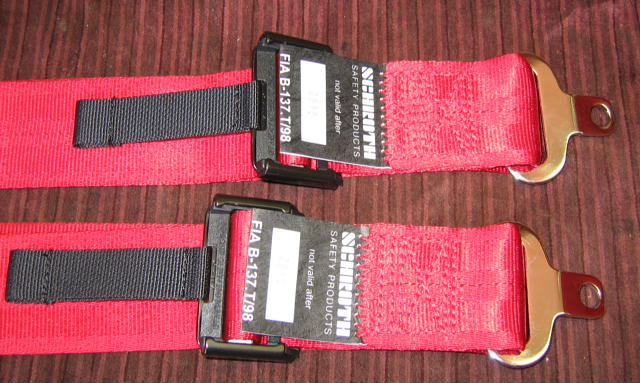
You will notice on the pic below how one of the metal tabs are bent, I will explain this later as they are normally straight.
Posted Image

Posted Image


Seats: Seating options that were available and what I personally decided to do.

There is a proper way to buy or modify a seat that will properly make the shoulder section work to hold you in place. A picture is worth a thousand words:

Posted Image

I first started looking at the different seats that were available from a few manufacturers to properly attach the harness... many to choose from. After spending a few days on and off speaking to different manufacturers, looking at different model seats & most importantly speaking & corresponding with other Jeepers that had seats I came to this conclusion....

Two Types: High & Low Sides.
Posted Image Posted Image

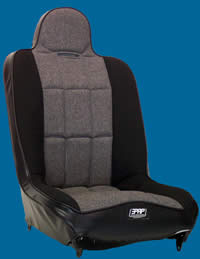
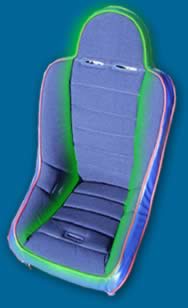
If your buying a seat, keep away from the high sides for easy entry/exit. IMO due to the speed of our sport on the trail, the side supports are not really needed. We get in and out way too much while on the trail and this will eventually get to be a bear. This was expressed to me by a few Jeepers I corresponded with that had the high sides, they all stated that if they had to do it again, they would purchase a low side.

Most after market seats that you will purchase will have a straight or non swivel back. It will also require an adapter bracket or a full replacement to make it fit in your Jeep. Plan to pay around $300 to $500 for a seat by the time is all said & done. I have to say that out of all the seats that I looked (if I was to purchase a seat), the Daily Driver made by PRP was my choice. They also made an adapter bracket for the Jeep instead of replacing the entire bracket system.

With all this in mind I decided that the stock OEM seat was not too shabby. :amazed: I thought to myself... what's the worst that can happen... ruin the seat... I guess I would have to buy one if I did. :cry: I wanted to save some money along with knowing that what I already had, worked well for me all these years. :ya: I tried to find info all over the place to see if anyone had modified the seat for this application, could not find anything. Someone advised that they saw one at a show that was modified but had no pics nor information on it. :down:

Modifying the stock OEM seat to accept a shoulder harness:

I looked at the shop manual to see what I was getting into. It showed a picture of the back rest frame being of tube with (what it looked like) sheet metal covering the entire area of the head rest, not much else was said on how to remove or install. This meant I had to take it apart to cut the sheet metal instead of just cutting the material & foam support from the outside. :1baby:

First: I ordered rectangular slots so it would not chew up the belts. I found them from a company called Corbeau. They originally quoted me $20 but when I go the bill it was $35. They are of two parts, front & back locking into each other. I made sure I had these in hand before undertaking stock seat modification. Part# GT7GT7 Harness Slots.

Before you start any of this... sit on the seat, take a ruler, lay it on top of your shoulder, measure and mark your shoulder height, you don't have to be exact but do try and get as close as possible.

1. You will need to remove the seat, four bolts with one star at rear passenger. Disconnect the electrical plug for the stock buckle sending unit.

Posted Image

2. Remove the pivot bolt that holds back rest to the bottom of the seat located on the passenger side. If you don't do this you will not be able to slide the zipper over the main bar.

3. Slide the entire back rest cover & foam support off the back rest frame. Your back rest frame is now completely exposed.

4. Measure the inserts (purchased or made), get as close to the shoulder height you previously measured, make a cut (larger than inserts, about 1/4 to 1/2" to allow spacing and alignment at the final install) on the sheet metal to the most outer part of the tube frame to create as much space in between the two cuts as possible.

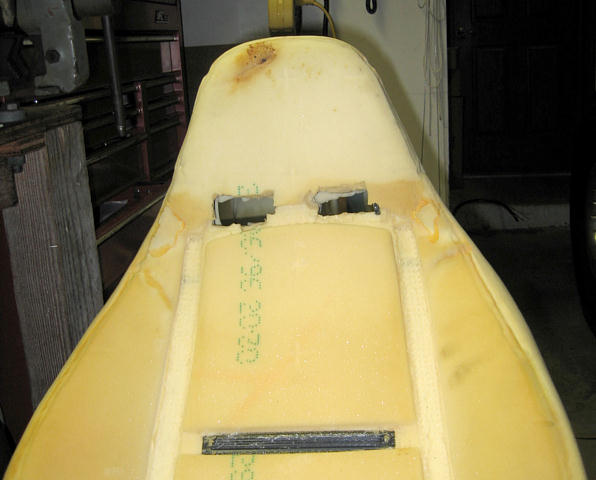
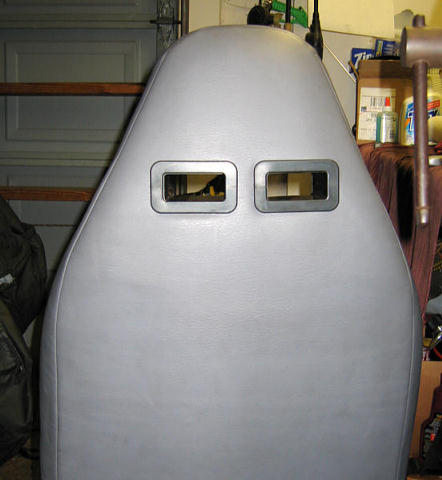
Below are back and front pics of the cut:
Posted Image

Posted Image

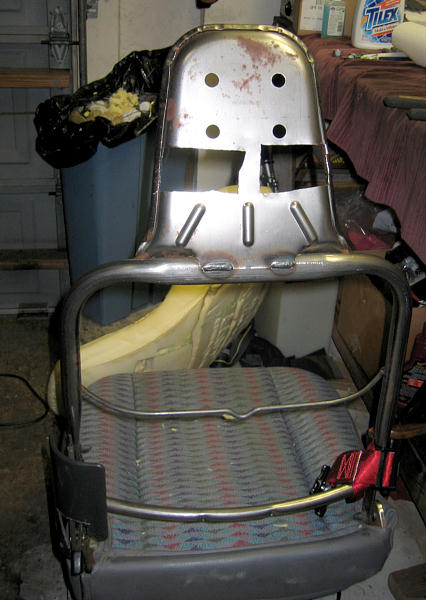
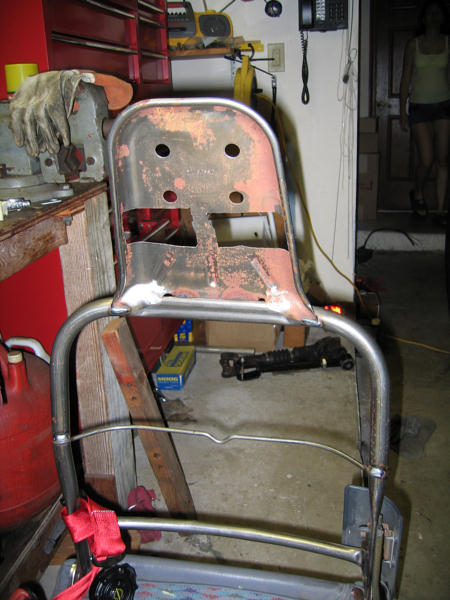
Notice that the cuts are not the most straight ones you have ever seen but as long as you get close enough and allow a gap, the inserts will align, give you support & adjustment for the inserts at the final stage.

5. Install the foam cushion back on the frame. Feel around, have patience and insert your favorite sharp object through what you think is the middle of both slots. Take a small scissors and start cutting away slowly making the hole bigger.

NOTE: Cut enough just to be able to push cushion out of the way with your hand and provide pressure to the insert as it is being installed. Make numerous try fits with the actual insert as often as possible until it slides all the way through. If you cut too much, your inserts will slide around, you then will need to go to the junkyard or buy a new seat. :cry: 
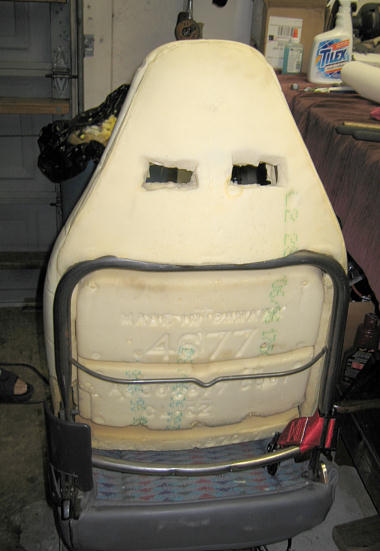
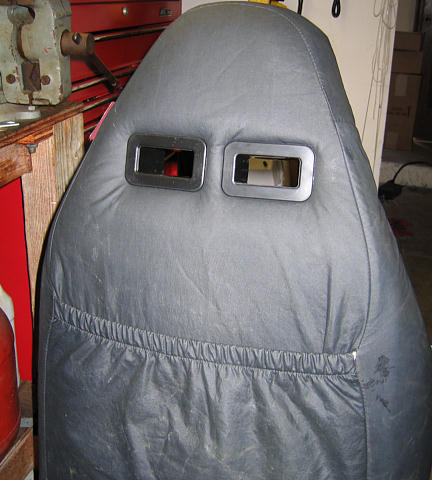
All cuts need to hug the insert and must not be larger than the outer lip.

Below are front and back pics of the cushion cut:
Posted Image

Posted Image

6. Install seat cover over cushion, make the cut following the instructions listed on #5.

Posted Image

7. Install the inserts from both the back and front side until the smaller bottoms out into the bigger one. Technically you are supposed to glue these so they do not pop out. I choose not too do so that I may install these over my seat covers allowing me to change out the seat cover in case it gets old & ripped.

Not gluing them created a problem because they would pop out (at least one did). I shaved a wooden dowel with a knife creating a wedge. I slid two of them between the corners of the inserts and they locked perfectly. Now I can remove & re-install the inserts anytime I wish.

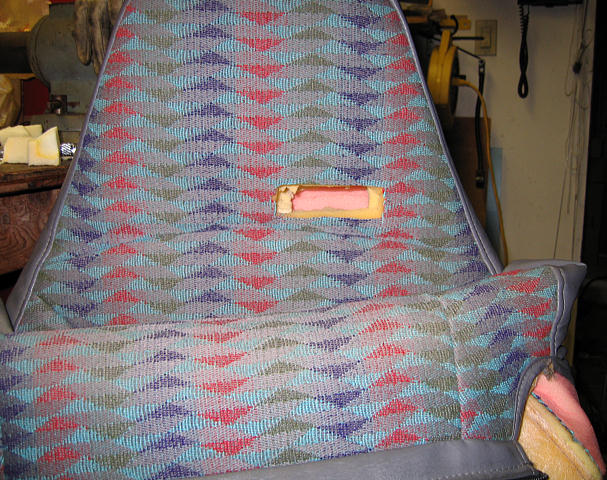
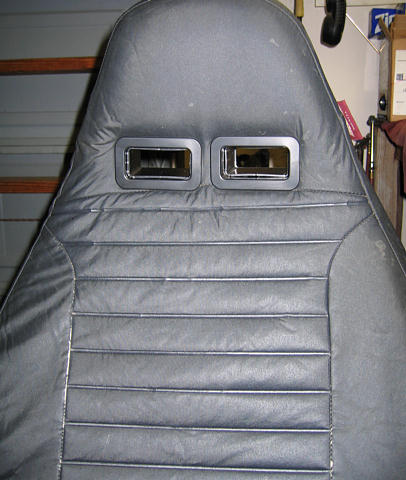
Below are pics of the finish inserts on the seat cushion & on the seat cover:
Posted Image

Posted Image

Posted Image

Posted Image

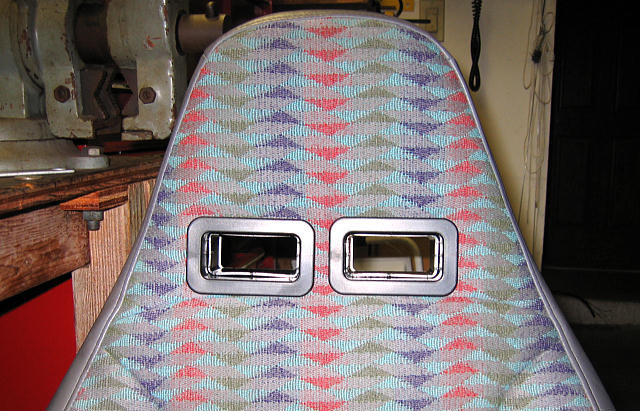
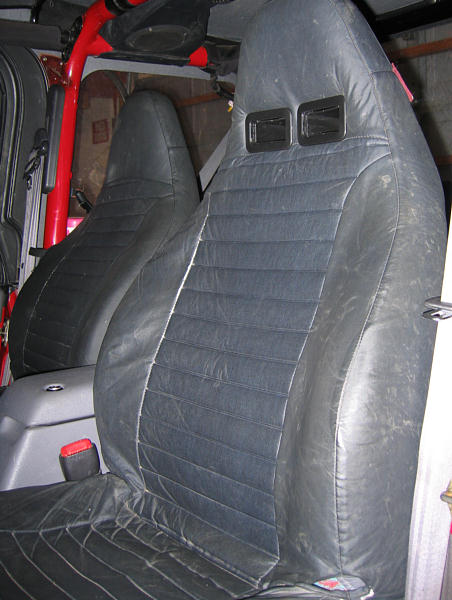
Picture of the finished stock OEM seat back on the TJ:
Posted Image


Installing The Lap Belt Section:

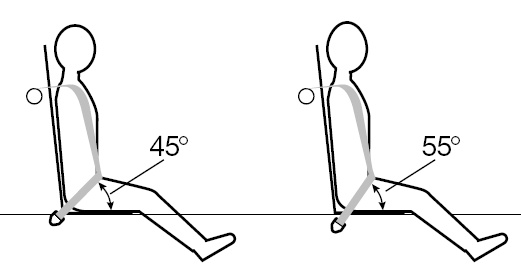
Attachment points must provide optimum geometry to minimize movement of the lap belt. Lap belts perform best when they act at an angle between 45° and 55° relative to the longitudinal axis of the vehicle. This angle permits the lap belt to react to the upward pull of the shoulder harness. A system installed with a shallow belt angle, permits the shoulder harness to pull the lap belt up off the pelvic area and into the abdominal region with the likelihood of injury to internal organs. Using the stock point of attachments insured me of this. If you are going to have other attachment points, please make sure to follow this rule.

Below is a pic of the graph outlining more detail.
Posted Image

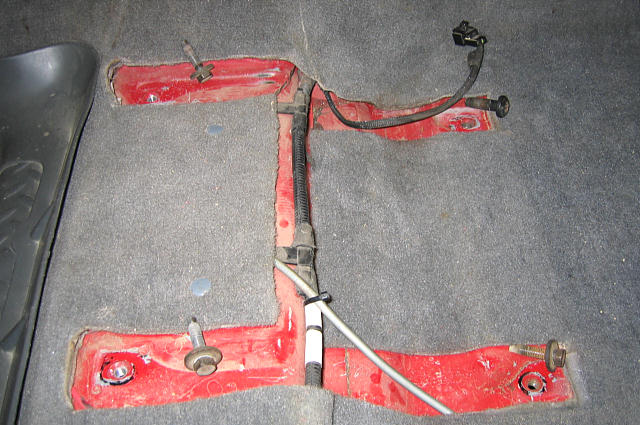
1. Remove the Star bolt located at bottom of the stock belt housing near the inside driver side rocker panel.

Posted Image

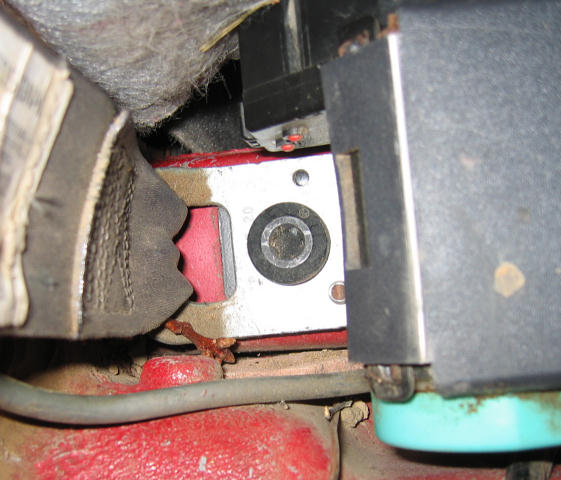
2. Remove housing, all should come out in one unit.

Posted Image

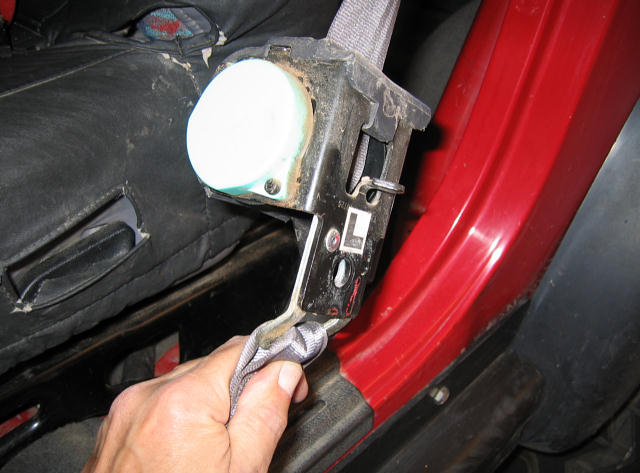
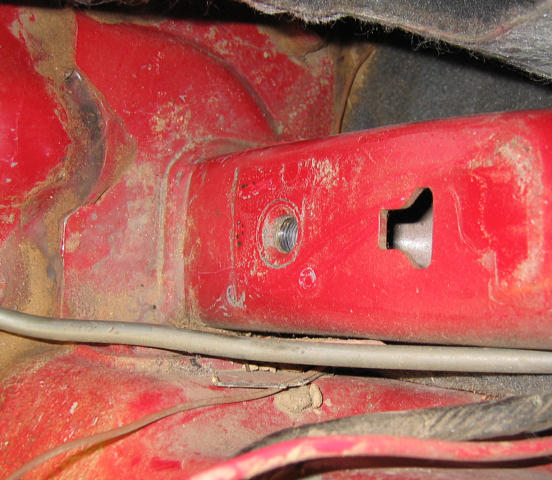
Take note and look down at the slots on the stock tube frame to get an idea how to re-install the housing.

Posted Image

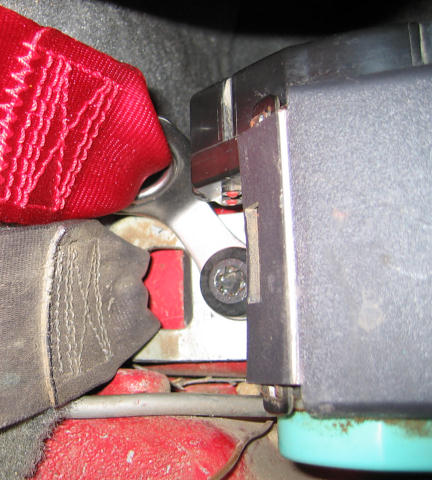
3. Install the lap belt driver side belt piggy back on the stock bolt bracket mount. The lap belt mounting tabs usual come straight. As you can see on the pic below I put a bend on them so that they clear & don't rub against anything.

Posted Image

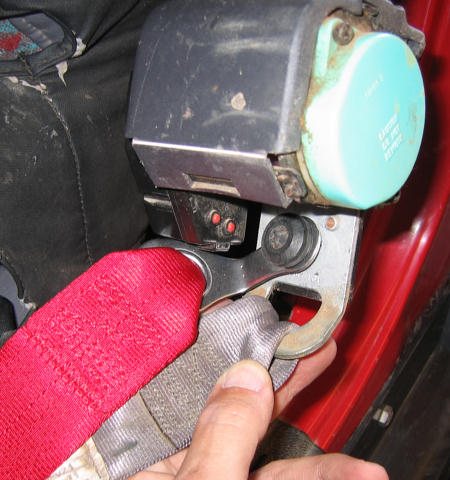
4. Install belt housing back on the vehicle. Notice the clearance of the stock & lap belt. They do not interfere with each other nor rub against anything.

Posted Image

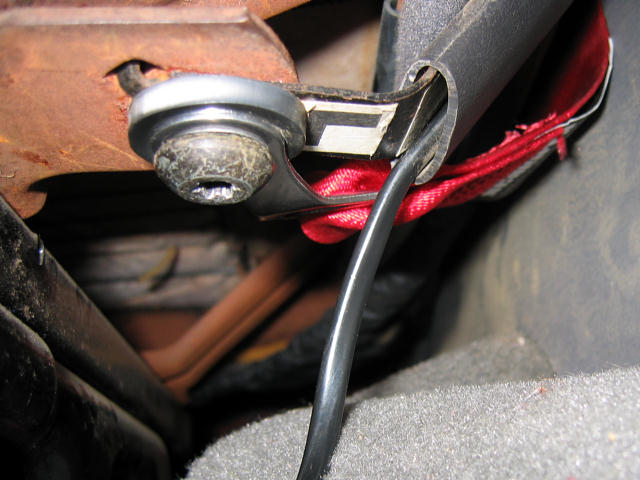
5. Remove the OEM driver seat buckle bolt located underneath the seat on the right side.

Posted Image

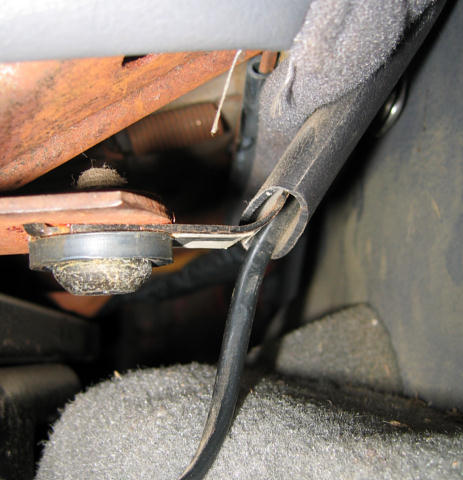
6. Piggy back the lap belt mounting tab on the same bracket using the same OEM bolt. You will notice that I also bent the mounting tab of the lap belt for better positioning and clearance.

Posted Image

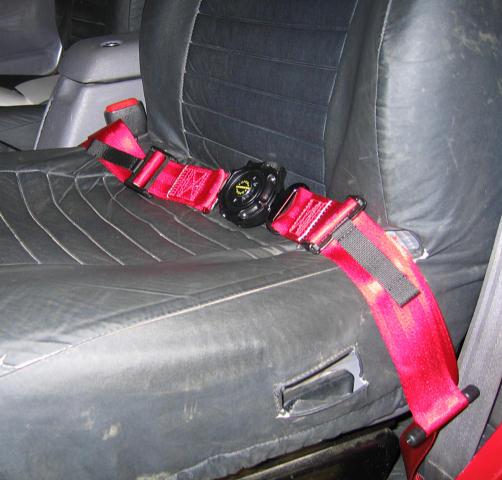
Below you will see the finish lap belt which is what some people just want to do rather than the additional 4 point harness. I forgot to mention that the cam buckle will stay on either the left or the right side (depending on how you ordered it) of the lap belt when released.

Posted Image


Choosing the Proper Shoulder Harness Attachment Point.

In order to choose & install the proper attachment point we first need to understand a few things.
Look at the picture below.

Posted Image

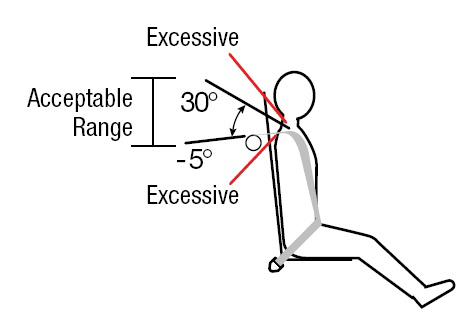
Shoulder harnesses should NOT be anchored more than 1 through 4"s below shoulder height. Mounting below this height may cause additional spinal compression.

In an accident situation, the shoulder belts pull down and back on the torso as they resist the forward motion of the driver. The resultant restraint force compresses the spinal column and will add to the stresses in the spine already caused by the force of the crash impact.

The end attachments of the shoulder harness must also be installed at appropriate angles. The ideal position is anywhere between 5° below and 30° above the driver’s shoulder. If the trailing ends of the harness are too far above the shoulder (greater than 30°), then two problems can occur. First, tension in the shoulder harness is increased and undue stress is applied to the harness and its structural attachments. Second, excessive angle will cause excessive motion. If the harness belts are too far above the shoulder, they will provide little resistance to forward motion of the driver’s upper torso. The result is impact with the steering wheel and the possibility of neck injury. The shoulder straps should also be 3 to 6"s apart behind the driver's neck to prevent slippage off the shoulders.

With this in mind, below you will find some pics of Proper and NOT so Proper attachment points. Some are being sold without knowing.

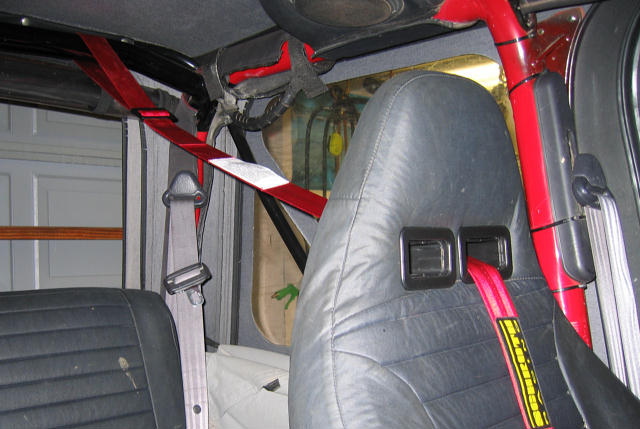
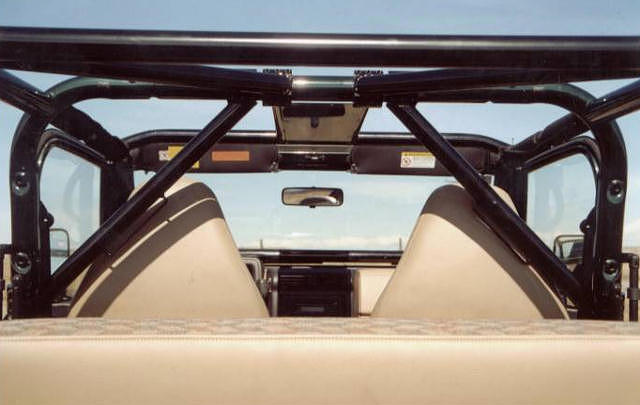
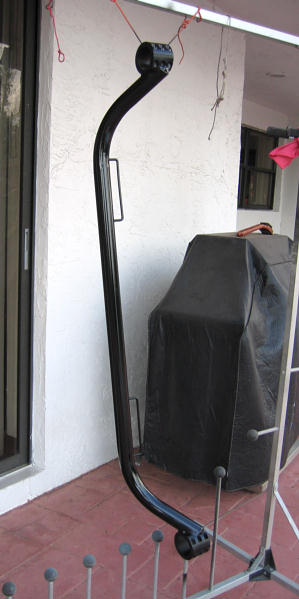
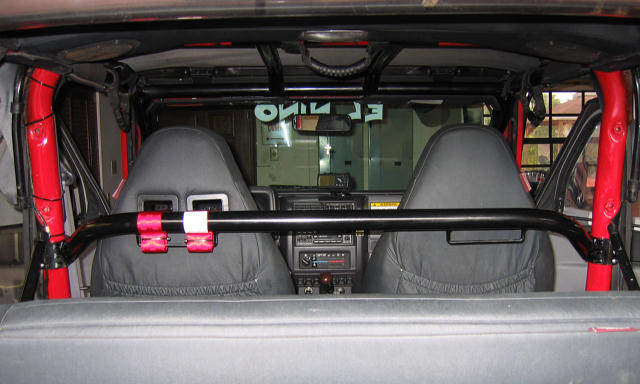
1. Here you have an install spreader bar on the top rear ears, I actually thought this would be too high but when I measured it with an angle finder I was 28 degrees which makes this an acceptable method since we are not exceeding the 30 degrees above shoulder.

Posted Image

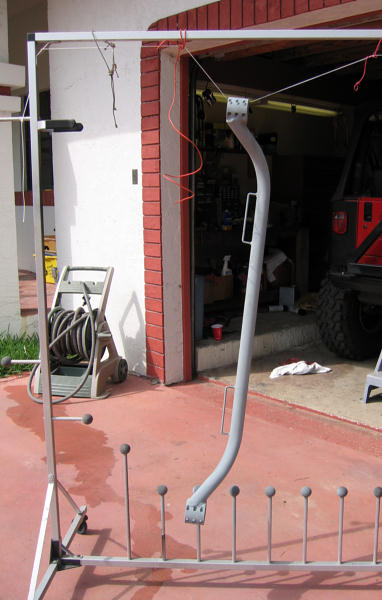
2. This is the perfect bar in my opinion made by Rock Hard 4x4. If you have a tube bender you can probably make one yourself. I choose not to since I did not want to do any trial error with the angles and the Rock Hard had beefy clamps (shown later on the install) allowing me not to have the bar welded to be removed at any time.

Posted Image

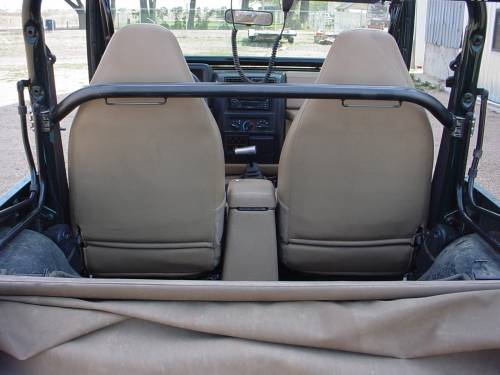
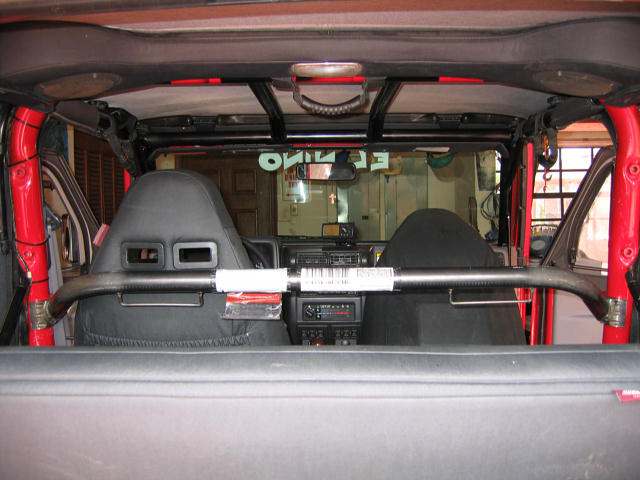
3. The next one is also made by Rock Hard 4x4. This IMO is incorrect and will NOT provide a correct attachment point even though the shoulder harness can be attached. I don't believe they actually know this and are selling them to please some of the people that want to still have an easy entry to the back seat.

Posted Image

I decided to do the number the #2 option. The #1 option would have been cheaper since I already had this brace but would have left things dangling a bit getting in the way of passengers along with a continuing concerns of the kids playing around in the back seat under normal situations. One quick note: When I received & installed the #2 option it was not bad at all getting to the back seat as I though it would be.

On to the #2 Attachment Point Install:

Before I install anything on the TJ I usually make sure everything fits. I truly believe there is no such thing as bolt on. I have to say that this has to be as close to bolt on as I have ever seen. The clamping ends were of good quality and the bar fit well around the tubes with some help from the hammer and a small wooden block. Let's just say that I will be selling this bar on my Cyber Store currently under development. :good:

1. Remove passenger seat belt attachment point at the top of the stock bar, 3 star bolts. You need to do this because of the angle that you must bring the bar in will not permit the clearance needed. :ya:

Posted Image

2. Make sure everything fits and aligns properly. Measure the height, get it as close as you can to the slot inserts on the seat. In the picture below, it still needs to come up a bit.

Posted Image

3. Remove, prime & paint. I used about 4 coats of a Cold Galv spray for priming after I cleaned and Acetone the bare metal. Used about 4 good coats (hour a part) of the final black spray paint.

Posted Image Posted Image

You will notice from the above pics my excellent paint booth. :grin:

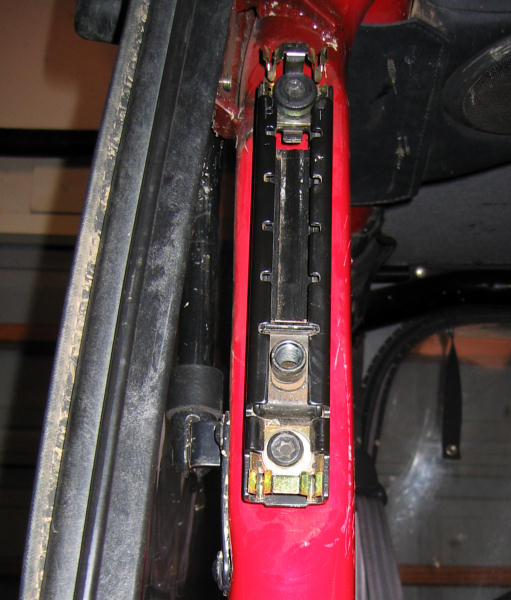
4. Install the bar after a few days of drying. Notice the quality of the end clamps with 6 bolts. This thing is not going anywhere. :question:

Posted Image

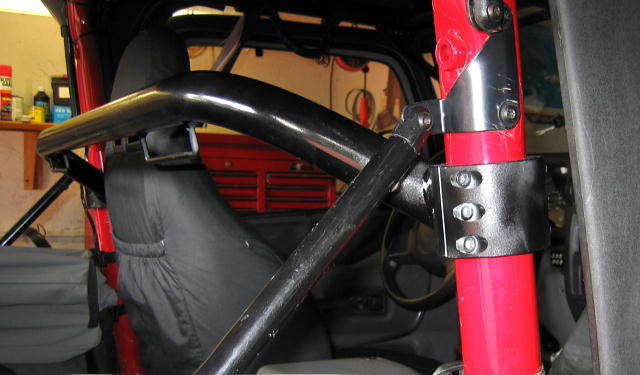
Check out the angle and the spacing from the front seats.
Posted Image

5. Install both the shoulder harnesses. Make sue that the buckle clip is fastened properly, there should be no movement.

Posted Image

Picture from below. Notice that I rolled the excess of the belt and wire tied to the bottom supports of the bar. Did not want to cut them in case I ever sell them or decide that my needs have changed and need to install it a different way.

Posted Image

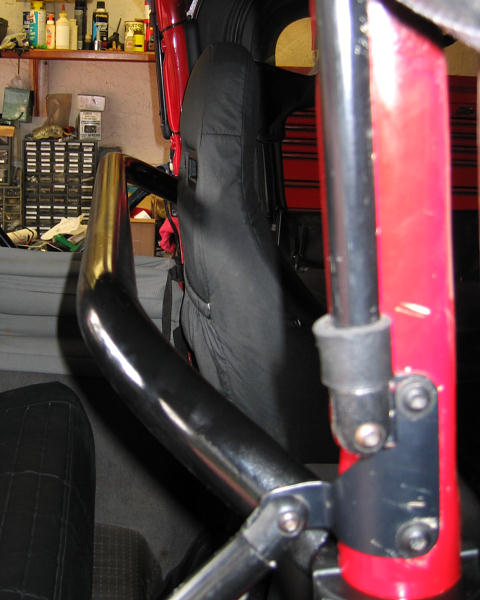
Side view from the opposite side so that you can see the angle coming into the slots.
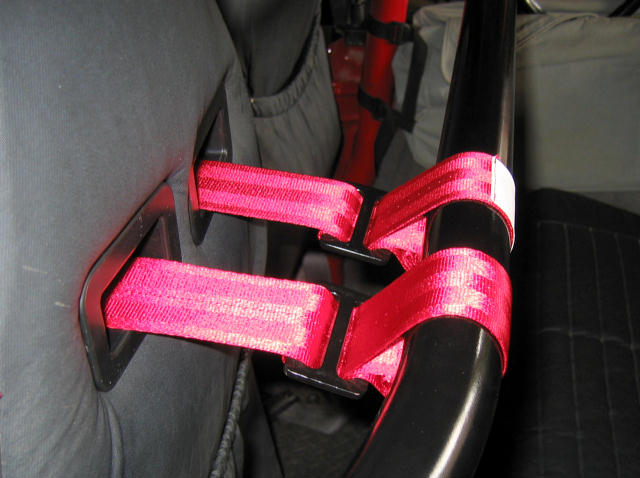
Posted Image

Finished back view.
Posted Image

Shoulder harness belts lay nicely on the sides of the OEM seat towards the rear. They don't move nor are in the way of anything when not in use.

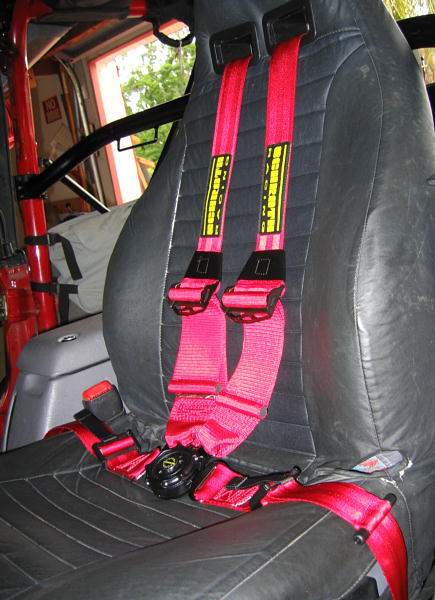
Below is a pic of everything connected.
Posted Image

Overall this was not a hard install by no means, I'm sure there is plenty of other ways of doing it, let's post up if you have some additional info. I do have to say that I probably have the only pics on the net with regards to modifying the stock OEM seat, I really tried to find info on this but came up empty. Feel free to share with anyone in hopes of helping someone putting this to use. :lazy2: :ya:
Posted Image Posted Image
El Niņo
Experience is defined as something you get, after you need it.
Give the world the best you have. The best will come back to you...

There are no rules for good photographs, there are only good photographs.
"Thou shalt not bear false witness against thy neighbour." 9th Commandment.
"Speak not Evil of the absent for it is unjust." George Washington, Rule 89 of Civility and Decent Behavior.
Wheeling Gallery ----- E-Mail
Life Member: South Florida Jeep Club

#2 User is offline   Rambo 

  • Brigadier General
  • Group: Members
  • Posts: 3,188
  • Joined: 18-May 04
  • Gender:Male
  • Location:GUAPERIA OFF-ROAD READY PA TU MUNDO

Posted 23 May 2005 - 03:32 PM

nice job... :question:
Posted ImagePosted Image

GUAPERIA OFF-ROAD READY PA TU MUNDO

visit 5050offroad.com

#3 User is offline   Livefree 

  • Major
  • Group: Members
  • Posts: 712
  • Joined: 05-February 07
  • Gender:Male
  • Location:Ocala, Florida

Posted 23 May 2005 - 06:58 PM

Nice write up. Looks like a clean installation.
2002 JT X, 35" MTR Kavlar Goodyear tires, Trail Ready 15"x 10" aluminum Beadlock Rims. Ox Lockers both axles, Currie Anti-Rock, Dana 44’s with Chromoly axles , Custom bully up, Warn 9500ti, 4” long arm lift, 1-1/2” body lift, 1” motor mount lift and more. Atlas 2 speed Transfer case, Custom High Steering and Tom Woods Front and rear Drive shafts. Sniper Fab front Bumper, and Jeeperman Rear. T&T Zero HI line front fenders and corner wrap skins with 4" LED tail lights.

#4 User is offline   YJWhenUCanTJ 

  • Captain
  • Group: Members
  • Posts: 555
  • Joined: 26-December 04
  • Location:Mall Crawlin'

Posted 23 May 2005 - 07:50 PM

A1 job there Jim. Almost inspiring to do that myself. Very clean, VERY functional. :question: :question:
David M.
2003 Sport
Posted Image

#5 User is offline   Mr.Bead 

  • First Lieutenant
  • Group: Members
  • Posts: 325
  • Joined: 07-July 03
  • Gender:Male
  • Location:Miami, FL

Posted 24 May 2005 - 01:01 AM

jim,
that came out really nice, almost looks like factory. :question:

Lee :question:
2001 TJ SAHARA, sitting on jackstands in my garage 1/2 built............ Dreaming of wheeling it again soon

#6 User is offline   JeepinIan 

  • Major General
  • View gallery
  • Group: Members
  • Posts: 3,384
  • Joined: 01-May 03
  • Gender:Male
  • Location:Miami, Fl USA

Posted 24 May 2005 - 05:52 AM

Good write up. One question, did you ever get that hair out of the paint on the cross bar you installed? :question: :question:
Ian Stewart

If you don't fight for the trails, there won't be any trails to fight for.

What you get by achieving your goals is not as important as what you become by achieving your goals.
Zig Ziglar

"War is an ugly thing, but not the ugliest of things. The decayed and degraded state of moral and patriotic feeling that thinks that nothing is worth war is much worse. The person who has nothing for which he is willing to fight, nothing which is more important than his own personal safety, is a miserable creature and has no chance of being free unless made and kept so by the exertions of better men than himself." ....

John Stuart Mill

#7 User is offline   Jim B 

  • Commander
  • Group: GlobalMod
  • Posts: 8,692
  • Joined: 30-April 03
  • Gender:Male
  • Location:Davie, FL

  Posted 24 May 2005 - 07:16 AM

Well fellows, I'm glad you liked it, glad I created a future inspiration. :blind:

With regards to the hair on the paint of the cross bar.... got it out :clap:
Drove me nuts so I'm going to have to design a better paint booth. :tease:

Told the kids there was a new monkey bar in the back seat, it's already been broken in and they can't wait till we leave in a few weeks. :yahoo:
Posted Image Posted Image
El Niņo
Experience is defined as something you get, after you need it.
Give the world the best you have. The best will come back to you...

There are no rules for good photographs, there are only good photographs.
"Thou shalt not bear false witness against thy neighbour." 9th Commandment.
"Speak not Evil of the absent for it is unjust." George Washington, Rule 89 of Civility and Decent Behavior.
Wheeling Gallery ----- E-Mail
Life Member: South Florida Jeep Club

#8 User is offline   hiway 

  • Second Lieutenant
  • Group: Members
  • Posts: 290
  • Joined: 28-January 05
  • Location:Enola, Arkansas

Posted 25 May 2005 - 07:38 AM

:blind: Man, that looks great! Hey, what is that welded on plate above the shoulder belt adjuster on the drivers side? It's at the door top on the main hoop. Just wondering. Nice write-up. :tease:
97 TJ Sport, 4" Superlift, 15x10's, 33" MTR's, Flowmaster, 8000# winch, doodads. 4:10's ready Posted Image

#9 User is offline   Tracy 

  • Second Lieutenant
  • Group: Members
  • Posts: 290
  • Joined: 18-May 03
  • Location:Palm City, FL

Posted 25 May 2005 - 08:02 AM

Excellent write up Jim! :jump:
another thing to add to the list :tease:
Red Beetle

#10 User is offline   Frank YJ 

  • Captain
  • Group: Members
  • Posts: 609
  • Joined: 22-January 04
  • Gender:Male
  • Location:Comer, GA

Posted 25 May 2005 - 09:24 AM

Very Good Write up Jim...
93 yj lifted snorked, soon to be locked "crunchy"
80 cj5 383 1tons propane "greenie"
1949 CJ3A "turtle"
1955 & 1950 willys pickup
02 ford superduty tow rig
07 chevy aveo

#11 User is offline   Jim B 

  • Commander
  • Group: GlobalMod
  • Posts: 8,692
  • Joined: 30-April 03
  • Gender:Male
  • Location:Davie, FL

  Posted 02 June 2005 - 10:29 AM

hiway, on May 25 2005, 07:39 AM, said:

what is that welded on plate above the shoulder belt adjuster on the drivers side?  It's at the door top on the main hoop.

Hiway,

That is a welded brace on both sides that is tapped to support my exo cage on the outside.

Pics of the Exo Cage. :cool:
Posted Image Posted Image
El Niņo
Experience is defined as something you get, after you need it.
Give the world the best you have. The best will come back to you...

There are no rules for good photographs, there are only good photographs.
"Thou shalt not bear false witness against thy neighbour." 9th Commandment.
"Speak not Evil of the absent for it is unjust." George Washington, Rule 89 of Civility and Decent Behavior.
Wheeling Gallery ----- E-Mail
Life Member: South Florida Jeep Club

#12 User is offline   Bevis 

  • First Lieutenant
  • Group: Members
  • Posts: 371
  • Joined: 02-June 03
  • Gender:Male
  • Location:Moore Haven, FL.

Posted 15 January 2006 - 08:34 PM

How did I ever miss this.... :thumbsup: Was talking about it on a ride with a fellow club member today. I like this idea Alot....Good Job Jim :2thumup:
97 TJ 2.5L, RE 5.5, 1" BL/MM, 35x12.50 BFG MT
Few Dents/Scratches From Roll @ Tellico
...and that tree in Ocala

Caloosa Jeepers Florida Jeepers

"Good News, If you woke up breathing. You have another chance"

#13 User is offline   Jim B 

  • Commander
  • Group: GlobalMod
  • Posts: 8,692
  • Joined: 30-April 03
  • Gender:Male
  • Location:Davie, FL

  Posted 16 January 2006 - 08:30 AM

Bevis, on Jan 15 2006, 08:34 PM, said:

How did I ever miss this.... :thumbsup: Was talking about it on a ride with a fellow club member today. I like this idea Alot....Good Job Jim :gossip:

Glad you found it and hope it helps out. :ya: Take some pics and post them up here when you finish. :2thumup:
Posted Image Posted Image
El Niņo
Experience is defined as something you get, after you need it.
Give the world the best you have. The best will come back to you...

There are no rules for good photographs, there are only good photographs.
"Thou shalt not bear false witness against thy neighbour." 9th Commandment.
"Speak not Evil of the absent for it is unjust." George Washington, Rule 89 of Civility and Decent Behavior.
Wheeling Gallery ----- E-Mail
Life Member: South Florida Jeep Club

#14 User is offline   Bevis 

  • First Lieutenant
  • Group: Members
  • Posts: 371
  • Joined: 02-June 03
  • Gender:Male
  • Location:Moore Haven, FL.

Posted 16 January 2006 - 08:31 AM

will do.
97 TJ 2.5L, RE 5.5, 1" BL/MM, 35x12.50 BFG MT
Few Dents/Scratches From Roll @ Tellico
...and that tree in Ocala

Caloosa Jeepers Florida Jeepers

"Good News, If you woke up breathing. You have another chance"

#15 User is offline   david97jeep 

  • Sergeant FirstClass
  • Group: Member
  • Posts: 46
  • Joined: 26-August 05
  • Location:Lauderhill, FL

Posted 16 January 2006 - 07:47 PM

I love the write up on the seats, very nice pic. Is that roll cage your design or bought from dealer. I like the whole thing, great job!!!

:naughty: :naughty: :amazed: :2thumup:
1997 TJ Wrangler 2.5 Lt. five speed
American racing wheels and KNL air filter redid everything under the hood, so it will run for ever!!
Front push bar and dayrunner KC lights.
Just added new seats, tow hitch, and center console and soon add a 3 or 4 in lift and 31x10.50R15

#16 User is offline   Jim B 

  • Commander
  • Group: GlobalMod
  • Posts: 8,692
  • Joined: 30-April 03
  • Gender:Male
  • Location:Davie, FL

  Posted 17 January 2006 - 10:52 AM

Kw-tj: had posted this information on the Florida Forum which I thought was good to copy here for additional ideas on how to attack this project.

Quote

Kw-tj wrote: Have done that on my TJ seats, but made a leather pass thru tongue instead of the plastic insert. One thing not mentioned in that how-to is that the stock seat cover is glued to foam at the seams. If you break those glue lines the cover won't fit down into the "grooves" when you put it back on. I removed foam and cover in one piece to preclude that possibility. Here's another link for a mod similar to what I've done (but on a Fiero seat) with the "tongues"

Quote

Jim B wrote: You bring up some good points. You are correct with regards to the seams, however I did not have any problems getting them back to fit into the groove, was expecting them to move slightly but they did not, there are also special glues you can use. You can look at the fit on the pictures. I did not want to take a chance being off on the outside material since you are working blind. The problem here is aligning it up with the sheet metal. If you can get the entire thing out and make your cut, yes it would be best.

With regards to the leather inserts vs plastic. Good idea but I was worried about movement and eventually cutting the leather (or any other kind) insert and harness with the sheet metal frame to the side. If you cut too much of the sheet metal, it will be sloppy and will not provide support for the harness upon a rollover. The harness will move inside the foam.

How much of the sheet metal did you cut ( you would still have to leave the outside frame for support), where did you tie in your harness in the rear? If you take your harness and pull sideways and up hard do you get any movement? Got any pics of the TJ? Thanks.

I did not want to take a chance being off on the outside material since you are working blind. The problem here is aligning it up with the sheet metal. If you can get the entire thing out and make your cut, yes it would be best.

Quote

Kw-tj wrote: What I did was to remove cover w/foam intact, just slid it up and off. Was able to mark on sheet metal where pass thru needed to be cut relative to fabric and foam. Did you remove the cover from foam before you removed foam from frame?

Made 2 rounded rectangular slots in sheet metal slightly wider than my 3" harness straps, protected with door edge protector mold. Very little movement possible. For now I've gone to original upper rear seat belt mounting point on roll bar, using a Y style harness so only one strap back to bar. Angle is pretty good, only slightly off to side and a real good height. Maybe can get some pics when I do the passenger seat soon as I get the time.. Never seem to remember to take pics while in the heat of the project - will try to remember this time.

BTW that was a good write-up you did. Think you could use the inserts like you did without removing cover from foam if you cut fabric/foam holes first and then marked sheet metal for that cut. Only trick would be to know exact width of headrest metal so you can position cuts before removing , I'll measure that when I do the next one. Might make it easier for the next guy. I had to remove back first to find frame position and put it back on to position cuts in upholstery only to remove again after marking to cut sheet metal.

Quote

Jim B wrote: Yes I did remove the seat cover first.  For some unknown reason it was not releasing so I took out the cover.

Nice touch on the door protectors on the inside sheet metal.  I was going to use inserts so there was no need for me to do this.

Another point I want to make is that I personally do not like they Y style harness like you are using.  I've seen a few on with some of the people I wheel and they tend to rub on your neck or get too close, this was my experience when I tried them.  You might not have this problem but most that I speak to that have them say the same thing.  By installing the split belt I though of it best to use the inserts which I'm glad I did.

You will notice that most racing setup are split and not Y.  I'm glad you are getting a good angle height on your attachment as this is very important.  If you have some time before you do the other you might want to post some pics of your end result with your attachment points as there is always more than one way to skin a cat.

Quote

Think you could use the inserts like you did without removing cover from foam if you cut fabric/foam holes first and then marked sheet metal for that cut. Only trick would be to know exact width of headrest metal so you can position cuts before removing

You've answered your own question. Since I could not find anyone that had done this before I was working blind because I did not know what the frame looked like underneath or if there was even one there. If you try this you will have to remove and install a few times.

Posted Image Posted Image
El Niņo
Experience is defined as something you get, after you need it.
Give the world the best you have. The best will come back to you...

There are no rules for good photographs, there are only good photographs.
"Thou shalt not bear false witness against thy neighbour." 9th Commandment.
"Speak not Evil of the absent for it is unjust." George Washington, Rule 89 of Civility and Decent Behavior.
Wheeling Gallery ----- E-Mail
Life Member: South Florida Jeep Club

#17 User is offline   Jim B 

  • Commander
  • Group: GlobalMod
  • Posts: 8,692
  • Joined: 30-April 03
  • Gender:Male
  • Location:Davie, FL

Posted 18 January 2006 - 08:50 AM

"kw-tj" said:

What I was able to do was to reach under the cover in the back and lift cross bars past the slots in the foam. It then slid off intact - took a little persuasion.but is doable. Spray silicone spray on frame to make it easier to put back on.

The Y in the harness is behind the seat,  have two slots in seat so there is no problem with seperation.  Y harness is no longer SFI.16 compliant but the V style is still allowed and effectively the same,  usually they bolt or wrap the V around the harness bar.  The Y style allowed me to run just one 3" strap back to roll bar.

I'm glad it worked for you. What I personally found out it that the 2" shoulder harness is more comfortable around shoulders, neck & much lower profile on the install vs the few 3"s that I tried. If you look at my pics you will notice that mine are in compliant and they are 2".

Quote

I will make a pattern template of the sheet metal headrest when I do the passenger seat. Should be able to post that also, it would simplify installation for the next guy.

Excellent idea. If I had this it would have really made the install easier to deal with. If I'm not mistaken I could not find anyone that had done this before I did and it is hard to be the pig pioneer. :innocent:
Posted Image Posted Image
El Niņo
Experience is defined as something you get, after you need it.
Give the world the best you have. The best will come back to you...

There are no rules for good photographs, there are only good photographs.
"Thou shalt not bear false witness against thy neighbour." 9th Commandment.
"Speak not Evil of the absent for it is unjust." George Washington, Rule 89 of Civility and Decent Behavior.
Wheeling Gallery ----- E-Mail
Life Member: South Florida Jeep Club

#18 User is offline   Dri-washjeepster 

  • Staff Sergeant
  • Group: Members
  • Posts: 35
  • Joined: 18-November 05
  • Location:Deltona, FL

Posted 29 March 2006 - 04:36 PM

Jim B. Thanks for a great, how to article. Here are pic of my seats. Your instructions were very clear. It took myself and a freind about an 1 1/2 hrs and the seat was back in. The holes for the pass threws we cut just about 1/8 th inch bigger in the steel head rest.

http://smg.photobucket.com/albums/v510/Dri...jeepster/seats/

Thanks again,

Tom
97 TJ, 4.0 L, Flowmaster 40, Locked, 1" BL, Flatty Fenders, On Board Air, Superwinch EP 9.0, Sync Winch Rope, Daystar Custom Bumper/Brush Guard, 5" Lift, 35X12.50 Baja Claws, HI-Lift Jack, CB, K/N, BanksHeader, Safari Snorkel, Shrockworks Rocksliders, Bevis bumper w/tire carrier/rack, GPS, JKS Quick Disc.

#19 User is offline   Rollbar 

  • Commander
  • Group: GlobalMod
  • Posts: 7,058
  • Joined: 16-May 03
  • Gender:Male
  • Location:Palm Harbor, Florida

Posted 29 March 2006 - 05:54 PM

Dri-washjeepster, on Mar 29 2006, 04:36 PM, said:

Thanks for a great, how to article.

Tom

Boy, don't let Greenlantern see this term paper, he might get an "A".

RollBar

P.S. Good job, :biggrin1:
*MY CJ IS YOUR yJ's DADDY*
'48 Willys; '74CJ5; '80CJ7; '84 CJ8; '86 CJ7

*Who Needs A Stinking Manual When You Have A Fat Wallet For Tech Support!*

*What man is a man who does not make the world better*

Support the Central Florida Bible Camp for kids

#20 User is offline   Rambo 

  • Brigadier General
  • Group: Members
  • Posts: 3,188
  • Joined: 18-May 04
  • Gender:Male
  • Location:GUAPERIA OFF-ROAD READY PA TU MUNDO

Posted 29 March 2006 - 09:41 PM

Nice Term paper.... will add it for my younger daughter's future homework...


:biggrin1:
Posted ImagePosted Image

GUAPERIA OFF-ROAD READY PA TU MUNDO

visit 5050offroad.com

#21 User is offline   Dri-washjeepster 

  • Staff Sergeant
  • Group: Members
  • Posts: 35
  • Joined: 18-November 05
  • Location:Deltona, FL

Posted 26 April 2006 - 08:24 PM

Ed and I did the pass through on the passenger seat. Here are a few pictures. The pictures show how to cut the head rest. The pass throughs can be bought at corbeau.

Tom

Moderator Message:

Note: Photobucket link removed. Does not exist any longer.


97 TJ, 4.0 L, Flowmaster 40, Locked, 1" BL, Flatty Fenders, On Board Air, Superwinch EP 9.0, Sync Winch Rope, Daystar Custom Bumper/Brush Guard, 5" Lift, 35X12.50 Baja Claws, HI-Lift Jack, CB, K/N, BanksHeader, Safari Snorkel, Shrockworks Rocksliders, Bevis bumper w/tire carrier/rack, GPS, JKS Quick Disc.

#22 User is offline   Jim B 

  • Commander
  • Group: GlobalMod
  • Posts: 8,692
  • Joined: 30-April 03
  • Gender:Male
  • Location:Davie, FL

  Posted 02 May 2006 - 04:25 PM

Hey Tom,

Nice pics great job. :scratch: I saw the vehicle in person at the last show and it turned out real nice. :1thumb:

Too bad the pics were a bit large to post up on the thread to show some of your fine and exact cuts on the metal. :puke:
Posted Image Posted Image
El Niņo
Experience is defined as something you get, after you need it.
Give the world the best you have. The best will come back to you...

There are no rules for good photographs, there are only good photographs.
"Thou shalt not bear false witness against thy neighbour." 9th Commandment.
"Speak not Evil of the absent for it is unjust." George Washington, Rule 89 of Civility and Decent Behavior.
Wheeling Gallery ----- E-Mail
Life Member: South Florida Jeep Club

#23 User is offline   SamarioJeep 

  • Corporal
  • View gallery
  • Group: Members
  • Posts: 16
  • Joined: 03-November 06
  • Gender:Male
  • Location:Fishers, Indiana

Posted 06 September 2007 - 01:50 PM

this write up is the coolest thing i've seen i am all about the cheap way and that conversion is pure genious Jim B. i might try that :blowup: Awesome

Share this topic:


Page 1 of 1
  • You cannot start a new topic
  • You cannot reply to this topic