Front Bumper From Scratch
#1
Posted 20 October 2008 - 07:51 PM
like the rack on the T/J i browsed designs of bumpers and we decided to come up with 1 of our own . i dove into the scrap bin and dug out a piece of steel angle stock and some 3 1/4 " flat stock for the shackles and 2" steel pipe to use as the brush guard .
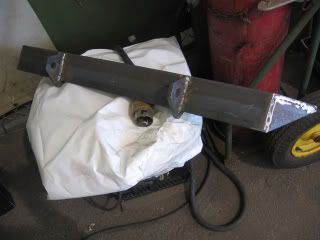
we then cut the angle to size 47" in length . then we welded in 3" back supports we cut out of the flat stock and began the weld work closing in the corners and welding in the supports and shackle brackets .
the pics below show the start of the work and how far we have gotton .....
the start
reinforsements welded in , shackle mounts welded in and drilled on the hot press , corners welded in , fit hot press mounting holes and wench holes and weld in the brush guard .and refinish it .
we use the hot press cause trying to drill through this stuff is a nightmare even with colbalt .
#2
Posted 20 October 2008 - 09:24 PM
#3
Posted 21 October 2008 - 03:42 AM
#4
Posted 21 October 2008 - 06:27 AM
-dave
#5
Posted 21 October 2008 - 11:37 AM
#6
Posted 21 October 2008 - 05:30 PM
this pic was taken before mounting holes were cut on the press
this pic shows inside of bumper after the inner gossetts were cut to fit over the front frame bar .
this pic shows bumper on cut table cooling and 2" pipe getting ready to cut and weld in place to form brush guard .
so all thats left is to cut form and mount the brush guard in place , finish up the winch plate , a few final touches . load test 1 more time then Grind ,prime , paint and install.
#7
Posted 22 October 2008 - 06:15 PM
brushguard pipes cut 2" steel pipe ...cut 18" center 7"
brushguard layout form on the tak scale table
checking proper level and angle and semitry . Guard had to be cut down just alittle to obtain
proper look about 1.5" reduction
grinding and setting filler angle
brushguard tacked in place
final fit of the brushguard in place roughedges ground smooth to form
next up winch plate welded in .....then on to be ground primed and refinished .when we get this done
this bumper is def gonna be hardcore heavy duty .
#8
Posted 23 October 2008 - 05:53 AM
If you don't fight for the trails, there won't be any trails to fight for.
What you get by achieving your goals is not as important as what you become by achieving your goals.
Zig Ziglar
"War is an ugly thing, but not the ugliest of things. The decayed and degraded state of moral and patriotic feeling that thinks that nothing is worth war is much worse. The person who has nothing for which he is willing to fight, nothing which is more important than his own personal safety, is a miserable creature and has no chance of being free unless made and kept so by the exertions of better men than himself." ....
John Stuart Mill
#9
Posted 23 October 2008 - 12:14 PM
the actually chances of the guard or bumper failing it self is about the same as any you could buy out of the book from any dealer and besides if i ever went top over and the bumper failed or guard failed
i would worry more about an extened hospital stay instead of the bumper .
but no this bumper is really put togeather well the fab guys we have here really know their buiss .....we have all the top metal working toys here ......
#10
Posted 24 October 2008 - 07:36 PM
Total over all Bumper weight 52 pds . ...
tomarrow im gonna pull it off ....grind it clean prime and paint it black .
its not a warn ...but its just as strong and durable . not everyday you can get a bumper like this for a case of ........................ and alittle bit of work and alittle imagination
after i get it painted i will post the finals .
#11
Posted 25 October 2008 - 10:56 AM
Final shots
i think it came out pretty good .