JEEPTALK.net: TJ Tube Fender Install - JEEPTALK.net

Jump to content

Page 1 of 1
  • You cannot start a new topic
  • You cannot reply to this topic

TJ Tube Fender Install

#1 User is offline   Jim B 

  • Commander
  • Group: GlobalMod
  • Posts: 8,692
  • Joined: 30-April 03
  • Gender:Male
  • Location:Davie, FL

Posted 18 February 2008 - 04:20 PM

I've had this on El Niņo for a while now and I finally had some time on/off to finish the write up of the install over the weekendl. :whistle: 
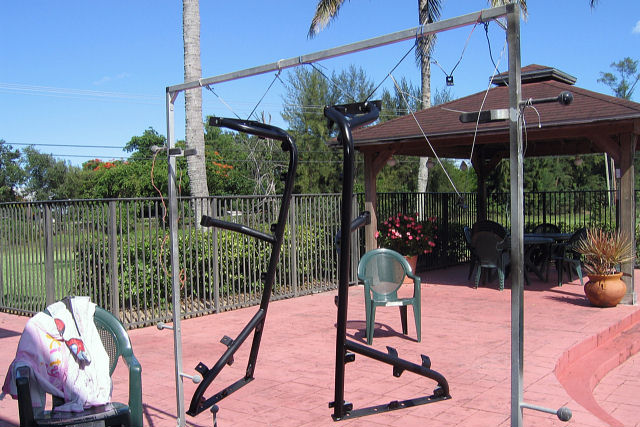
I have to confess that I had these for almost 2 years sitting in the garage trying to stretch a bit more out of my stock fenders from each trip. :drunk: They got so bad that I finally had to make time for this otherwise my family would not ride with me around town... they called it embarrassing. :naughty:

There are a few Tube fenders manufacturers out there with different type features. I decided to go with Metal Fusion.

What attracted me the most about the Metal Fusion fenders is that I actually gained 1.65 inches of clearance to the rear fender well tapering towards the bottom. Most other manufacturers like Poison Spider make you lose at least 2"s from stock due to the way they are built. :boo: MF come unpainted so you can be as creative as you like. :ya: They now also make a kit with flares for those of you that have to have them.

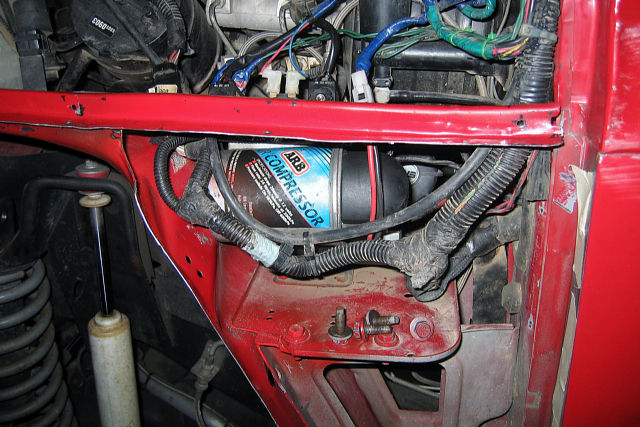
Other things I liked about MF, the side panel comes off to get at the air compressor (or whatever you have on the tray below the booster) on the driver side or the battery compartment on the passenger. I was thinking of welding them but I firmly believe that I will get more useful use keeping them this way.

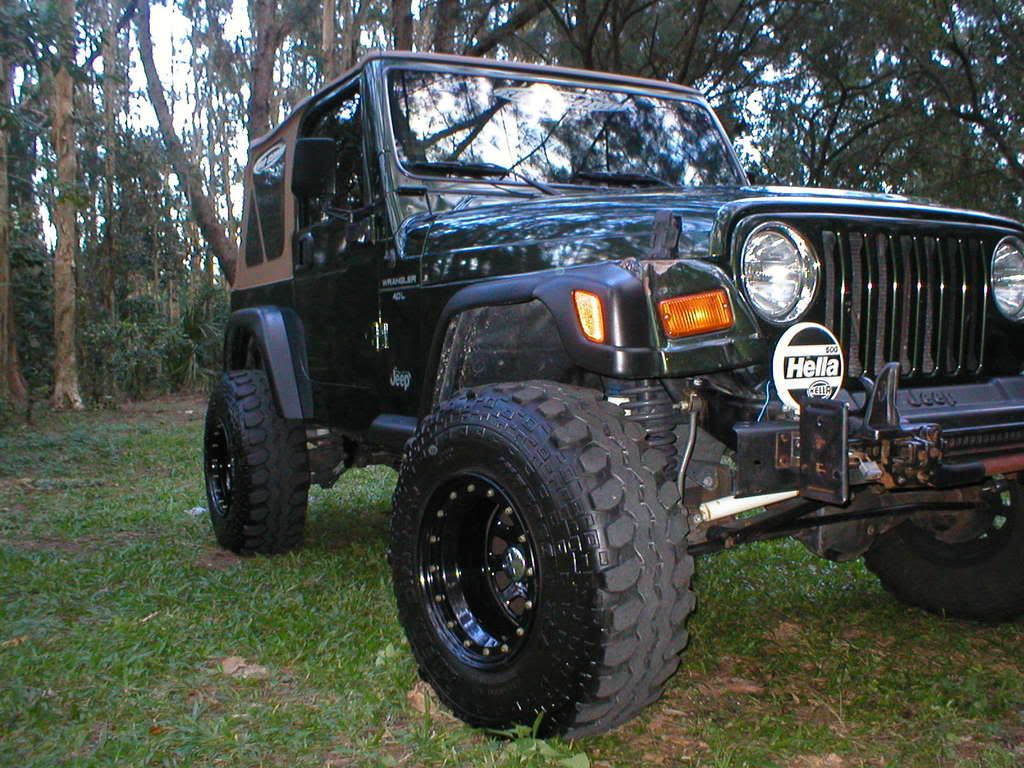
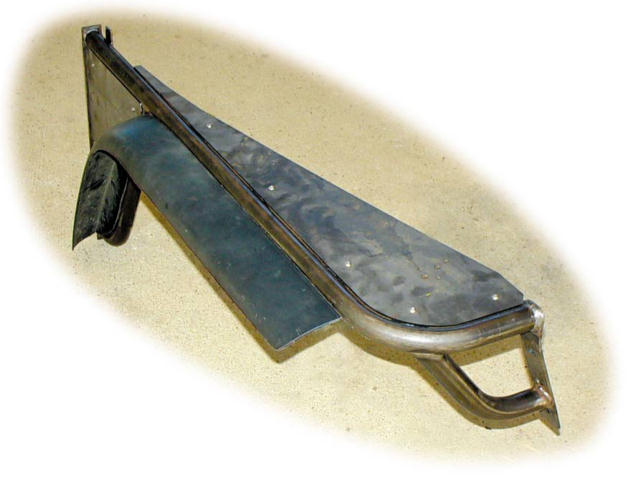
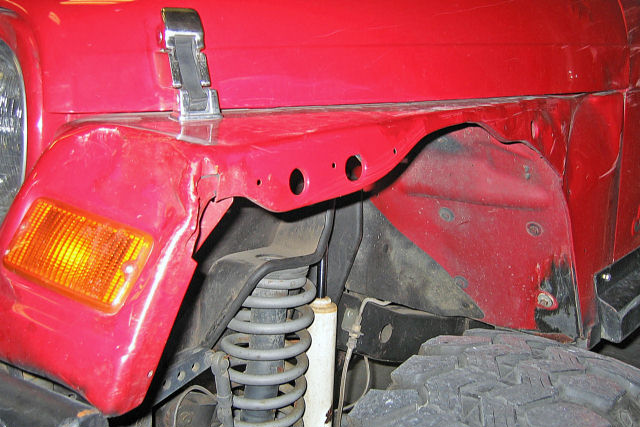
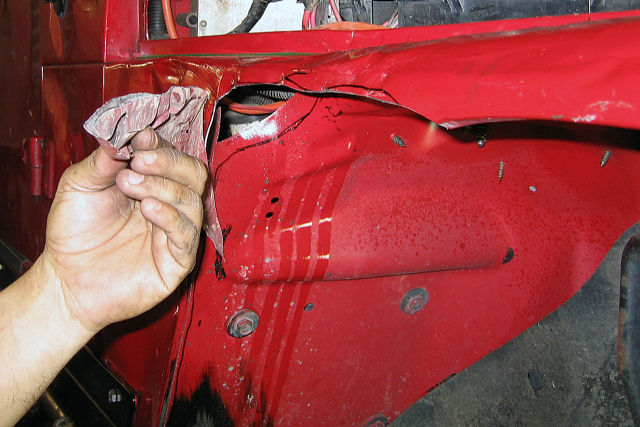
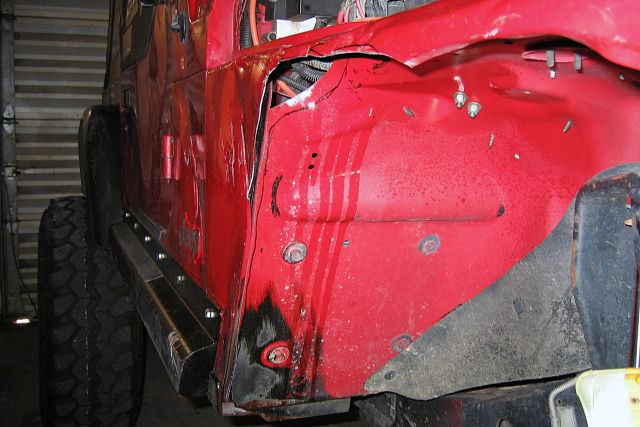
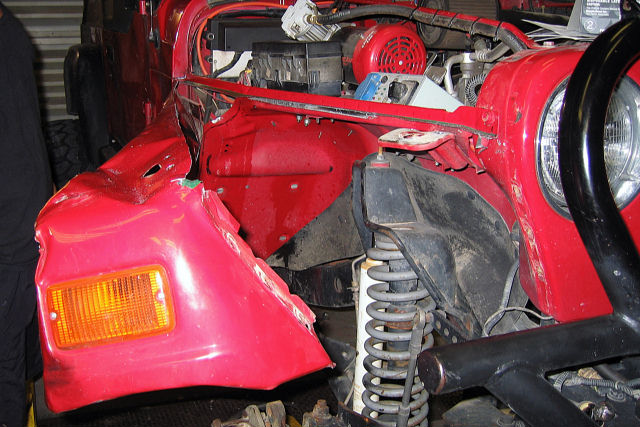
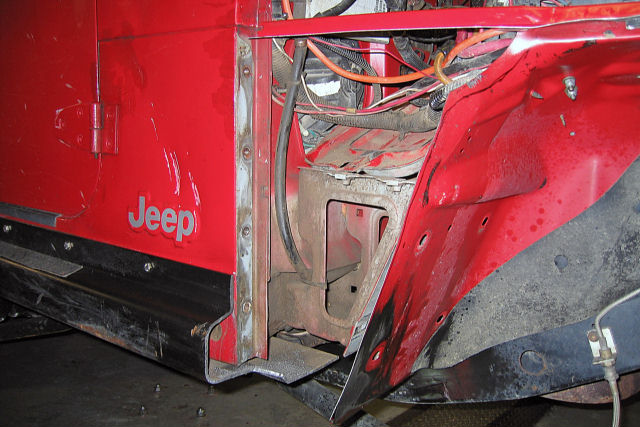
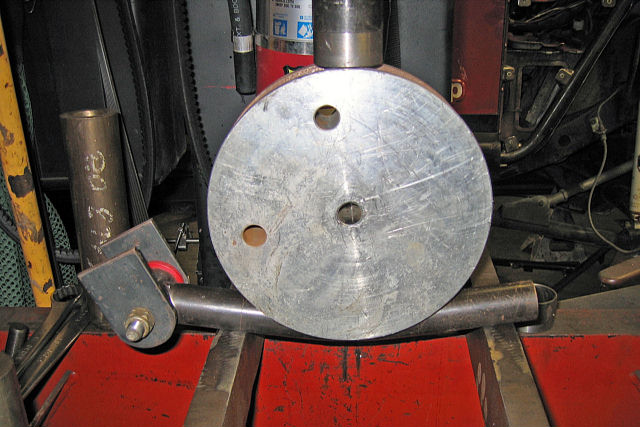
Below are a few pictures on what my fenders used to look like:

Posted Image

Posted Image

Before I go on I want to thank the Animal at Animal Offroad for the use of some of his equipment and help in installing these fenders. The TJ had been tweaked over the years and I knew nothing would be aligning correctly. I was going to need an extra pair of hands straightening a few things out and my buddy the Animal was there with no questions asked.

Now to the Install! :ax:

Kit contents:
Qty Description
2 tube frames
2 top panels
2 side panels

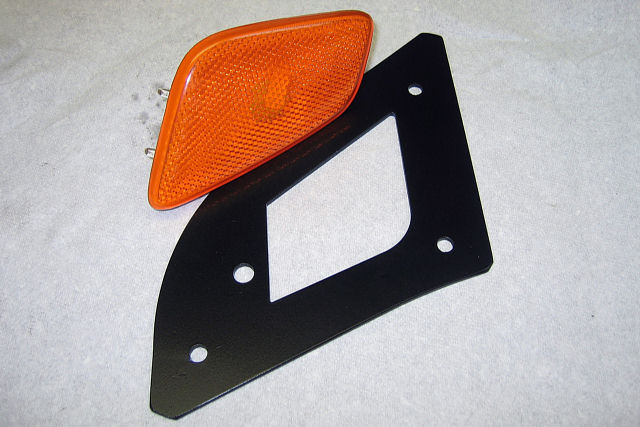
Optional light panel kit:
2 front light panels
2 light panel tabs
1 light panel template for
OEM side marker

I liked they way the lights looked so I go the complete kit. I did not like the Led little markers that I have seen on other vehicles.

Tools needed for installation:
Eye protection
Gloves
3.4" masking tape
Pencil or Marker
Straight edge
Center punch
Flat file
Drill & various bits
Sawzall
Jigsaw
Die grinder/Cut off wheel
Sheet metal pliers
10-32 tap**
Misc. hand tools (wrenches,
sockets, etc.)
Welder (to modify my rocker panels)

Raise the front of the vehicle and support it with jack stands.
Remove the front wheels.
Disconnect the battery and remove it.
Remove the factory fender flare, front/side markers, hood latches and hood bumpers. Make sure all wiring is secured away from cutting areas before you begin.

Place a piece of 3.4" masking tape along the rain gutter.
Make a mark 1.2" from the firewall, and another at the front edge of the rain lip.
From the underside, mark the center of the two spot welds on the hood latch brace, and pilot drill with a 1.8" bit. From the top, using a 3.8" bit, drill through the fender just enough to relieve the weld.

From the wheelwell, insert the sawzall blade at the top of the inner fender, and cut adjacent to the outer shell. Stay as close as you can to the outside. This is NOT the finish cut.
With your die grinder, cut down and over on the front and rear marks. Be sure not to cut the cowl or grille.

Posted Image

Posted Image

Posted Image

Posted Image

Remove the three bolts attaching the outer shell at the grille, and the four bolts at the firewall. Remove the outer shell. Remove the battery tray/fender shelf now, as it can be easily accessed.
A stiffening section of the fender will be left and needs to be removed.
Run you die grinder back and forth between the two lips, scoring the edge. Be sure not to cut all the way through.

Using your sheet metal pliers, bend the lip up and down until it breaks loose.
Remove the two outer bolts that connect the fender to the fender brace.
Remove the two U-nuts from the fender brace.
Using your sheet metal pliers, bend the outer lip of the fender brace towards the firewall, approximately 1.4" at the top and 1.2" at the bottom. This is not too critical.

From the underside of the rain lip, measure down 11.2". Make a sweeping radius from the
middle of the rain lip. Trim this out to make room for the tube. Make sure to remove any seam
sealer from this area.

Posted Image

Slide the tube fender in from the top.
Gently lift up on the rain gutter to clear the tab.
Loosely bolt the fender in place, reusing the factory bolts.
Install the top panel using the 10-32 x 5.8" SS button head bolts to secure the panel to the tabs.
Adjust the height of the tube fender until the top panel touches the bottom of the remaining lip. Tighten the bolts to the grille and firewall.
Mark 1" forward of the rear edge of the top panel on the remaining lip, 1.4" out from rain lip. Mark 1.2" back from the front edge of the rain lip, 1.4" out.
Make four more marks in the same fashion, equally spaced approximately 61.4" apart. Find the center of the rear tab, left-to-right, and mark 1.4" up from the remaining lip. With a 1.8" pilot bit, drill through the lip and panel/tab

Posted Image

Due to the TJ being so tweaked as you can see by the above picture I had to use clamps to tap, drill and allow the connection of the rain gutter.

Posted Image

Push the inner fender as far back as you can. Use your sheet metal pliers to hold the bottom edge straight so the inner well will bend along the edge of the bracket behind it. Center mark
the holes for the two inner tabs. Pilot drill 1.8", and final drill with a 3.8" bit. Secure with 5.16-18 x 11.4" hex head bolts (The inner fender will pull back to the tabs). Use a 5.16" fender washer on the fenderwell side and a 5.16" plain washer, lock washer and nut on the bracket side.

Mark the inner well for final cut. Using a straight edge, draw a line on the inner well, top-to-bottom, down the center of the tube. Radius the corner at the bottom.
Remove the tube fender. From the 1.8" pilot holes, drill the top panel & tab with a 5.32" bit. Tap the holes in the top panel & tab 10-32 (or use the enclosed self-tapping machine screws).
Oversize the holes in the remaining fender lip/rain gutter to 1.4".
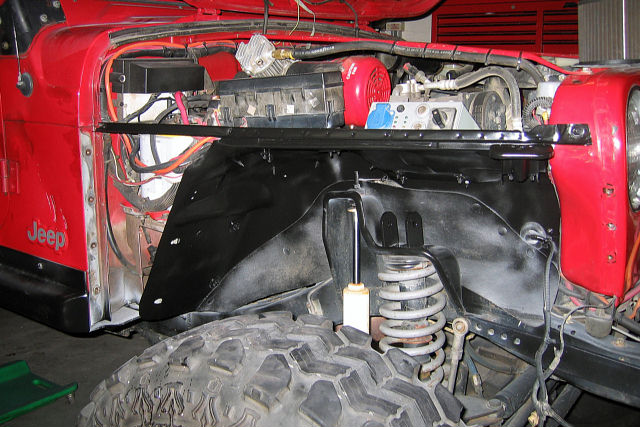
The battery tray and fender shelf need to be trimmed to allow room for the tube. Approximately 3.4" deep x 11.2" long.
Reinstall fender and check all fits. Use 10-32 x 3.8" SS button head bolts for securing top panel to rain gutter.
Clean and de-bur around all cut edges (Be careful, they are sharp!). Remove all oil, wax, dirt, etc. Touch up any bare metal with paint. Install the edge trim on the two cut edges of each fender. Trim to length.
The bottom of the hood latches need to be trimmed. The locating shoulder on the underside can be removed with a die grinder. It needs to be flush or just below the surface so the hood latch will mount flush.

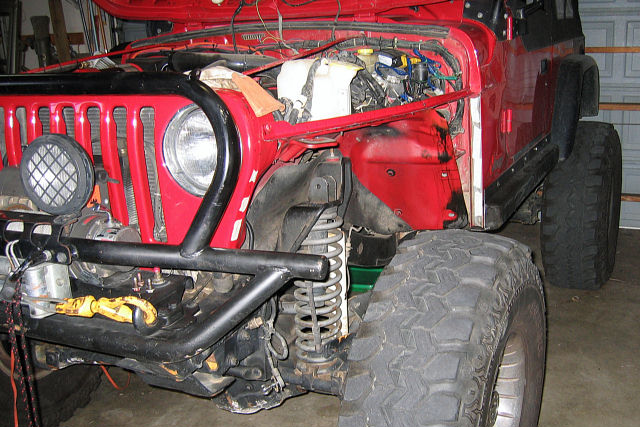
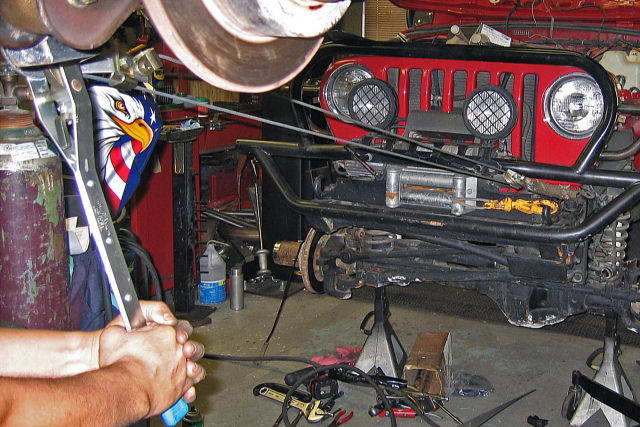
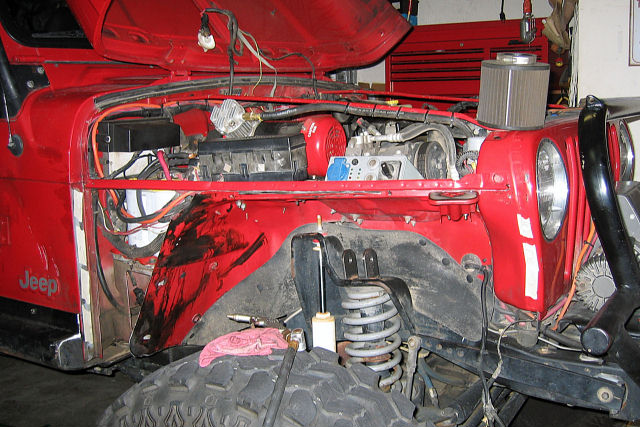
It was not easy aligning everything to get a first fit, below you will see the pulley we used to pull out the grill.

Posted Image

Posted Image

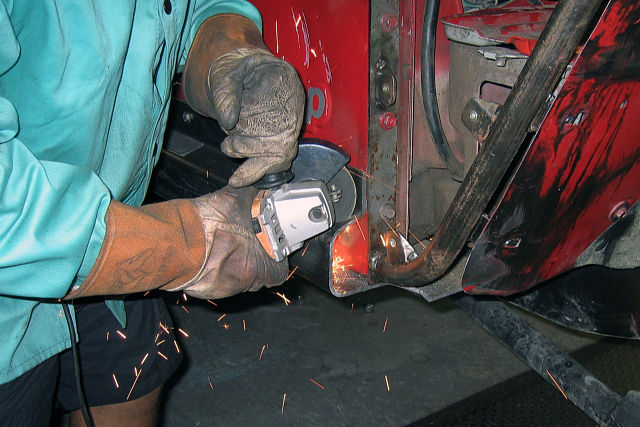
Next we modified the Rocker Panel guard as it was a bit longer than needed. There was a reinforced plated also welded to the bottom.

Posted Image

Posted Image


One thing that concerned me for the type of wheeling I do, I was worried about the hard side hits to fender.
None of the manufacturers including Metal Fusion address this.

All the tube fenders I've seen on the market use the front grill for support. This bearing weight really needs to be moved to the frame, or front bumper some how. I had an idea on a cross support with a bushing that attaches to the front bumper. I've seen other installs that use a brace to the spring tower, even seen weak supports to stinger bumpers. I'm concern about my idea to the front bumper as if the bumper takes a hit and it bends inward, this support could cause a lot more damage than good if it's attached to the fender.

Kicking back and forth for an adequate side to side & lift support to the tube fender from side hits (I'm not talking a small rub), or a flop. I decided to go to the spring tower. I understand that you really can not protect yourself from damage on a full rollover but at least I want to make it as strong as possible from damage travel to other vital areas. Movement of the front grill from a side hits can ruin your day especially if you are on a 15-20 day wheeling trip.

I had located the straight tube, bushings and even cut the brackets to the spring tower. The Animal had the tools I needed to bend the tube and weld the spring tower. :good:

WARNING: When welding additional supports to these tube fenders they must be done while the fender is installed on the Jeep. Tack, measure, install and then weld. If you don't do it on the Jeep the heat will cause the metal to shift and you will not be able to install the fender to frame support because the holes will not line up. No we did not run into this problem but many people are not aware of this until it's too late.

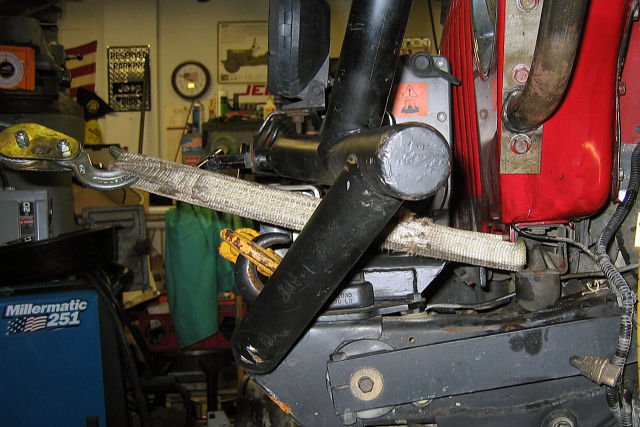
Bending the tube for tire clearance:
Posted Image

Cutting the radius:
Posted Image

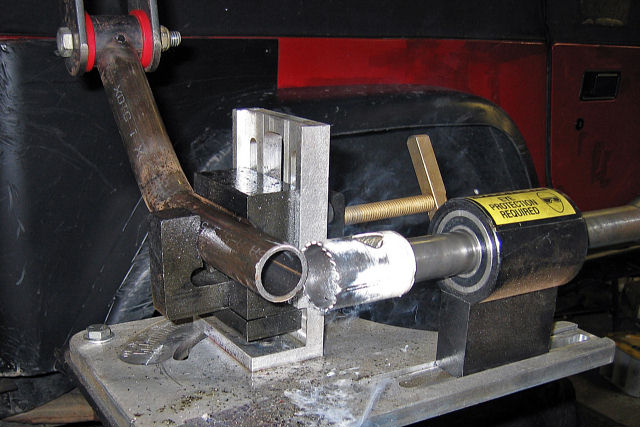
Welded brackets at spring tower:
Posted Image

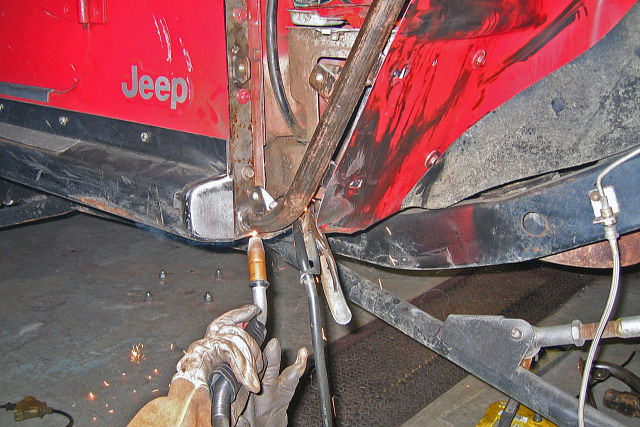
Bending, re-bending, measuring, tack and finish welding for side support:
Posted Image


After the hard part was done I drove the El Niņo for a few days to settle things down with body and frame before I took all of it down again for paint, wiring and final install.

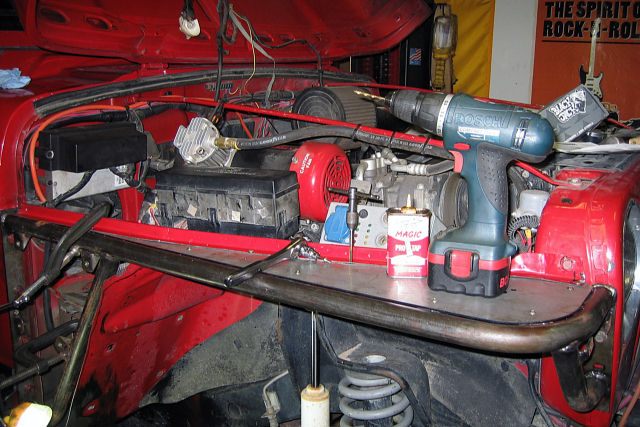
Below is my personal paint booth:
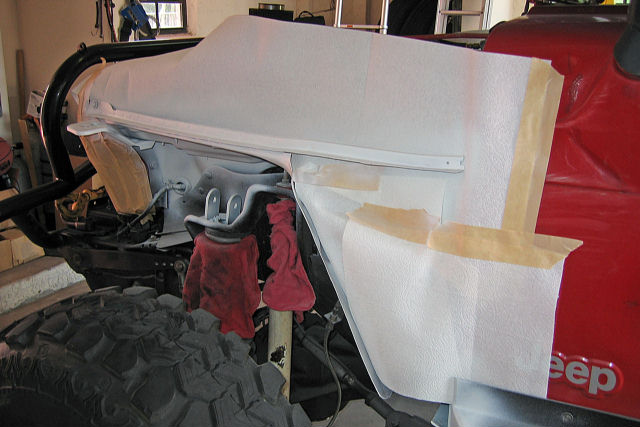
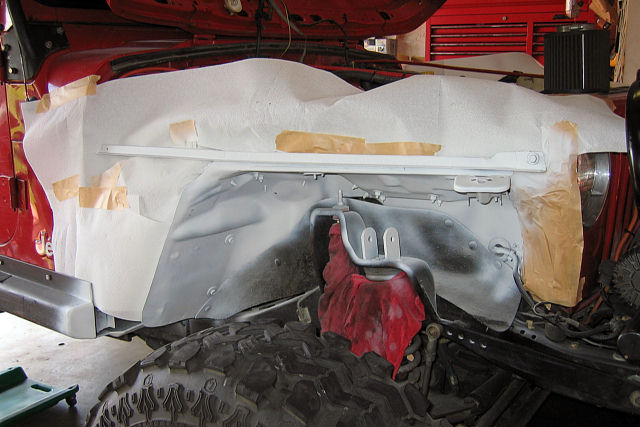
Posted Image

Fender Prep work:
Posted Image

Posted Image

Posted Image


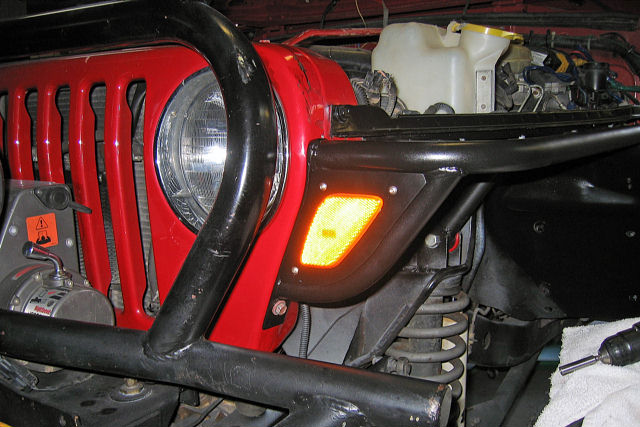
Now for the running and signal lights:
What I liked about this kit is that by ordering with the optional light kit they actually designed the fender with an additional support that in my opinion not only houses the light but provides additional support to the front fender structure.

If using the OEM side markers, align holes on template with holes in plate and transfer marks. Use a drill to make access holes and cut with a jig saw. Drill retaining hole to 5.16".
Remove the middle bolt securing the fender to the grille.
Install the light panel tab, and snug bolt.
Install light panel, securing with 10-32 x 3.8" SS button head bolts. Align panel and tighten all bolts.

Side marker and metal provided metal template:
Posted Image

Posted Image

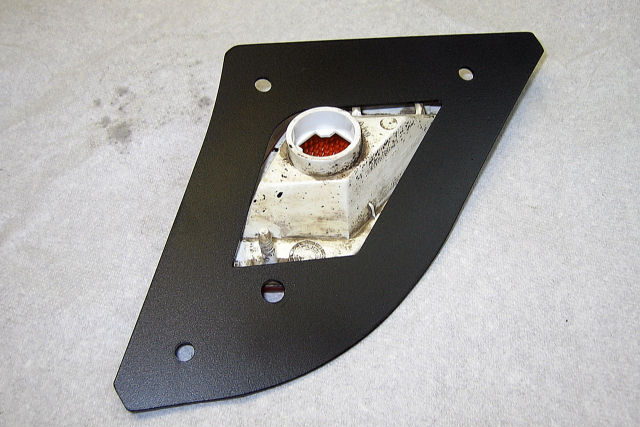
Backside of signal light:
Posted Image


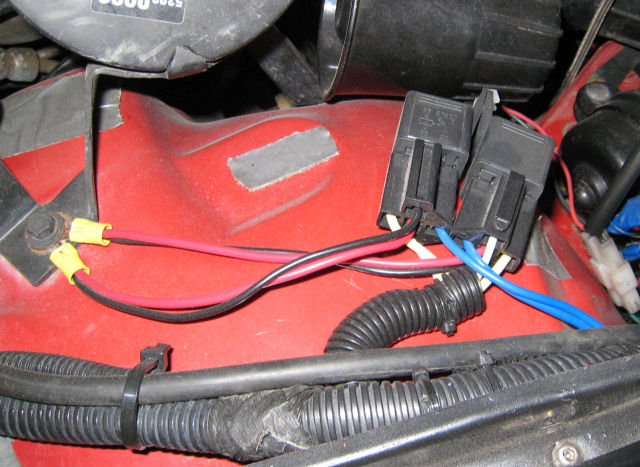
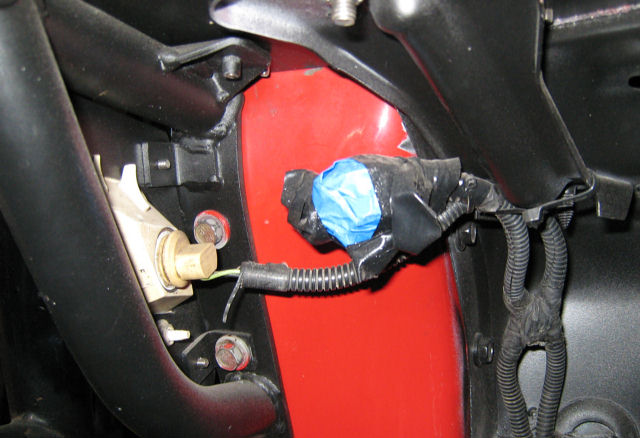
Now for the optional wiring: The kit comes with everything you need except for the flasher.

NOTE:
TJs use an combination electronic flasher/hazard that senses low current, i.e,. a blown out bulb (or missing bulb in this case), which causes the indicators and markers to flash rapidly

There are instructions on the kit on where to hook up the two relays provided withe diagram. You will basically be using the side marker as your new running and signal light.

Posted Image

I did not want to tottaly remove the OEM running/signal connection so I taped it up and secured it out of the way.

Posted Image

One more thing with regards to eliminating the lamp failure detector circuit.
Remove the electronic flasher
Remove the flasher cover, a small screwdriver and some careful prying makes this happen.
Cut the trace coming from pin 7 of the chip.
Replace cover
Install flasher
You are finished. This works on my 97TJ.

As for cutting the circuit, it's easily done with a knife, or as I like to use on circuit boards, a small Exacto-knife. What you're cutting is nothing more than a thin easily cut copper layer on top of the circuit board. You could make two small cuts an eigth-inch apart or so and just peel up the little 1/8" of copper between the cuts with the tip of a knife or Exacto-knife.

On 97-2001 TJs, the flasher is under the knee kick plate attached to a steering column brace. If you just activate your flashers then listen/feel for the clicking you should be able to locate it.

The Triden Stant EP26 is an exact replacement for the factory flasher, and is identical inside, and easily found for $12.00 or so at your local auto parts store if you screw this up.

For the guys that also like to use LEDs lights; The new EP-26 is a drop in replacement for the older TJs. Be sure the package says LED on it so you know you have the new model and not old inventory from the auto parts warehouse.

Another option is to use the Tridon Stnd EL12 flasher, 3 prong intead of 4 and it's round, this is what I used and zipped tied the connection to other wires instead of placing it back into the bracket by the kick plate.

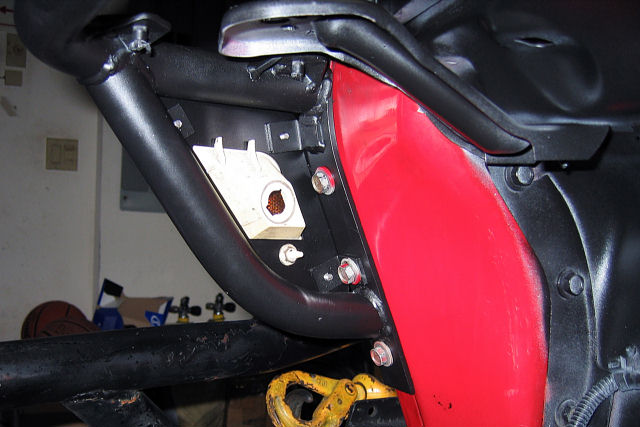
Finished picture of running and signal light connected and working:
Posted Image


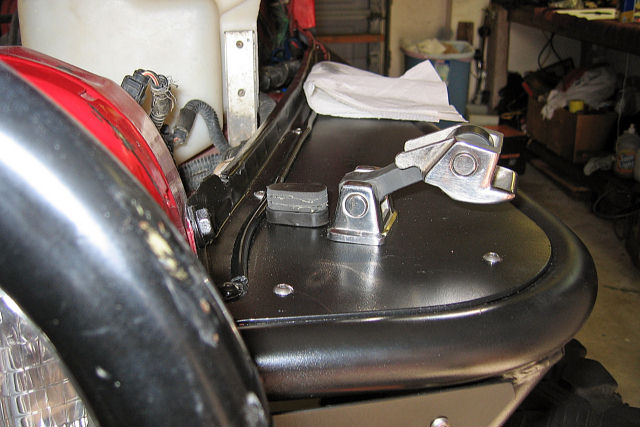
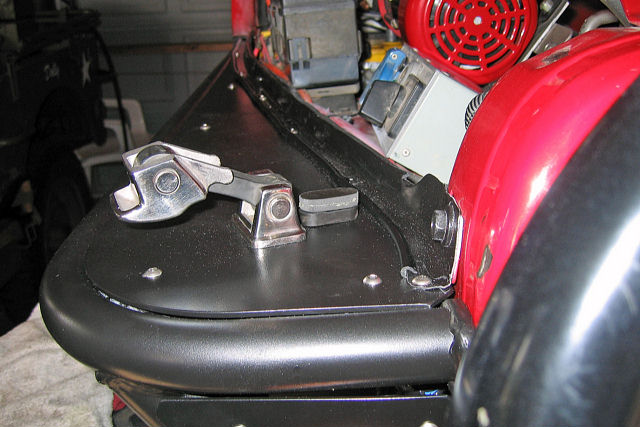
Now for the Hood Latches and support:

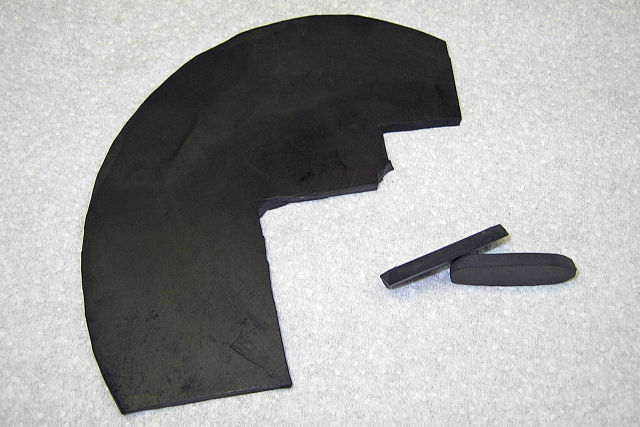
I noticed that when I installed the hood latches and locked them down the rubber support was not tall enough and it would tend to bend the hood into the grill a bit.
I found a similar rubber piece laying around my garage with some glue and build up the rubber support, worked great.

Cut out of rubber pieces.
Posted Image

Posted Image

Glued and installed Hood supports.
Posted Image

Posted Image

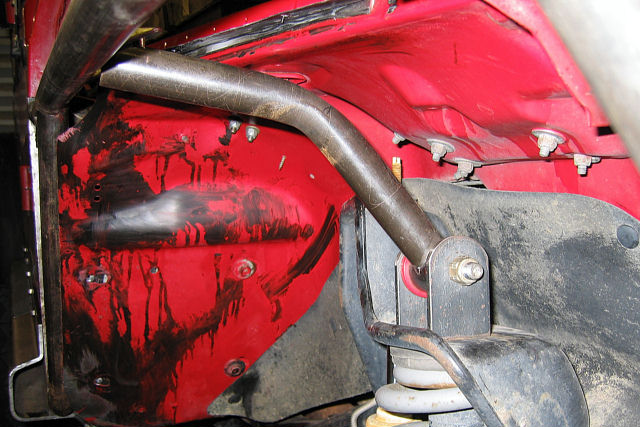
The rest are pictures of the finish Tube Fender Install

Posted Image

Posted Image

Posted Image

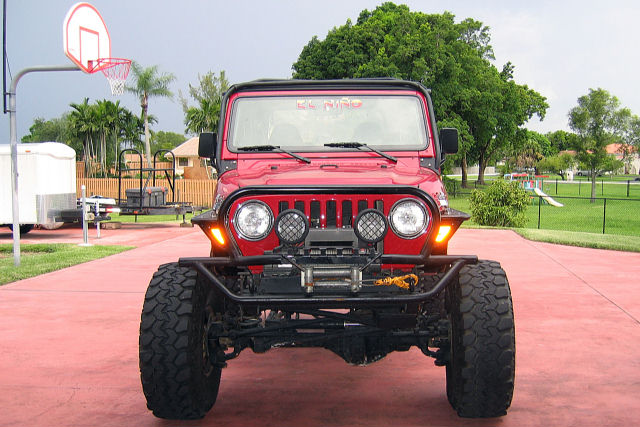
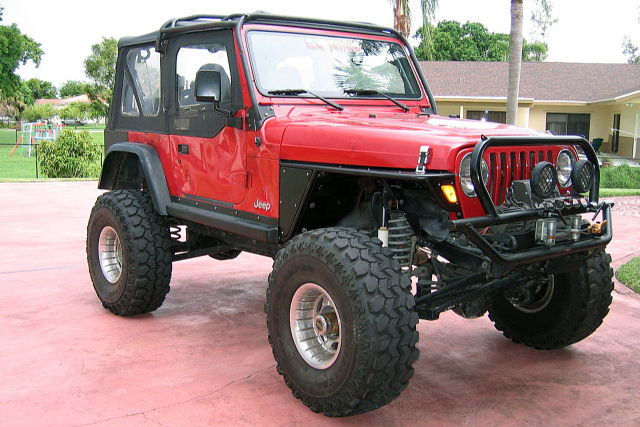
I am very satisfied with the way it all came out. If you have any questions post up. :scratch: :crazy:
Posted Image Posted Image
El Niņo
Experience is defined as something you get, after you need it.
Give the world the best you have. The best will come back to you...

There are no rules for good photographs, there are only good photographs.
"Thou shalt not bear false witness against thy neighbour." 9th Commandment.
"Speak not Evil of the absent for it is unjust." George Washington, Rule 89 of Civility and Decent Behavior.
Wheeling Gallery ----- E-Mail
Life Member: South Florida Jeep Club

#2 User is offline   Rollbar 

  • Commander
  • Group: GlobalMod
  • Posts: 7,058
  • Joined: 16-May 03
  • Gender:Male
  • Location:Palm Harbor, Florida

Posted 18 February 2008 - 04:48 PM

Very nice. Well done but U do know they have a better system out, now :whistle: that it took U two yrs to complete. It attachés by magnets :drunk: .
I like the marker lights, makes it look very clean.

Good Job. :naughty:

P.S. What about the passenger side door :scratch: , U have to fix that up for Dolly. :sneak:
*MY CJ IS YOUR yJ's DADDY*
'48 Willys; '74CJ5; '80CJ7; '84 CJ8; '86 CJ7

*Who Needs A Stinking Manual When You Have A Fat Wallet For Tech Support!*

*What man is a man who does not make the world better*

Support the Central Florida Bible Camp for kids

#3 User is offline   southrider 

  • Major
  • Group: Members
  • Posts: 835
  • Joined: 17-February 07
  • Gender:Male
  • Location:Cuba's 2nd Floor... Hialeah

Posted 18 February 2008 - 07:57 PM

looks awesome!

great write up :scratch:
2006 Rubicon.

#4 User is offline   TallJeep 

  • Colonel
  • View gallery
  • Group: Members
  • Posts: 2,050
  • Joined: 29-April 05
  • Gender:Male
  • Location:Ft.Lauderdale, FL

Posted 18 February 2008 - 08:37 PM

Excelent write up Jim :naughty: , I think I could picture something like that on my TJ :scratch:

#5 User is offline   JeepNWilly 

  • Brigadier General
  • View gallery
  • Group: GlobalMod
  • Posts: 2,570
  • Joined: 23-April 07
  • Gender:Male
  • Location:West Palm Beach, FL

Posted 18 February 2008 - 09:12 PM

View PostTallJeep, on Feb 18 2008, 09:37 PM, said:

Excelent write up Jim :whistle: , I think I could picture something like that on my TJ :naughty:

Hmm I sense another mod :scratch:
Willy
2006 Wrangler X , 2014 JK Unlimited Sport
Keep Calm And Wave On
Pics:

Posted Image

#6 User is offline   Rambo 

  • Brigadier General
  • Group: Members
  • Posts: 3,188
  • Joined: 18-May 04
  • Gender:Male
  • Location:GUAPERIA OFF-ROAD READY PA TU MUNDO

Posted 18 February 2008 - 09:50 PM

looks real nice Jim, dont know about your electrical connections, but the fenders look GREAAAAT!


:gl:
Posted ImagePosted Image

GUAPERIA OFF-ROAD READY PA TU MUNDO

visit 5050offroad.com

#7 User is offline   CaptainCody 

  • First Lieutenant
  • Group: Members
  • Posts: 334
  • Joined: 15-December 07
  • Gender:Male
  • Location:Key Largo Fl

Posted 18 February 2008 - 10:41 PM

Hey Jim, how long did this actually take?? I have been wanting to do this for a long time, and is it possible to get those braces you fabbed up premade?? :2thumup:

#8 User is offline   LostJ 

  • Major
  • View gallery
  • Group: Members
  • Posts: 818
  • Joined: 17-September 06
  • Gender:Male
  • Location:FL

Posted 19 February 2008 - 03:53 AM

:2thumup: i like that brace, i think im gunna copy that idea :2thumup:
74' CJ5
00' TJ
86' BLONDE

#9 User is offline   Jim B 

  • Commander
  • Group: GlobalMod
  • Posts: 8,692
  • Joined: 30-April 03
  • Gender:Male
  • Location:Davie, FL

  Posted 20 February 2008 - 05:21 PM

Glad you enjoyed the write up guys, it took me almost two years to get started. I actually should have had them on my Arkansas trip but I wanted to stretch out the old fenders one more trip.

View PostGreenlantern, on Feb 18 2008, 09:50 PM, said:

looks real nice Jim, dont know about your electrical connections, but the fenders look GREAAAAT!
:gl:

GL, out of the two electrical pics, the ones that looks bad is the one of the original OEM housing that I did not want to cut away and leave there for a rainy day. I just wrapped taped around it to prevent water intrusion and short circuits. I'm sure you know all about shorts and how to trouble shoot so I know I can always count on you. :whistle: :innocent:


View PostCaptainCody, on Feb 18 2008, 10:41 PM, said:

Hey Jim, how long did this actually take?? I have been wanting to do this for a long time, and is it possible to get those braces you fabbed up premade?? :devil:

Captain, I did this in stages, it is not my daily driver so I can work on it for a few, and walk away. This helps in between the paintings also as it has 2 coats of primer and 2 coats of black paint. I went with black because it is much easier to spray bomb when you encounter rock rash. I would starve as a full time mechanic. :drive:

With regards the brace. I forgot what the radius of the tube measured, the brackets you can make out of scrap 1/4". You can buy the Polly bushings anywhere. When your ready I can measure this for you. If you look at the pictures you will see that I had a straight tube, you need a heavy duty press to start bending. If you know someone with a tube bender it also might help. Go easy and allow for spring back until you get the right angle. If you don't do it correctly your tire will hit as it stuffs into the well on articulation.
Posted Image Posted Image
El Niņo
Experience is defined as something you get, after you need it.
Give the world the best you have. The best will come back to you...

There are no rules for good photographs, there are only good photographs.
"Thou shalt not bear false witness against thy neighbour." 9th Commandment.
"Speak not Evil of the absent for it is unjust." George Washington, Rule 89 of Civility and Decent Behavior.
Wheeling Gallery ----- E-Mail
Life Member: South Florida Jeep Club

#10 User is offline   JeepinIan 

  • Major General
  • View gallery
  • Group: Members
  • Posts: 3,384
  • Joined: 01-May 03
  • Gender:Male
  • Location:Miami, Fl USA

Posted 20 February 2008 - 05:24 PM

Jim,
Is David still producing these? I thought he sold the patent.
Ian Stewart

If you don't fight for the trails, there won't be any trails to fight for.

What you get by achieving your goals is not as important as what you become by achieving your goals.
Zig Ziglar

"War is an ugly thing, but not the ugliest of things. The decayed and degraded state of moral and patriotic feeling that thinks that nothing is worth war is much worse. The person who has nothing for which he is willing to fight, nothing which is more important than his own personal safety, is a miserable creature and has no chance of being free unless made and kept so by the exertions of better men than himself." ....

John Stuart Mill

#11 User is offline   Jim B 

  • Commander
  • Group: GlobalMod
  • Posts: 8,692
  • Joined: 30-April 03
  • Gender:Male
  • Location:Davie, FL

  Posted 20 February 2008 - 05:43 PM

View PostJeepinIan, on Feb 20 2008, 06:24 PM, said:

Jim,
Is David still producing these? I thought he sold the patent.

Ian,

He did sell the patent. Very nice people to work with as I was actually calling them afterward to trouble shoot the different type of flashers for the model year. They plan to continue building them along with a few other things. The have CJ, YJ, TJ, custom cages, metal grab handles ready to weld, etc. They have the tube fenders now with metal flares for those that wish to reach out to the rocks a lot sooner, etc. They also a have builder's kit which is much cheaper if you want to do all the welding yourself.

Metal Fusion Products
Posted Image Posted Image
El Niņo
Experience is defined as something you get, after you need it.
Give the world the best you have. The best will come back to you...

There are no rules for good photographs, there are only good photographs.
"Thou shalt not bear false witness against thy neighbour." 9th Commandment.
"Speak not Evil of the absent for it is unjust." George Washington, Rule 89 of Civility and Decent Behavior.
Wheeling Gallery ----- E-Mail
Life Member: South Florida Jeep Club

#12 User is offline   WranglerAngler 

  • Sergeant FirstClass
  • Group: Members
  • Posts: 49
  • Joined: 12-January 08
  • Gender:Male
  • Location:WPB, FL

Posted 21 February 2008 - 12:06 PM

I'm going to hold out for the new units coming out from Rokmen
I talked to Mike yesterday and he said they were wrapping up the design and tooling to sell their "highline" tube fenders. They will be around $200 and a self-weld deal.
If you check out the jeep on their website www.rokmen.com it looks like a really good design. I would add the lateral support like on El Nino.
Bill P

00 TJ 4.0 5sp
35" BFG AT | 3.5 RE Long Arm | 4.3 Atlas
4.88 | 44 Rear / HP D30 Locked
Warn HS 9500i | Rails & Skids
God, I miss big rocks!

#13 User is offline   JeepinIan 

  • Major General
  • View gallery
  • Group: Members
  • Posts: 3,384
  • Joined: 01-May 03
  • Gender:Male
  • Location:Miami, Fl USA

Posted 21 February 2008 - 01:33 PM

View PostJim B, on Feb 20 2008, 06:43 PM, said:

Ian,

He did sell the patent. Very nice people to work with as I was actually calling them afterward to trouble shoot the different type of flashers for the model year. They plan to continue building them along with a few other things. The have CJ, YJ, TJ, custom cages, metal grab handles ready to weld, etc. They have the tube fenders now with metal flares for those that wish to reach out to the rocks a lot sooner, etc. They also a have builder's kit which is much cheaper if you want to do all the welding yourself.

Metal Fusion Products


Jim,

Who bought it? They still only have the same products that David had when he sold it.I would have thought they would get more prducts going.
Ian Stewart

If you don't fight for the trails, there won't be any trails to fight for.

What you get by achieving your goals is not as important as what you become by achieving your goals.
Zig Ziglar

"War is an ugly thing, but not the ugliest of things. The decayed and degraded state of moral and patriotic feeling that thinks that nothing is worth war is much worse. The person who has nothing for which he is willing to fight, nothing which is more important than his own personal safety, is a miserable creature and has no chance of being free unless made and kept so by the exertions of better men than himself." ....

John Stuart Mill

#14 User is offline   Jim B 

  • Commander
  • Group: GlobalMod
  • Posts: 8,692
  • Joined: 30-April 03
  • Gender:Male
  • Location:Davie, FL

  Posted 22 February 2008 - 08:15 AM

View PostWranglerAngler, on Feb 21 2008, 12:06 PM, said:

I'm going to hold out for the new units coming out from Rokmen
If you check out the jeep on their website www.rokmen.com it looks like a really good design. I would add the lateral support like on El Nino.

WrangleAngler, picture of them looks ok and as I said many different manufacturers out there to choose from. By looking at this picture it looks like it has flares, I particular don't like this for my own reasons. You should also make sure that it does not rob you of precious wheel well clearance... most do. From the picture I personally do not like the very front part by the grill area, I don't see the support that mine has. But if you like the looks and it serves your purpose make sure and take some pics on the install and let us know on the detail, they were was not much on the website other than a picture. :good:

View PostJeepinIan, on Feb 21 2008, 01:33 PM, said:

Jim,
Who bought it? They still only have the same products that David had when he sold it.I would have thought they would get more prducts going.

Ian, it is a father and son family business. They added a few things (not much) plus they now make them with fender flares for those who want them. They are located in TN near where Dave lives. There is so much competition that he seems to be concentrating in the local market which is plenty in that area. He did mention that some stores are carrying them but I did not get into it much.
Posted Image Posted Image
El Niņo
Experience is defined as something you get, after you need it.
Give the world the best you have. The best will come back to you...

There are no rules for good photographs, there are only good photographs.
"Thou shalt not bear false witness against thy neighbour." 9th Commandment.
"Speak not Evil of the absent for it is unjust." George Washington, Rule 89 of Civility and Decent Behavior.
Wheeling Gallery ----- E-Mail
Life Member: South Florida Jeep Club

#15 User is offline   WranglerAngler 

  • Sergeant FirstClass
  • Group: Members
  • Posts: 49
  • Joined: 12-January 08
  • Gender:Male
  • Location:WPB, FL

Posted 23 February 2008 - 10:22 AM

View PostJim B, on Feb 22 2008, 08:15 AM, said:

WrangleAngler, picture of them looks ok and as I said many different manufacturers out there to choose from. By looking at this picture it looks like it has flares, I particular don't like this for my own reasons. You should also make sure that it does not rob you of precious wheel well clearance... most do. From the picture I personally do not like the very front part by the grill area, I don't see the support that mine has. But if you like the looks and it serves your purpose make sure and take some pics on the install and let us know on the detail, they were was not much on the website other than a picture. :scratch:


The Rokmen fenders require that you cut the hood. It changes the body lines like the AEV highline kit. I do like how the front panels are designed on your fenders. It wouldn't be too difficult to adapt that feature to these and add the lateral support to the frame like you thought up.
I'm definitely going to steal some of your ideas. They have not released their kit yet. they are a few months away from the release. Its probably easier to finish the design when jeep heads are not calling every day asking about it

What would be really cool is if I could find suitable plastic and put a flexible flare on the tube fenders.
My family lives in PA. LEO's love to pull you over for not having tire coverage up there.
Bill P

00 TJ 4.0 5sp
35" BFG AT | 3.5 RE Long Arm | 4.3 Atlas
4.88 | 44 Rear / HP D30 Locked
Warn HS 9500i | Rails & Skids
God, I miss big rocks!

#16 User is offline   Jim B 

  • Commander
  • Group: GlobalMod
  • Posts: 8,692
  • Joined: 30-April 03
  • Gender:Male
  • Location:Davie, FL

  Posted 25 February 2008 - 09:00 AM

View PostWranglerAngler, on Feb 23 2008, 11:22 AM, said:

What would be really cool is if I could find suitable plastic and put a flexible flare on the tube fenders.
My family lives in PA. LEO's love to pull you over for not having tire coverage up there.

I've seen a few guys use some type of a tractor belt which is very flexible and durable. They use quick disconnect screws. Personally if I had your problem in where I needed to do this, this is the way I would go as the extra tube sticking out of the fender acting as a flare on some of these flare tube models become a grappling hook catching on things.

Below is picture of a TN Jeep that did this. Yes it might not be as pretty as a Tube Flare but I'd rather not have the Tube flare and it's drawbacks on the trail.

Posted Image
Posted Image Posted Image
El Niņo
Experience is defined as something you get, after you need it.
Give the world the best you have. The best will come back to you...

There are no rules for good photographs, there are only good photographs.
"Thou shalt not bear false witness against thy neighbour." 9th Commandment.
"Speak not Evil of the absent for it is unjust." George Washington, Rule 89 of Civility and Decent Behavior.
Wheeling Gallery ----- E-Mail
Life Member: South Florida Jeep Club

Share this topic:


Page 1 of 1
  • You cannot start a new topic
  • You cannot reply to this topic