JEEPTALK.net: Auxiliary Cooling – Hood Louvers /Vents - JEEPTALK.net

Jump to content

Page 1 of 1
  • You cannot start a new topic
  • You cannot reply to this topic

Auxiliary Cooling – Hood Louvers /Vents

#1 User is offline   Daless2 

  • Sergeant FirstClass
  • Group: Member
  • Posts: 43
  • Joined: 02-June 03
  • Location:Kentucky

Posted 14 July 2003 - 01:38 PM

Auxiliary Cooling – Hood Louvers / Vents

Hi Folks, this will be the first of at least two, possibly three write-ups on my efforts to better manage under hood temperatures.

This one will be on Hood Louvers and my thinking, testing and implementation on my 97 TJ with 4.0L.

The second will be on Evaporative Cooling and how it can be used, for short term extra cooling when needed.


OK, here we go. I will be writing this in sections and posting each as I can find the time.


End Result

I think the best way to start this off is with the results and a picture of the end result.

Given an outside air temperature of 90+ degrees F, I have been able to reduce the under hood air temperatures on my 97 TJ by as much as;

-11 degrees F at Idle.
-16 degrees F during Stop and Go
-27 degrees F during Highway Travel


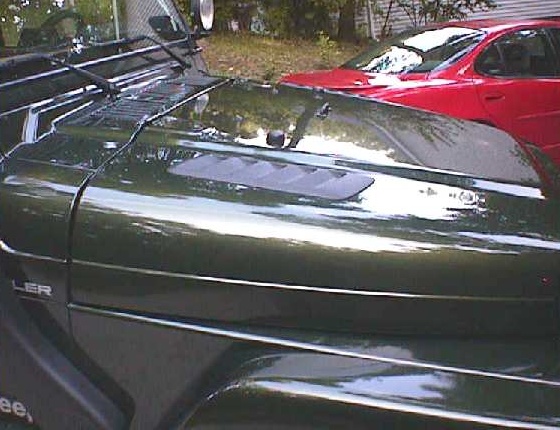
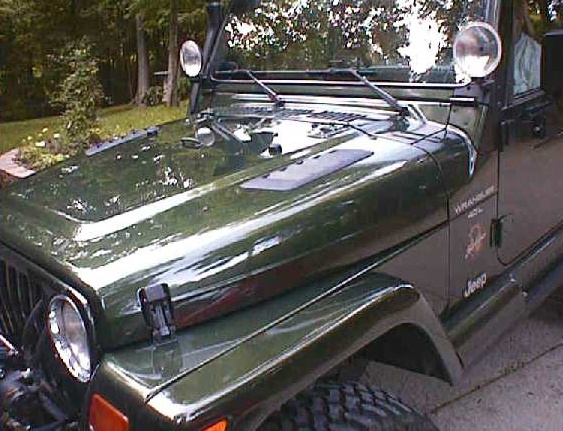
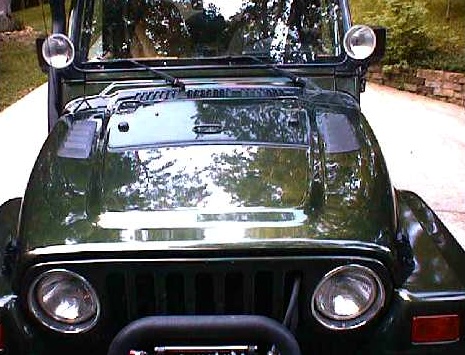
Here is what this implementation looks like.
Posted Image


What you are looking at is the hood of my Jeep after installing the Louvers which allow the under hood temperatures to be lowered as I have shared above.

Yes I think they look nice, but function is what I was going after in doing this modification. Prior to installing the louvers I did quite a bit of investigating, research and testing.

With the help of my friend Kevin, who owns an automotive testing lab capable of measuring temperatures and pressures I set out on this task.


Where to install the louvers?

What I was looking for was the most effective location to install the Louvers!

I wanted to know two things;

1 Where is the heat the highest under my TJ’s hood.

And

2. Where if any is there a vacuum (low pressure) location on top of the hood .(Yes even a Jeep has aerodynamics, be they poor.)

Please note I did give some thought to determining where, if any, a high pressure point would be UNDER the hood, but I did not elect to follow up on this.

Temperature Measurements and Findings

To determine the highest temperature locations under the hood I made more then a few trips to my friend Kevin’s lab. There I barrowed 48 temperature sensors, and the computer/recording device to capture the data I wanted.

The 48 sensors where mounted on the underside of my hood, forming a grid that covered the better part of the under hood. (Approximately 1-inch below the hood)

My thought was to find those areas that would get the hottest, and then look to see if I could install the louvers in this location.

I wasn’t really sure I needed to this as “I was sure I knew” where the greatest heat would be found. Trust me, I was wrong.

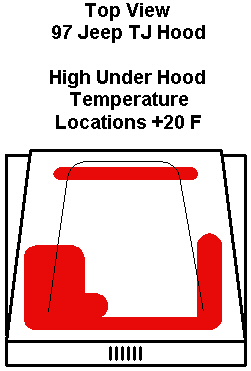
Here is a simple drawing that reflects the plotted data elements collect from my tests locating the highest under hood air temperatures on my TJ.

Posted Image


The red shaded areas represent the highest temperature areas, under the hood, taken approximately 1-inch below the hood.

Everything under the hood gets hot, yet these areas had temperatures of at least 20 Degrees F hotter then all the others.

Remember when I said “I already knew” where the heat was located?

I was wrong.

It wasn’t on top of the engine or even centered on the exhaust manifold as logic would suggest.

Why is this?

I have no clue, only guesses.

I suspect part of this is due to the air movement caused by the fan, and part probably has something to do with heat being trapped between engine compartment components.

I am sure there may be other good explanation as well. All I know is that I am confident, at least on my Jeep, this drawing represents the highest under hood AIR temperatures, by geography, in my engine compartment.

For the record, the single highest temperature I recorded in this effort was located 4-inches in front of the firewall, and 6-inches off the center toward the driver side.


Please note while there are significant differences in high temperatures for each of the three tests that I ran, (Idle, Stop and Go, and Highway) the pattern of High Temp Location never changed significantly. Meaning, the hottest locations remained the hottest locations regardless of what test was performed.


Temperature Testing Methodology

In order to capture the temperatures accurately I used a methodology I have used in another cooling system test write-up. It goes like this.

The equipment I used this time had 48 temp sensors as explained above. Each was mounted to the underside of the hood about 1-inch off the hood. (I was measuring Air temperatures, not surface temperatures.)

These sensor recorded time and temperature data, ever 3 seconds, to a small hand-held data collection device. All temperatures are in degrees F and recorded to an accuracy of 1/10 of a degree F.


Types of Tests:

I performed a set of three different tests throughout this effort [I](At Idle, Stop and Go, and Highway)[/u]. Each set was performed no less then 4 times, prior to installing the louvers and after installing the louvers


At Idle Test:
This test measured and recorded all under hood air temperatures from each of the 48 sensors with the Jeep idling in my driveway for 15 minutes after a 5-minute warm up period.

Stop and Go:
This test was a 6-mile stop and go, inner city drive, after a 5 minute warm up period. Again measuring and recording all under hood air temperatures from each of the 48 sensors.

Obviously each test was not exactly the same as stoplights and traffic most likely did differ to a small degree. But the course was indeed exactly the same each time. Max Speed was 25 MPH.

Highway:
This test covered a distance of 18 miles on Interstate 75. Nine miles down the interstate, off the exit, turn around and nine (9) miles back. Highway Speed maintained at 65 MPH. Again measuring and recording all under hood air temperatures from each of the 48 sensors.


Test Notes:
As I stated, each of these tests was conducted multiple times. The data I will be am sharing is the data I have for those days when the outside air temperature was the hottest. for each setup (with or without louvers.)

Also note, the outside air temperatures are different for each of these tests, In every case the outside air temp was Lower for the “No Louver” tests, then it was for the “Louvered” tests.

Folks I have a lot of temp data and I will be sharing it farther on down in this write-up as time permits. Hopefully in a way that is easy to understand.


Identifying the Low Pressure / Vacuum Areas on the Hood

I wanted to determine where, if any place on the hood a low pressure or vacuum area might be located.

Being I don’t have access to a wind tunnel I had to get creative here.

I taped to the hood 48 pieces of yarn, each 3-inches long, in the approximate locations to where the under hood temp sensors where mounted.

The yarn was taped (with duck tape) to the outside surface of the hood and then I simply drove the Jeep and observed what happened..

You’d be amazed at how and what directions the yarn will flow and point to. Sometime it even sticks straight up! (Good Vacuum for a brick)

Based on more then a few drives with the yarn on my hood (talk about funny looks from people) and a lot of note taking I determined to my satisfaction the low-pressure area.

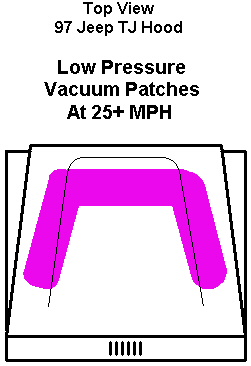
Here, shaded in the pinkish color are my results.
Posted Image


If you decide to do this little exercise on your own be aware you need to get yourself going at least 25 MPH for this to be effective. I could not discern any significant difference in airflow patterns at any speed over 25 MPH.

The shaded areas represent the locations where the yard either shot straight back (To the back of the Jeep) or shot straight UP in the air once up to speed.

In some areas, like close to the windshield, the yard pointed toward the front of my Jeep confirming the high-pressure area at the base of the windshield.

After I did all this testing and came to my own conclusions about the low-pressure (vacuum) areas I showed my results to Kevin. He looked at them, dropped them on the table, when to a cabinet, and preceded to hand me a testing tool to validate my results.

Unfortunately he only had two pressure sensors so I had to do a lot of driving, recording, stopping and moving sensors around. But I did it.

For what it is worth I can now tell you this; $1.99 worth of yarn and a bit of duck tape came up with the same answer as a very expensive piece of lab test equipment. J


Hood Louver Location

I now knew where the highest under hood temperature were located.

I also had to a reasonable degree of accuracy, the locations on the outside of the Jeep’s hood where the low pressure / vacuum areas were located.

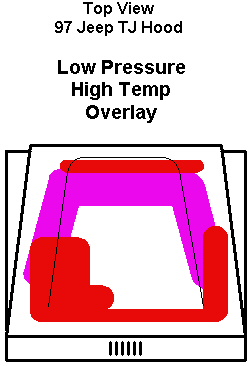
To determine where to mount the louvers all I did was to lay one set of data elements on top of the other and look for commonality of location, or overlap.

Here is what it looked like.
Posted Image


See those locations where the High Temp and Low Pressure areas overlay each other?

That’s where my louvers are installed. (Life is Simple J ! Life is Good!)


Frank

#2 User is offline   Daless2 

  • Sergeant FirstClass
  • Group: Member
  • Posts: 43
  • Joined: 02-June 03
  • Location:Kentucky

Posted 14 July 2003 - 01:43 PM

I have a lot of data I want to put up but there seems to be a rather large interest in getting to the part numbers and the install so I will use the limited time I have today documenting that part.

Louvers, Drip Pans and Part Numbers

The louvers I am using come from a 1994-96 Pontiac Grand Prix GTP. These are functional hood louvers and are made out of a high temperature resistant Nylon.

In addition to the louvers I also purchased the drip pans, which mount inside the hood, under the louvers. PLEASE NOTE: The drip pans severely restrict airflow out of the louvers. I purchased them to install during the winter weather months when I don’t really want to loose very much of my engine compartment heat.

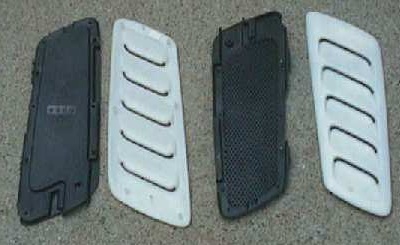
Here is a picture of the Louvers (top and bottom0, and the drip pans as they come from the Pontiac dealer.

Posted Image


As you can see the vents come snow-white nylon and have to be painted. I used DupliColor “Bumper Black” as it contains a flex agent that should allow for expansion and contraction without harming the paint.

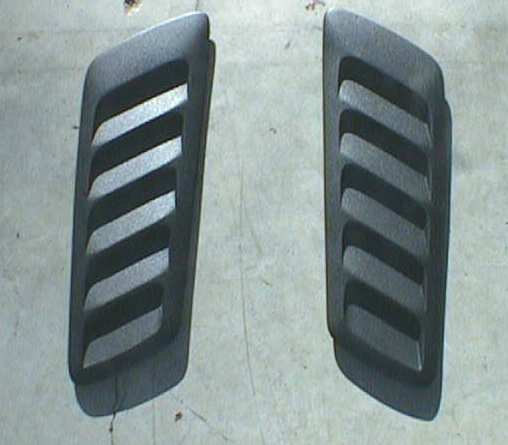
Here is what they looked like after painting.

Posted Image

Sorry this picture is a little grainy

I did put the nylon louvers in my bead-blasting cabinet for a few minutes to rough them up some prior to painting. I did not use any primer or other flex agent, other then the Bumper Black rattle can stuff. So far the paint is holding up well.


Part Numbers and Costs

#10225885 - Left Side Louver $27.23
#10230097- Left Side Drip Pan $4.56

#10225886 - Right Side Louver $27.23
#10230098 - Right Side Drip Pan $4.56


Installation

Template Location

Once I knew the area I wanted to install the louver at I made a template to match the underside of the louvers so I could mark the holes I needed to cut in the hood of my Jeep.

Note: If I can come up with a way to replicate this cardboard template, I will do so and would be happy to send them out to folks if you have an interest. Let me see what I can do with it first.

I covered the hood on both sides with masking tape so that I could trace the template out on the hood in the proper location on both side.

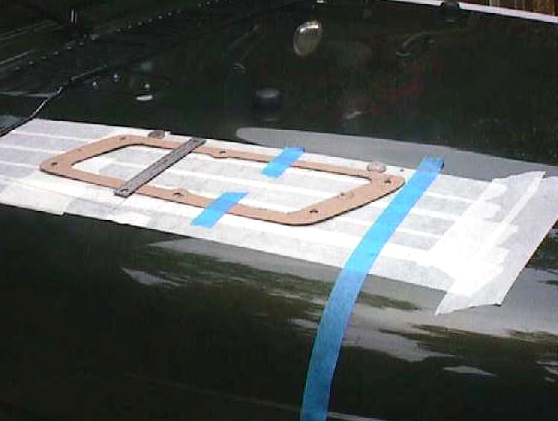
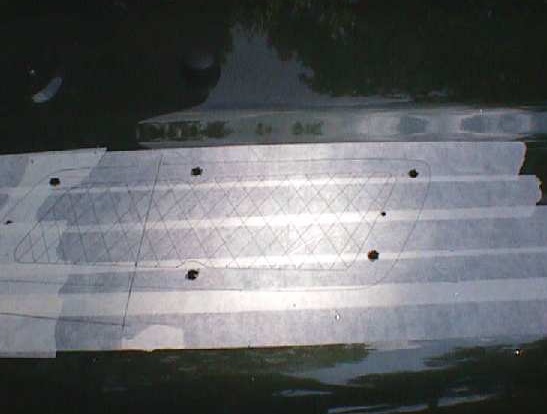
Here is a picture of the template in place ready to be traced.

Please Note, it is the inside edge of the template that gets traced, as well as the holes that mark the drill locations. The outside edge of the template represents the outside edge of the louver when it is installed.

Posted Image

Please take note of the two nickels and the long piece of blue marking tape.

The blue tape is exactly 20.75-inches (20 and ¾-inches) from the rear edge of the hood. This is important. This places the front edge of the louvers. If you do this, DO NOT go less then 20 and ¾-inches or you will have a clearance issue inside the hood with the bracing on the rear edge of the hood.

The two nickels where used to space the template (and louver) away from the curvature of the hood where it bumps up. Just lay the two nickels down and push them up to the curve while allowing the nickels to remain level and NOT ride up the curve. This will mark one edge of the template (and louvers) for you.

Tape the template down and then trace the inner section on the tape. Be sure to trace and mark the eight (8) holes that you will have to drill to mount the louvers through the hood.

Edited to fix part number for right side droip pan

#3 User is offline   Daless2 

  • Sergeant FirstClass
  • Group: Member
  • Posts: 43
  • Joined: 02-June 03
  • Location:Kentucky

Posted 14 July 2003 - 01:44 PM

Here are two more pictures of the louvers installed.

Posted Image


Posted Image


I will do more writing later. For now I do want to read the comments more closely and try to replay to those that I have not addressed yet.

Frank

#4 User is offline   Mr.Bead 

  • First Lieutenant
  • Group: Members
  • Posts: 325
  • Joined: 07-July 03
  • Gender:Male
  • Location:Miami, FL

Posted 14 July 2003 - 02:58 PM

DALESS2

THE LOUVERS LOOK PRETTY COOL, I SAW A SIMILAR THING ON A JEEP AT DPG OFFROAD ALL THOUGH THERE WRITE UP WAS NOT AS DETAILED. I HEARD THEY WORK GREAT. GOOD JOB :cool:
2001 TJ SAHARA, sitting on jackstands in my garage 1/2 built............ Dreaming of wheeling it again soon

#5 User is offline   Jim B 

  • Commander
  • Group: GlobalMod
  • Posts: 8,692
  • Joined: 30-April 03
  • Gender:Male
  • Location:Davie, FL

  Posted 14 July 2003 - 07:39 PM

Frank,

Hats off to you. Great write up, great mod. :nerd: My hood gets so hot sometimes that it amazes me how the temperature gauge stays within limits. :unsure:

Since I have the QuickAirIII mounted under the hood near the battery, when I air up I usually bring the hood all the way up against the windshield and wait a few minutes before I run the compressor. Otherwise it gets too hot and the 50amp breaker kicks before I can air up the last tire. :cry: Use to have a fuse and changed to a breaker for this reason. Since I raise the hood and wait for a few it does not trip. :o

Let me know when you have a template made, if not I'll make one myself as I like this mod and plan to do this when I finish some of the maintenance projects that I'm currently undertaking. I will also try to find more of a darker black to paint these.

The only thing that worries me is clearance with all the stuff I have installed under the hood. I will have to check for this before I start to cut. Can you please answer a few. Does the drip pan snap in or out (can you post some pics on this)? How much room or should I say clearance do you need when the drip plan is installed? I need to see if I'm going to hit anything under there. Here in Florida and when I go away I probably will not be using the drip pan... but you can never say never so I want to allow for this. :cool:
Posted Image Posted Image
El Niño
Experience is defined as something you get, after you need it.
Give the world the best you have. The best will come back to you...

There are no rules for good photographs, there are only good photographs.
"Thou shalt not bear false witness against thy neighbour." 9th Commandment.
"Speak not Evil of the absent for it is unjust." George Washington, Rule 89 of Civility and Decent Behavior.
Wheeling Gallery ----- E-Mail
Life Member: South Florida Jeep Club

#6 User is offline   Jim B 

  • Commander
  • Group: GlobalMod
  • Posts: 8,692
  • Joined: 30-April 03
  • Gender:Male
  • Location:Davie, FL

  Posted 14 July 2003 - 07:53 PM

Frank,

Forgot, I was also surprised to see your diagram on where most heat was located. Just goes to show you, sometimes you just can't go with an educated "guess". :cool:
Posted Image Posted Image
El Niño
Experience is defined as something you get, after you need it.
Give the world the best you have. The best will come back to you...

There are no rules for good photographs, there are only good photographs.
"Thou shalt not bear false witness against thy neighbour." 9th Commandment.
"Speak not Evil of the absent for it is unjust." George Washington, Rule 89 of Civility and Decent Behavior.
Wheeling Gallery ----- E-Mail
Life Member: South Florida Jeep Club

#7 User is offline   Daless2 

  • Sergeant FirstClass
  • Group: Member
  • Posts: 43
  • Joined: 02-June 03
  • Location:Kentucky

Posted 14 July 2003 - 08:55 PM

Hi Jim,

Drill & Cut

Here is a picture of the template traced on the masking tape and the eight holes (6 are 5/16-inch and two locating holes are 1/8-inch) drilled in my hood.
You can also see I marked the section that needs to be cut out with a criss-cross pattern so even if I where having a blonde day it would be difficult for me to screw up!

Posted Image

Piece of advise. Tape and trace the template on both sides of your hood before you do any drilling or cutting. In this project you want to measure 5 times and cut only once for each louver hole.

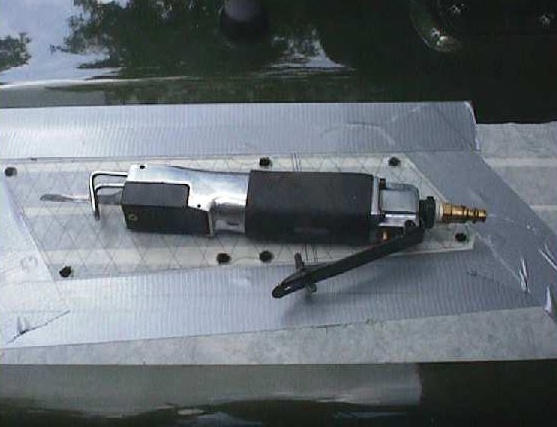
Prior to making “the big cut” on each side I drilled several pilot holes in the section of my hood that would be cut out. I also protected the hood with some duck tape to keep the vibration on the Air Saw shoe from scratching the paint. The Louvers themselves I have held in place using 3M double sided trim tape from the under side of the louver to the top of my hood. There are six (6) little studs on the louvers that pass through the holes you need to drill in the hood. The drip pan is held in place on these studs with six small screws.

Posted Image

I suppose any number of tools can cut this hole out. I used an Air powered Body Saw which I have had for years. If you don’t have one maybe you can barrow one from a friend. These things cut single thickness sheet metal like a hot knife through butter, leave no distortion in the hood when done. Also, Harbor Freight sells these every day of the week for $39, but every three or four weeks they have them on sale for $20.

After cutting the hole on the template line all I had to do was take a file to de-burr the edge and trial fit the louvers. They fit perfectly. I did use touch up paint on the edges that I cut.

I mounted the louvers using 3M-brand Trim tape purchased at Auto Zone. This stuff is incredible. I just laid a 1/8-inch bead of tape all around the underside of the louver and put the louver in place.

Tip! DO NOT pull the backing off the 3M trim tape until you have the louver in place on the hood. Once in place you can pull the backing off and press the louver right down. Trust me, it will not move, and you will not get it off again without sliding a knife between the louver and hood to cut the tape.

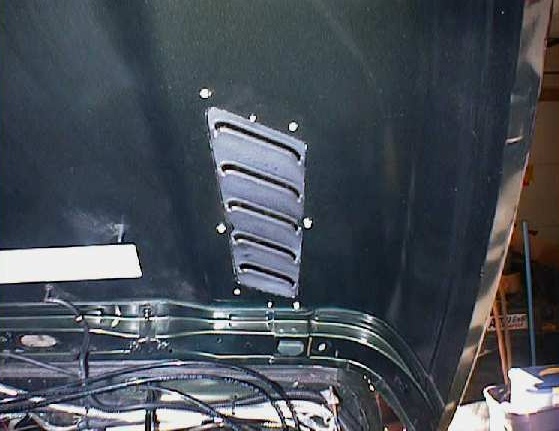
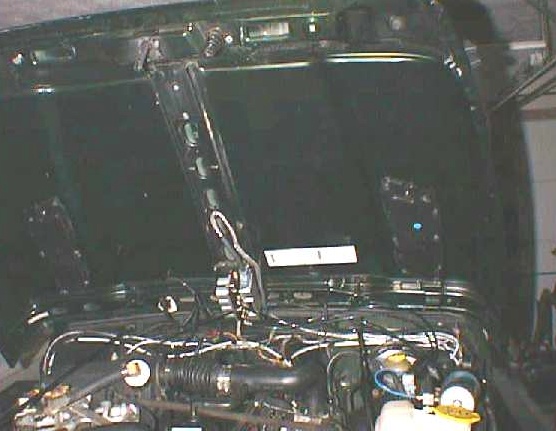
Here is a picture from under the hood at the driver’s side louver. See those little white stand-offs? The drip pan mounts to these stand-offs with screws.

Posted Image

Please note, the little pin in the center near the top of the louver is a locating pin for the drip pan. There is another on the other end. Kinda just lines everything up nicely to put the drip pan on.

The drip pan is not very thick at all. At it's widest point I just measured 9/16-inch. My engine compartment, like yours is stuffed.
For clarities sake I took a picture of the bottom of the drip pan. You can see the six holes where the screws go in to hold it to the underside of the hood and louver.

Here is a poor side view of the drip pan. That circle is a dime.
Posted Image

As I said the drip pan is held in place with six small screws into the louvers. This isn't a problem for me but I will probably figure out a way to hold them in place using Velcro.

Hope this answers your questions.

As for the template, I would like to come up with a way to scan it and put it out in a file on the web. Problem with that is two fold. First it is larger then 11 inches long, and second, different printers will change ever so slightly the aspect ratio of an object and I can’t let that happen to a template.

I will be happy to make and send you one, I just need a better solution before I have a need to make lots more and send them out to folks. (I mean I have to have time to wheel sometime!)

Frank

#8 User is offline   Jim B 

  • Commander
  • Group: GlobalMod
  • Posts: 8,692
  • Joined: 30-April 03
  • Gender:Male
  • Location:Davie, FL

  Posted 15 July 2003 - 07:17 AM

Frank,

Excellent detail to my questions. You need to live around here so I can drop by your place every week until a restraining order is issued. :unsure: Now for some more. :cool:

If it rains, how much flow of water would you say that engine compartment would take without the drip pan? Hot engine, cold water, I've done this before but on short cleanings, do you think this scenario would be a problem? :man:
Posted Image Posted Image
El Niño
Experience is defined as something you get, after you need it.
Give the world the best you have. The best will come back to you...

There are no rules for good photographs, there are only good photographs.
"Thou shalt not bear false witness against thy neighbour." 9th Commandment.
"Speak not Evil of the absent for it is unjust." George Washington, Rule 89 of Civility and Decent Behavior.
Wheeling Gallery ----- E-Mail
Life Member: South Florida Jeep Club

#9 User is offline   Daless2 

  • Sergeant FirstClass
  • Group: Member
  • Posts: 43
  • Joined: 02-June 03
  • Location:Kentucky

Posted 15 July 2003 - 03:08 PM

Hi folks,

First my apologies. I should have had this data in a format ready to go when I started this post.

I have no excuses even though the volume of data I have is immense.

When you run three tests, (Idle, Stop and Go and Highway), four time each for before the louvers and after the louvers, using 48 temperatures sensors each taking and recording a reading every 3 seconds you end up with more then a quarter of a million data elements.

Needless to say these data elements are organized, yet it has been a challenge to get this data in a format that I can easily explain.

Here is my attempt.
.
.
.
Temperature Performance Reporting

As I mentioned, I ran each of the three tests (Idle, Stop and Go, Highway), with and without louvers, four times, with and without the louvers installed.

Rather then report an average of how each setup did for all four testing cycles I have elected to report this data in the following way.
.
.
I have chosen to use the test data from the “Pre-Louver Testing” that reflexes the absolute Best Performance (lowest air temp readings) of the four test cycles.
.
In other words, the data I am showing in the chart below reflects the LOWEST Temperature Recording for one of the four tests cycles I performed, Without the Louvers.
.
.
2. Likewise, I have chosen the absolute Worst Performance (highest temp readings), of the four test cycles With the Louvers Installed.
.
.This means the Louver Temperature numbers are the HIGHEST temperatures recorded from one of the four test cycles, With the Louvers Installed.
.
.
I feel that comparing the Best Performance Without the Louvers to the Worst Performance With the louvers will present a pretty good picture of what you can expect if you where to do the same implementation on your TJ.
.
.
.
Temperature Performance Results

This chart illustrates two major points of each of the three tests, comparing the air temperature performance before and after the louvers were installed.
.
.
High Temperature

The HIGH temperature indicates the absolute highest temperature recorded on ANY of the 48 sensors at ANY time during the test. Please understand this is one temperature at one moment in time, the single highest under hood air temp recorded during the test.

For example;

During the Idle Test, before the louvers where installed, the highest under hood air temperature recorded on any of the 48 sensors was 267 degrees F.

The Highest temperature recorded on any of the 48 sensors during the Stop and Go test after the louvers were installed was 227 degrees F.

.
.
Average Temperatures

The Average Temperature is the average of ALL temperatures recorded by ALL 48 Sensors (ever 3 seconds) during the full duration of the test. The Average Temperature is illustrated with a red line on each vertical bar.

For example;

The Idle Test was conducted over a 15 minute period of time, using 48 sensors, each recording a temperature every 3 seconds. This creates 14,400-temperature reading which are used to generate this average.


The intent is to give a fairly good picture of the general under hood air temperatures relative to having louvers or no louvers installed.

The YELLOW bars represent the test data captured BEFORE the louvers where installed.

Likewise, the BLUE bars reflect the test data captured AFTER the louver where installed.
.
.
Posted Image


Analysis


As you would expect, across the board, the under hood air temperatures are consistently lower with the louvers installed.
.
.
High Temperatures

High Temperatures came in as follows.

Idle Air Temps were - 23 degrees cooler
Stop and Go Air Temp were - 35 degrees cooler
Highway Air Temps were –27 degrees cooler

When the Louvers are installed.
.
.
Average Temperatures

Idle was - 11 degrees cooler
Stop and Go –16 degrees cooler
Highway was –27 degrees cooler

When the Louvers are installed.
.
.
.
Under Hood Temperature Patterns

I did not want to just post the above number and present that as a complete picture or understanding as to what is going on, air temperature wise under the hood with and without the louvers.

I wanted to present another view of the data I have.

If you remember, there are 48 sensors, each taking a reading every three seconds during the life cycle of each test.

In the chart below I am illustrating How Many of the 48 sensors Recorded a Temperature ABOVE 200 degrees F more then 50% of the time.

In other words, each of the 48 sensors during the Idle Test recorded 300 readings. If 151 or more of the 300 readings were Above 200 F then that sensor is shown Above the Bar in the Chart.

If 150 or more of the 300 readings were Under 200 F then that sensor is shown Below the Bar in the Chart.
.
.
Posted Image


.
.
.
Not only are the under hood air temperatures lower with the louvers then without them, but I believe the heat distribution under the hood is far better with the Louvers; Less hot spots!

I do plan to do another chart like which will reflect a higher percentage. In other words, how many sensors recorded temperatures above 200 degrees F more then 75% of the time.

This effort will have to wait till later.


Other Thoughts

Across the board, the under hood air temperatures on my TJ have been reduced. The greatest benefit appears to come at highway speeds. This is probably happening as a result of an increased volume of air coming through the radiator and an increased vacuum on top of the hood louvers cause by the higher speed.

I do not know this as fact, but logic and physics leads me to believe this.

My friend William has given me an idea that I wish to pass along.
I would imagine the under hood air temperatures could be reduced farther, especially during idle and stop and go travel simply by mounting two pancake fans on the underside of the louvers or drip pans.

Given the drip pan are so inexpensive I may pick up an extra set and try this to measure the results.

I already have a plan for these louvers and drip pans. Blaine and I have been doing a fair share of research and experimenting with Evaporative Cooling. I intend to build an emergency cooler for both my power steering and engine oil when we get the bugs worked out. . These cooler will be mounted under the vents and will have both fans and an evaporative cooling element in the design.

You’d be amazed how much cooling can happen with a small mist of water, but that’s for another Auxiliary Cooling Topic.
.
.
I hope I was able to explain accurately and in a way that is understandable and valuable what I am reporting here.

If not please let me know and I will take another shot at it.

Have a great day folks.

Frank

#10 User is offline   Daless2 

  • Sergeant FirstClass
  • Group: Member
  • Posts: 43
  • Joined: 02-June 03
  • Location:Kentucky

Posted 15 July 2003 - 03:17 PM

Jim B, on Jul 15 2003, 08:17 AM, said:

Frank,

Excellent detail to my questions. You need to live around here so I can drop by your place every week until a restraining order is issued. :unsure: Now for some more. :cool:

If it rains, how much flow of water would you say that engine compartment would take without the drip pan? Hot engine, cold water, I've done this before but on short cleanings, do you think this scenario would be a problem? :man:

Hi Jim,

There is no doubt in my mind that rain water will enter the engine compartment in a heavy down poor, Especially while sitting still.

Last week I drove home from Minnesota to Kentucky without the drip pains in place. The rain, all the way home, was like your South Florida Thunder storms only constant.

I do not believe very much rain entered the engine compartment while I was driving, but it certainly flowed in when I stopped to get something to eat.

I am not worried about this at all as I have waterproofed everything I can find under my hood.

Do I think the rain water will harm the hot parts under the hood? I suppose it can happen, but I think the likelihood is small. Just my feeling here, I don't have any data to back it up.

I did a write-up on "How to Water Proof Under Hood Electrical Connectors". If you think folks would be interested in reading it I can put a post up for it, else I can email it to you if you would like to see it.

Let me know.

You get over to Tellico a couple of times a year don't you? We'll have to get together there sometime.

Frank

#11 User is offline   Jim B 

  • Commander
  • Group: GlobalMod
  • Posts: 8,692
  • Joined: 30-April 03
  • Gender:Male
  • Location:Davie, FL

  Posted 15 July 2003 - 09:49 PM

Frank,

Yes I've water proof my engine mostly with dialectic grease in all the connectors plus some other things. Heck Frank, you might as well post your write up on waterproofing the engine since you always have such detail in your write ups. All of us can benefit by this including myself. Start another thread on this one.

Getting back to the water coming in on a down pour, would you say that on the driver side would be on top or near the manifold? What about on the passenger side.

Your graph results are unbelievable in the amount of heat that it can reduce for such a simple mod. With regards to the fans you plan to install underneath, how will they deal with water coming in?

With regards to meeting up in Tellico, go here Tellico Trip

I think it would be a lot of fun if we could meet up. I might stop over in Alabama before for a few days before heading over to Tellico. :cool:
Posted Image Posted Image
El Niño
Experience is defined as something you get, after you need it.
Give the world the best you have. The best will come back to you...

There are no rules for good photographs, there are only good photographs.
"Thou shalt not bear false witness against thy neighbour." 9th Commandment.
"Speak not Evil of the absent for it is unjust." George Washington, Rule 89 of Civility and Decent Behavior.
Wheeling Gallery ----- E-Mail
Life Member: South Florida Jeep Club

#12 User is offline   Daless2 

  • Sergeant FirstClass
  • Group: Member
  • Posts: 43
  • Joined: 02-June 03
  • Location:Kentucky

Posted 17 July 2003 - 07:46 PM

Water Flow / Drainage

I have received a few questions about what would be the effects of water flowing through these louvers. In truth I do not know, but I do not believe there will be a problem on my Jeep. You would have to make your own decision on this.

If you take the time to waterproof your under hood electrical connectors I don’t think you would have a problem at all. If you care to read how to do this I did a write-up a while back.

You can pull it down from my very simple web site at

http://home.att.net/~email.id/wsb/html/vie...home.html-.html

Or you can take a look at a forum thread here

http://jeeptalk.net/index...ct=ST&f=2&t=212


I wanted to take a few pictures of my engine compartment to show where the louvers actually fall. This was easier said then done. Finally I came up with the idea to just place the template I used to cut the holes in the hood exactly where the louvers fall.

Here is a picture of the driver’s side.

Posted Image


As you can see there isn’t much for any rainwater to cause problems with.


The passenger side is a bit different. Things are closer. My battery is a sealed cell battery so I have no worries about water on it. The Power Distribution center is sealed with a gasket that I made a long time ago, and the Computer is both covered with the plastic cover and waterproofed using the technique I descried in the previous write-up.

Here is a picture.

Posted Image


My engine compartment is stuffed to say the least. In truth I doubt more then 3 water molecules could congregate in there at the same time!

Posted Image


Other Under Hood Cooling Options

If you take a good look at the underside of the TJ hood you will see a “Spine” or channel that runs right down the middle of the hood and another which runs across the rear edge of the hood.

Here is a picture.

Posted Image


I am sure this channel is there to stiffen the hood and keep it from flexing.

Well, there are 6 oval shaped holes cut out of the center channel and another 6 oval shaped holes cut in the channel at the back of the hood.

These oval shaped holes are LARGE. 2 and 3/8-inch by 1 and 1/8-inch.

While I have not done this, I see no reason why the hood could not be” precision drilled” with 1-inch holes along these channels.

I think if I were to do this, and I may, I would drill the holes so they would NOT line up with the oval holes in the underside of the channel. This would help control water flow.

I think I also would need some means of making these holes look finished and a means of closing them off in the winter.

In short, this is only a thought with potential. I will look into it as I have the time.

Have a wonderful day,

Frank

#13 User is offline   Daless2 

  • Sergeant FirstClass
  • Group: Member
  • Posts: 43
  • Joined: 02-June 03
  • Location:Kentucky

Posted 19 July 2003 - 07:50 PM

Hi Folks,

This should be my last post on this unles someone has any questions. I will be moving on to Evaporative Coooling soon.


I have received more then a few PM’s and email notes from various forums asking for help on locating the parts for this project.

I wish I were able to.


While I would like to help folks out when I can, I am not in a position to become a Louver Parts Dealer. I am affraid anyone who would like to install these louvers will have to pay a visit to ta Pontiac Dealer(with “Parts” Departments). I think just about every town has one close by.


Once again here are the part numbers and what I paid for them locally from the dealer.

Part Numbers and Costs

#10225885 - Left Side Louver $27.23
#10230097- Left Side Drip Pan $4.56

#10225886 - Right Side Louver $27.23
#10230098 - Right Side Drip Pan $4.56


From the feedback I have been received from Jeepers a lot of Dealers are not giving folks any discount off list price on these at all. (Shame on them! Trying to “fund” their retirement plans off of just one customer, YOU!)

Here is an online site that carries just about ANY GM PART, as long as you have the part number (which you do! Look UP!)

http://www.parts.com/index.cfm?action=goTo...ont&sfid=213768

Once you go to the site, enter the OEM Part Number (Look Up!) and select Pontiac.

Then click Search. It will pull the part # you typed in and you can order it.


I just checked and it appears all four part numbers are in stock and available to ship.

The Louvers online at this site are: $34.40 each (List is $41.95)

The Drip Pans online at this site are: $9.50 each (List $11.49)

Obviously these prices are higher then what I paid for my parts. I suppose I received a deeper discount.

I would suggest you check with your local Pontiac Dealer for Price and Availability and compare to the Price and availability at the above link.

Once again I wish I could help you out farther but I simply do not have that kind of time for the volume of requests I have received to order and ship folks parts. I am certain most folks can understand this.

Frank

#14 User is offline   Daless2 

  • Sergeant FirstClass
  • Group: Member
  • Posts: 43
  • Joined: 02-June 03
  • Location:Kentucky

Posted 19 July 2003 - 09:45 PM

Louver and Drip Pan Part Sources

I really do not like when I have a bad taste in my mouth because things just didn’t finish up with “apple pie alamode”.

The Pontiac dealer I received my parts from does not ship, or you would have the name and phone number already.

The other think I don’t like is that folks seem to not be able to replicate the prices I paid for my parts.

So…… I did a little more looking and have come up with some pretty low pricing.

Here is a list of Parts dealers who not only sell these parts but also claim to have them in inventory ready to ship. (You will have to figure out what their shipping costs are when you call as I do not know this information.)


I have listed these dealers in order of pricing for the louvers, lowest price ($28.95) first, along with the means of ordering online or by tool free phone number (in most cases.)

Here are the parts sources folks.


P & G Chevrolet
Go to this link and put your part numbers in to order.
http://www.parts.com/index.cfm?action=goTo...eFront&sfid=192
Have Louvers for $28.95 each and drip pans for $8.00 each
.
.
.
Van Chevrolet
Scottsdale, AZ
1-800-477-9233
Have Louvers for $29.37 each and drip pans for $8.11 each
.
.
.
First Toyota, GMC Pontiac Parts
Reton, WA
1-888-271-3948
Have Louvers for $30.20 each and drip pans for $8.34 each
.
.
.
Bob McGuire Parts
205 Hedding Rd
Bordentown , NJ 08505
800-524-0096 Ext 917
Have Louvers for $31.04 each and drip pans for $8.58 each
.
.
.
A.W. Golden GM & Isuzu Parts
Reading, PA
610-777-4113
Have Louvers for $31.46 each and drip pans for $8.69 each
.
.
.
Lake Chevrolet
Lake Ellsinore, CA
1-866-546-2333
Have Louvers for $31.46 each and drip pans for $8.69 each
.
.
.
Jim Fresard Auto Dealerships
400 N. Main Street
Royal Oak, Michigan 48067
1-800-373-7273
Have Louvers for $31.46 each and drip pans for $8.69 each
.
.
.
New GM Parts
Hyannis, MA
1-800-858-1977
Have Louvers for $31.46 each and drip pans for $8.59 each
.
.
.
Chevy and GM Parts
Puyallup, WA
1-800-650-4036
Have Louvers for $32.72 each and drip pans for $9.04 each
.
.
.
#1 GM Parts Worldwide
Laguna Niguel, CA
(866) 968-6425
Have Louvers for $33.56 each and drip pans for $9.27 each
.
.
.
Genuine GM Parts
Bellingham, WA
1-866-572-2277
Have Louvers for $33.56 each and drip pans for $9.27 each
.
.
.
The GM Parts Warehouse
1-866-789-3333
Have Louvers for $34.44 each and drip pans for $9.25 each
.
.
.
Yes! now that tastes better.

Have a great night folks,

Frank

#15 User is offline   Tracy 

  • Second Lieutenant
  • Group: Members
  • Posts: 290
  • Joined: 18-May 03
  • Location:Palm City, FL

Posted 21 July 2003 - 12:54 PM

Thank you Frank,
This like your other posts are very well researched and very well explained. Thanks again,
Jim let me know when you decide to do this, I want to see it please. this is a really good thing! :2thumup: I've always wondered about trying to lower the temp under the hood, just makes sense. :sneak:

Tracy
Red Beetle

#16 User is offline   Jim B 

  • Commander
  • Group: GlobalMod
  • Posts: 8,692
  • Joined: 30-April 03
  • Gender:Male
  • Location:Davie, FL

  Posted 21 July 2003 - 07:43 PM

Tracy,

Frank is sending me a template. When I get some time I will take a look at this, I was thinking of just doing it on the driver side as I have my electric compressor and welder on the passenger side right underneath where the louver would go. I'm concern a bit on the water entry.

Any amount of temperature lowering would help, even if it is just on the driver side. I could do the passenger side and leave the drip pan installed but I don't know if it would do that much good for all the work involved for a full time drip pan.
Posted Image Posted Image
El Niño
Experience is defined as something you get, after you need it.
Give the world the best you have. The best will come back to you...

There are no rules for good photographs, there are only good photographs.
"Thou shalt not bear false witness against thy neighbour." 9th Commandment.
"Speak not Evil of the absent for it is unjust." George Washington, Rule 89 of Civility and Decent Behavior.
Wheeling Gallery ----- E-Mail
Life Member: South Florida Jeep Club

#17 User is offline   Tracy 

  • Second Lieutenant
  • Group: Members
  • Posts: 290
  • Joined: 18-May 03
  • Location:Palm City, FL

  Posted 22 July 2003 - 07:23 AM

Thanks Jim,
I think this would be a worth while mod. I know you are stuffed under the hood, but mine is like, has nothing under there yet.... it's like a virgin ha :sneak:
Red Beetle

#18 User is offline   Daless2 

  • Sergeant FirstClass
  • Group: Member
  • Posts: 43
  • Joined: 02-June 03
  • Location:Kentucky

Posted 23 July 2003 - 07:15 AM

Jim quick note on the template,

I traced the template I used on some card stock for you. Fit the 8 holes to your louver first. The holes I marked on the template are a bit "Smaller" then what you will actually need as you must allow for expansion and contraction. In the end, the 6 mounting holes ended up being 5/16-inch plus a couple of strokes of a round rat tail file.

My apologies for shipping the template out late. I didn't get it to the post office until Monday morning. Seems I had to have my wisdom teeth taken out on Friday and that turned out to be a bigger deal then I thought it would be. I figured you didn't want me to trace that template while I was on drug half in la-la land.

Have a nice day,

Frank

#19 User is offline   NonStop 

  • Colonel
  • Group: Members
  • Posts: 1,488
  • Joined: 16-May 03
  • Gender:Male
  • Location:Palm Beach, FL

Posted 30 July 2007 - 11:33 PM

The ZJ and WJ crowd have been using either the factory 5.9, a special edition for just one year '98 with a 360 in it, or the pontiac grand prix vents... Also have found that when placed closer to the center line and further back in the hood is better for slow speed, and closer to the outer edge is better for faster speed heat evac... Seems logical..
ANother thread about them

The thread also talks about simple mods like raising the back half of the hood with washers and pulling the weatherstriping, these are for WJ,XJ,ZJ, types..
I just checked and these are now $49.99 per side and 9.99 for the drip pan..still pretty darn chaep, the yards charge that..
Here are a couple other options, but that pricing is awesome, I was down at Upullit this week looking for some cheap..Now I don't have to, thank you Rollbar!


Another option... Genright Vents

Another option... Lebaron Hood Vents
2000 5.2 WJ

#20 User is offline   Jim B 

  • Commander
  • Group: GlobalMod
  • Posts: 8,692
  • Joined: 30-April 03
  • Gender:Male
  • Location:Davie, FL

  Posted 31 July 2007 - 05:41 PM

I can't remember where I saw this picture that I had in my Jeep archives. It's of a square YJ doing it a bit differently. I have no information other than the picture of it's working capability.

Looks a bit..... different. :gun:
Posted Image

I wonder if we can get Frank to provide us with the missing pics and I would be happy to host it for him. The thread is a bit old so I'm sure he has moved the pics somewhere else.

NonStopWJ, the Genrights seem to be a pretty good option being one of our Sponsors for JT it's good to know.
Posted Image Posted Image
El Niño
Experience is defined as something you get, after you need it.
Give the world the best you have. The best will come back to you...

There are no rules for good photographs, there are only good photographs.
"Thou shalt not bear false witness against thy neighbour." 9th Commandment.
"Speak not Evil of the absent for it is unjust." George Washington, Rule 89 of Civility and Decent Behavior.
Wheeling Gallery ----- E-Mail
Life Member: South Florida Jeep Club

#21 User is offline   Joe Dillard 

  • Sergeant Major
  • Group: Members
  • Posts: 168
  • Joined: 29-January 06
  • Gender:Male
  • Location:Southern Maryland

Posted 09 August 2007 - 01:40 PM

Jim, I snapped that pic of the YJ with the hood fan. I took it one day while in Moab at the campground I was staying at. The guy driving the YJ stopped by my campsite to chew the fat for a bit & I thought his hood fan was kinda unique. So much so, and being the pic whore that I am, I took a pic of it. :bounce: Really, that part is true, honest.

Now for the fairytail.......

I think he mentioned something about taking a large dinner plate & sitting it on his hood to cook/heat-up his dinner one day. Then got the bright idea of just cutting a hole in the hood to let excessive heat escape. :lol:

Seriously, I did take that pic ~3 years ago.

#22 User is offline   Jim B 

  • Commander
  • Group: GlobalMod
  • Posts: 8,692
  • Joined: 30-April 03
  • Gender:Male
  • Location:Davie, FL

  Posted 09 August 2007 - 02:41 PM

View PostJoe Dillard, on Aug 9 2007, 02:40 PM, said:

Jim, I snapped that pic of the YJ with the hood fan. I took it one day while in Moab at the campground I was staying at. The guy driving the YJ stopped by my campsite to chew the fat for a bit & I thought his hood fan was kinda unique. So much so, and being the pic whore that I am, I took a pic of it. :bounce: Really, that part is true, honest.Seriously, I did take that pic ~3 years ago.

I believe you Joe, especially the part about the pic whore. :dance: :lol: Hey, I'm also a member of the pic whore club that you belong to. :bounce:

I always enjoy collecting unusual pics on the net and keeping them for a rainy day. Wow this was a while ago. I like the story. I bet he went to home depot and got one of them small roof fans. :bounce:
Posted Image Posted Image
El Niño
Experience is defined as something you get, after you need it.
Give the world the best you have. The best will come back to you...

There are no rules for good photographs, there are only good photographs.
"Thou shalt not bear false witness against thy neighbour." 9th Commandment.
"Speak not Evil of the absent for it is unjust." George Washington, Rule 89 of Civility and Decent Behavior.
Wheeling Gallery ----- E-Mail
Life Member: South Florida Jeep Club

#23 User is offline   JeepinIan 

  • Major General
  • View gallery
  • Group: Members
  • Posts: 3,384
  • Joined: 01-May 03
  • Gender:Male
  • Location:Miami, Fl USA

Posted 09 August 2007 - 02:57 PM

View PostJim B, on Aug 9 2007, 03:41 PM, said:

... I bet he went to home depot and got one of them small roof fans. :lol:


It looks like some of the aftermarket radiator fans. Possibly even a Taurus fan.
Ian Stewart

If you don't fight for the trails, there won't be any trails to fight for.

What you get by achieving your goals is not as important as what you become by achieving your goals.
Zig Ziglar

"War is an ugly thing, but not the ugliest of things. The decayed and degraded state of moral and patriotic feeling that thinks that nothing is worth war is much worse. The person who has nothing for which he is willing to fight, nothing which is more important than his own personal safety, is a miserable creature and has no chance of being free unless made and kept so by the exertions of better men than himself." ....

John Stuart Mill

#24 User is offline   TufrThNails 

  • Second Lieutenant
  • Group: Members
  • Posts: 284
  • Joined: 01-July 07
  • Gender:Male
  • Location:Lakeland, FL

Posted 11 August 2007 - 02:36 AM

Wish you lived down here you could make some money installing. I know I would pay you. They look great.
Miller, Jonathan
"Baby Kong"
2002 wrangler X
Enough my wife stays pissed at me!

Lakeland Jeep Club


"If I break it. It's an excuse to get what I really want right?"
"How many jeeps do we really need in the driveway at one time?"

Share this topic:


Page 1 of 1
  • You cannot start a new topic
  • You cannot reply to this topic